Pav bhaji is a popular Mumbai street food made of a spicy mashed vegetable curry served topped with a dollop of butter along with soft butter-toasted dinner rolls, crunchy onions, and lemon. It is an easy, hearty, and delicious meal that is a crowd-pleaser and perfect for dinner or even parties.
I'm sharing how to make an easy Mumbai street-style Pav Bhaji recipe at home using a stovetop and Instant Pot (or traditional pressure cooker).
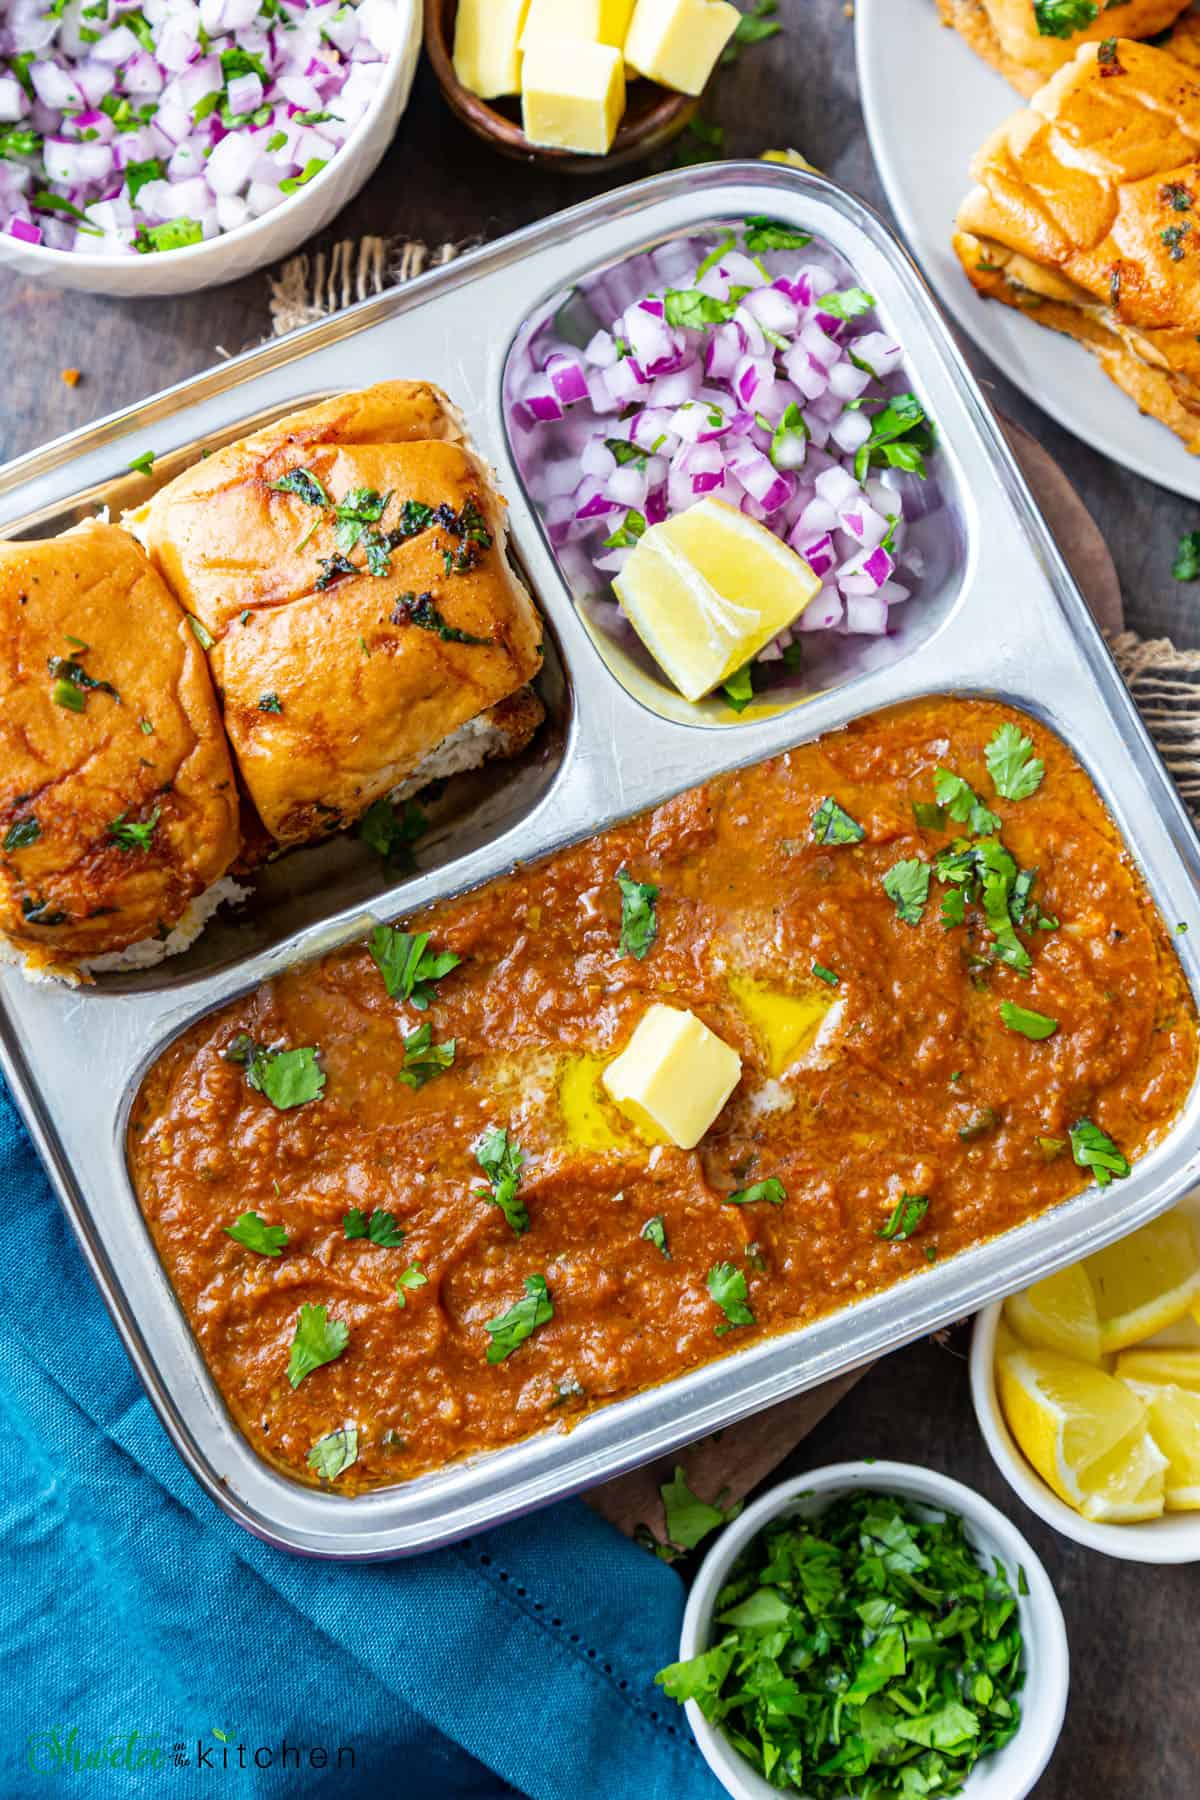
Pav bhaji is one of the most loved and famous Indian street food and undoubtedly it is one of mine too. From Juhu beach to Sardar pav bhaji, from a restaurant to a small roadside eatery, I never miss a chance to eat it.
After coming to the USA, I truly missed that Mumbai pav bhaji taste. The restaurants here don't do justice to this dish so after many trials I finally nailed the best pav bhaji recipe that takes me back to those Mumbai days!!
It is now my family's favorite fast food too and I make it even for weeknight dinner due to the convenience of Instant Pot.
If you love pav bhaji, try the Tawa pulao or Masala pav recipes. Am sure you will love them too!!
Jump to:
- What is Pav Bhaji?
- About This Recipe
- Recipe Ingredients For Bhaji
- Ingredients For Serving Pav Bhaji
- How To Make Pav Bhaji in Instant Pot (Stepwise Photos)
- How To Make Pav Bhaji on Stovetop
- Serving Suggestions
- How To Eat Pav Bhaji
- Variations
- Recipe Tips
- Frequently Asked Questions
- More Mumbai Street Food Recipes
- Recipe Card
What is Pav Bhaji?
Pav Bhaji is a popular Indian street food dish made of thick mashed vegetable curry served with soft dinner rolls toasted in butter.
This dish originated in Mumbai as a quick meal option (fast food) and is now well spread across the world due to its immense popularity. You will find it served from street-side eateries to even at high-end upscale restaurants.
As the name states, Pav bhaji is made of Pav which is the Hindi/Marathi name for dinner rolls, and Bhaji, a mixed vegetable dish.
The Mumbai street-style pav bhaji is made on a huge iron tawa (griddle) by mashing a variety of veggies in onion tomato masala that makes the bhaji thick, creamy, and almost smooth.
It is cooked in lots of butter and flavored with a special spice mix called Pav Bhaji Masala that lends this dish its unique flavor and taste.
For serving, the soft dinner rolls (pav) are lightly toasted in butter on the same tawa as the bhaji is made which makes them super soft and more flavorful.
Last but not least, the soft pav and piping hot bhaji are served topped with more butter, finely chopped onions, cilantro, and lemon wedges. Absolutely delicious!
About This Recipe
Making Pav bhaji at home is easier than you think. Even if you don't have tawa you can easily make this dish in
- Pot on the stovetop
- Traditional pressure cooker
- Modern pressure cooker like Instant Pot
Making Pav bhaji in Instant Pot is my preferred way these days it is very convenient, you don't have to boil the veggies separately, and they all get cooked together in one pot. Saves utensils and makes meal times effortless.
If you don't have an Instant Pot you can make pav bhaji in a traditional pressure cooker too.
Alternately, you can make it the way street vendors make it or like my mom makes it too. Boil the veggies (potatoes, cauliflower, green peas, and beet) and then adds them to the onion tomato masala.
Either way, this homemade pav bhaji is delicious and satisfies all your street food cravings!!
Recipe Ingredients For Bhaji
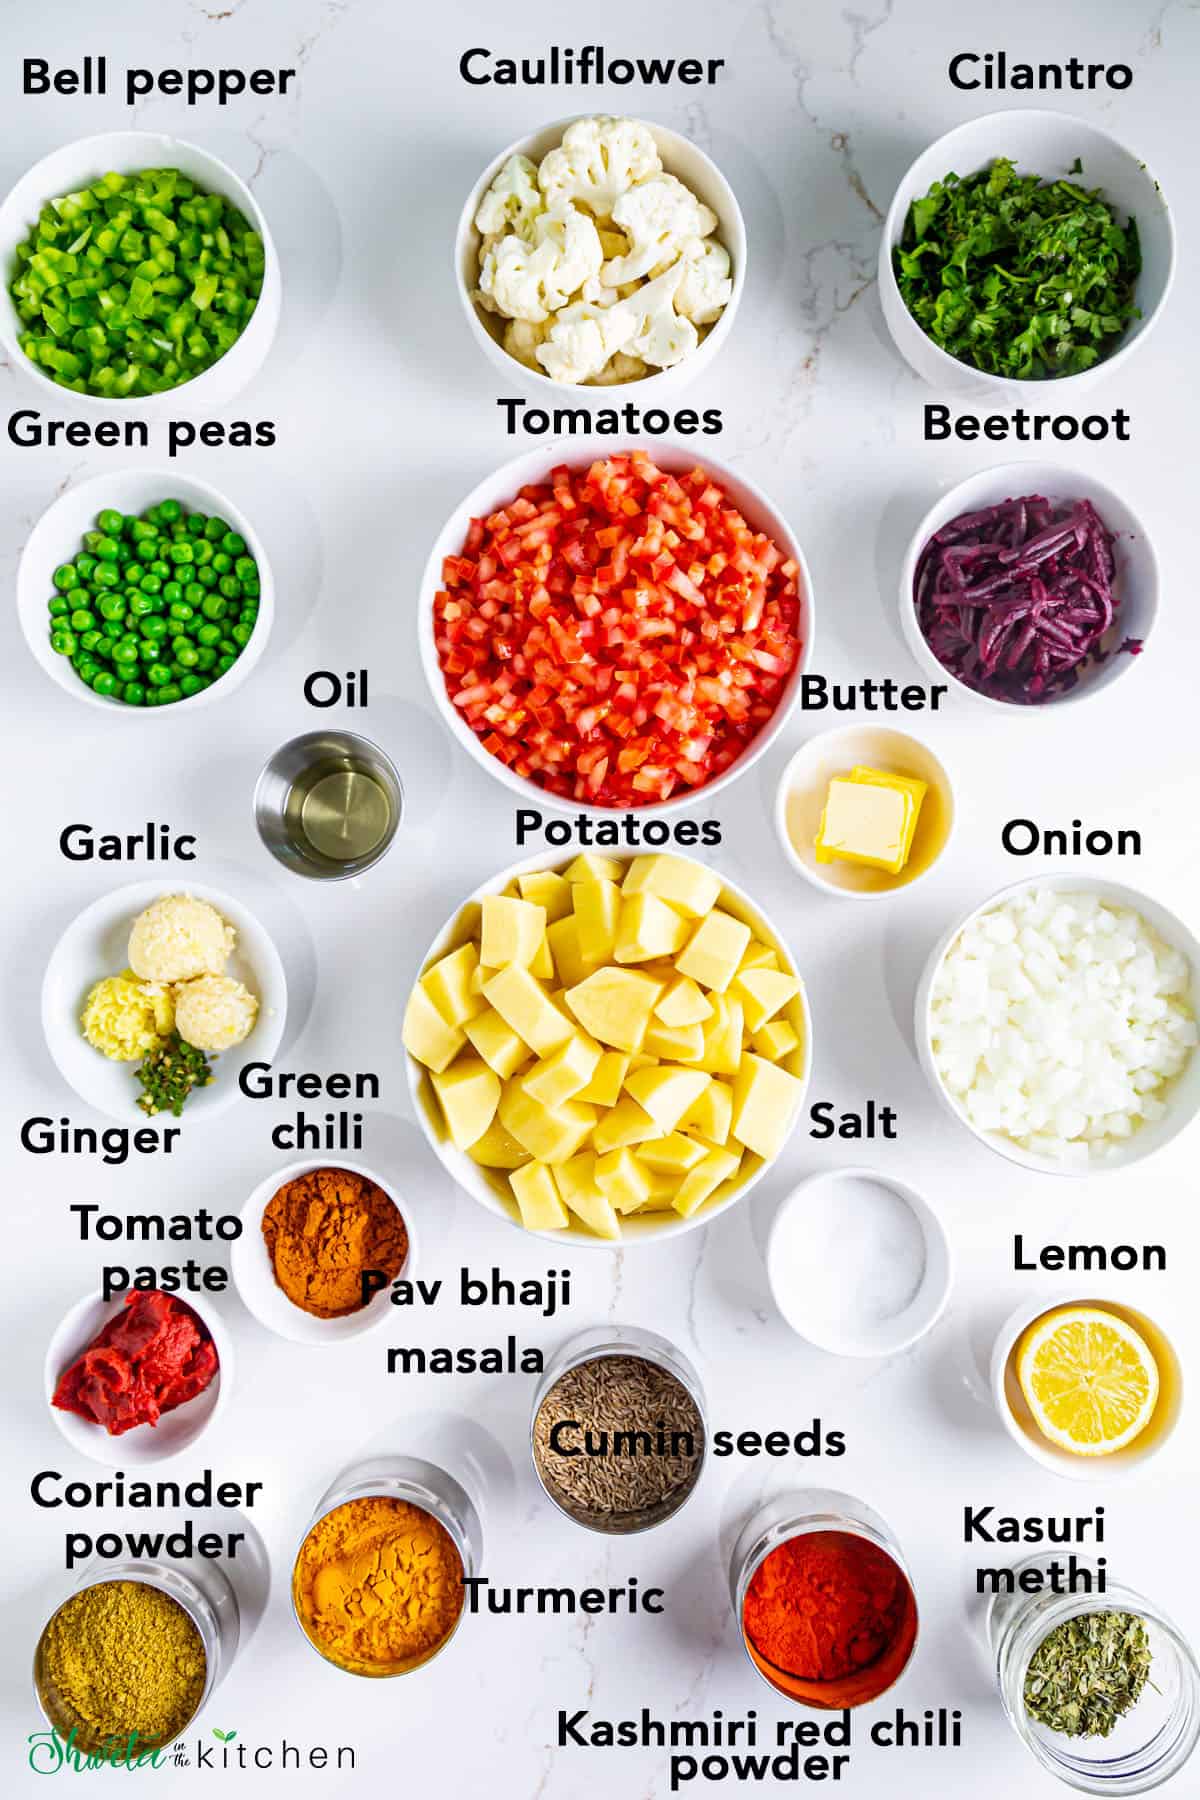
Butter - For a good street style Pav Bhaji, lots of good quality butter is a must!! It adds tons of flavor. For that Mumbai taste, use Amul butter. It is usually available in Indian grocery stores. In addition, I also use oil for cooking along with butter.
Vegetables - Typical veggies used in this recipe are potatoes, cauliflower, bell pepper, and green peas. I also add beet since it lends a beautiful natural color to the bhaji. In addition, you can also add carrots and cabbage.
Many street vendors use dry green peas instead of fresh ones to make it more cost-effective. You can also use dry green peas. Soak them overnight, pressure cook until done, and then use in the recipe.
Aromatics - The basic trio - ginger, garlic, and green chili. Use fresh for the best flavor. In addition, you will also need onions (yellow or red).
Tomatoes - Use fresh tomatoes chopped or pureed. With fresh tomatoes, I like to add a tablespoon of tomato paste to that boost tomato flavor and color. You can also use store-bought tomato puree instead of fresh tomatoes.
Pav bhaji masala - This is the main flavoring ingredient for this recipe. It’s a special spice blend known as Pav Bhaji Masala and is easily available in Indian grocery stores or online or you can make It at home. I prefer Badshah or Everest or the MDH brand of Pav Bhaji Masala.
Spices - In addition to pav bhaji masala, I use some basic spices like turmeric, coriander powder, Kashmiri red chili powder, and salt. Highly recommend adding the Kashmiri red chili powder instead of the regular one, since it adds tons of flavor without too much heat.
Others - For final touches, some ore butter, cilantro, and lemon juice.
Ingredients For Serving Pav Bhaji
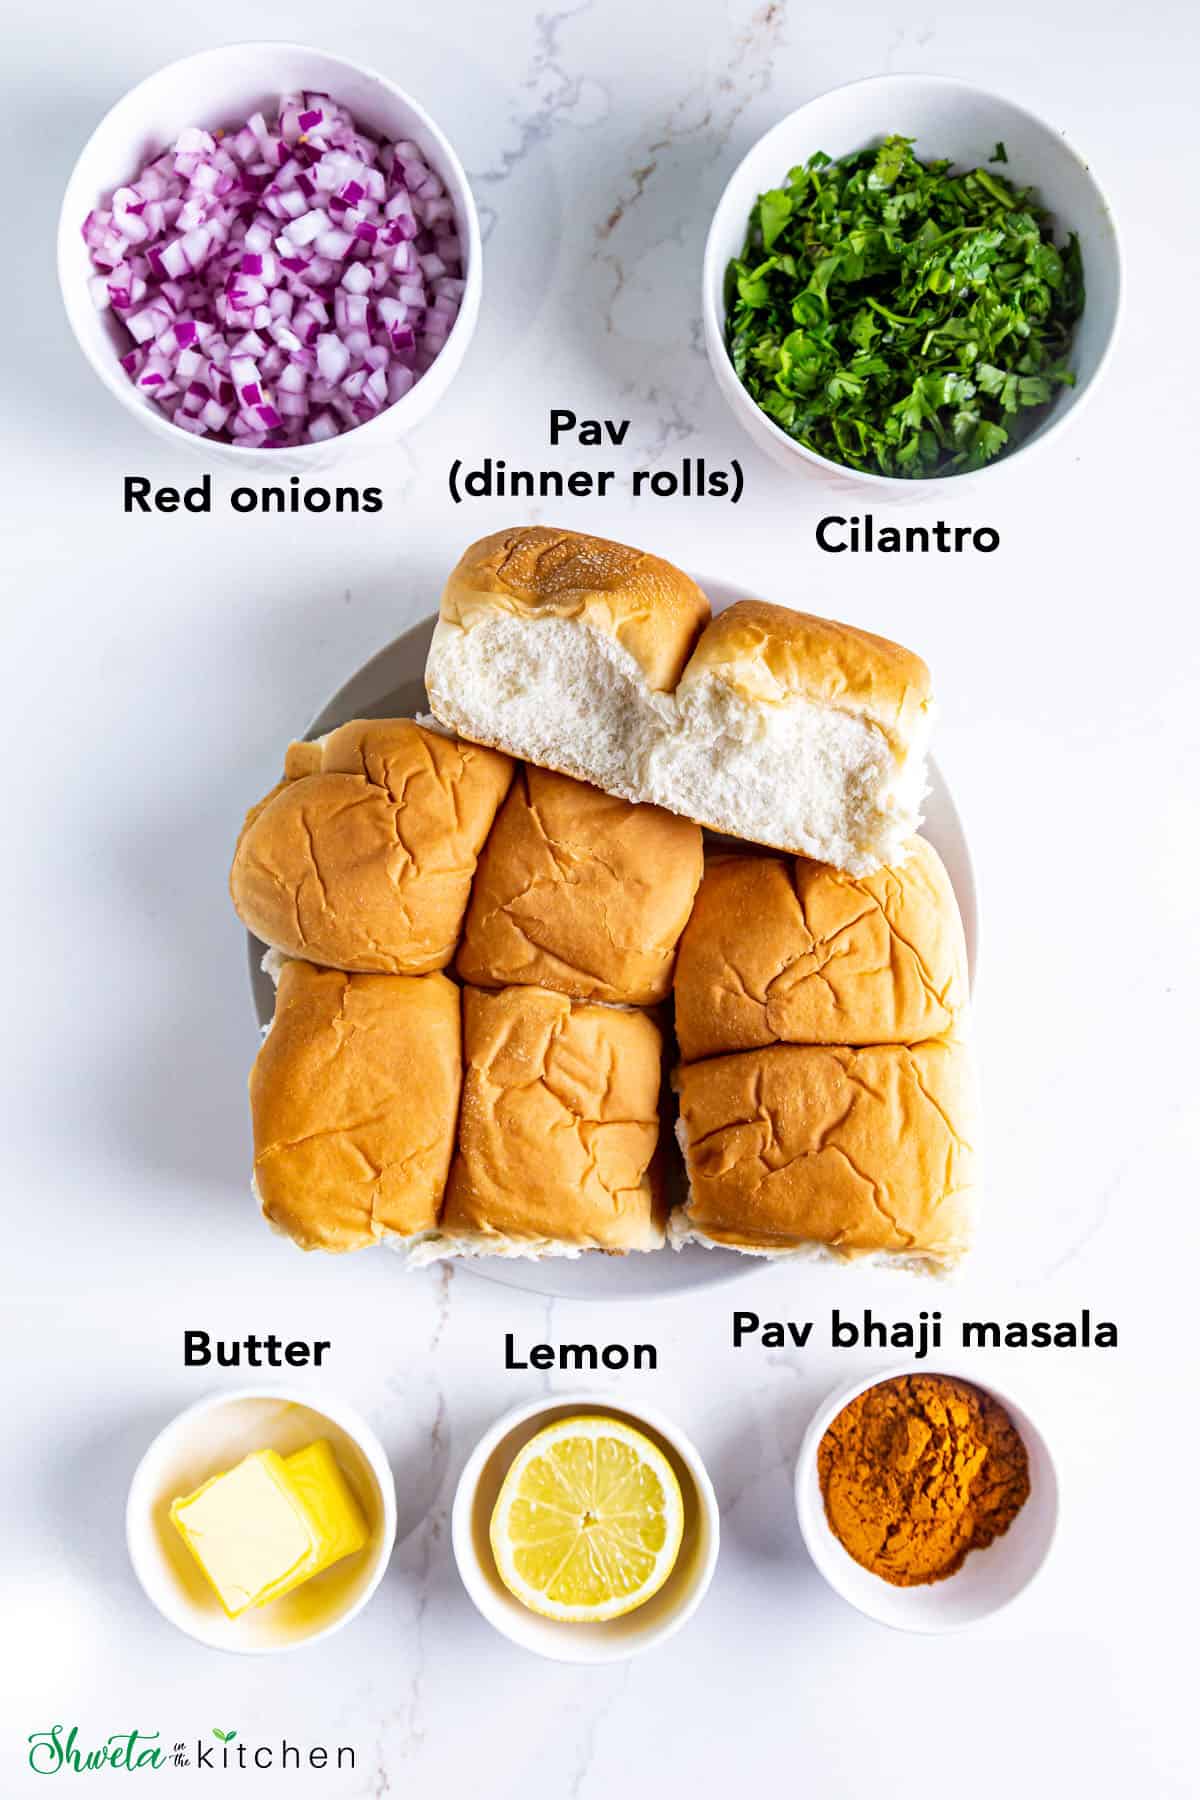
Pav - These are dinner rolls (type of bread). You can use store-bought or make them at home. Here is my homemade pav recipe. If dinner rolls are not available, you can use potato rolls, savory Hawaiian dinner rolls, burger buns, or even sliced bread. Just make sure the bread is not too sweet (less than 3g sugar preferably).
Butter - You will need butter for toasting the pav as well as for serving the bhaji.
Pav bhaji masala - This is optional but to make it Mumbai street style, add pav bhaji masala powder while toasting the pav. You can skip it for kids.
Red onions - finely chopped onions are a must. They add a nice crunch.
In addition, you will also lemon wedges, and cilantro for serving.
Please refer to the recipe card for exact measurements of ingredients.
How To Make Pav Bhaji in Instant Pot (Stepwise Photos)
Making Pav bhaji in Instant pot is an easy and one-pot method where you don't have to boil the veggies separately but instead cook everything directly in the Instant Pot.
Prep work
Rinse all the veggies. Finely chop veggies like onions, bell pepper, and tomatoes. You can also puree the tomatoes in which case roughly chop them.
Peel and roughly chop potatoes, peel and grate beetroot and cut cauliflower into medium size pieces.
Make fresh ginger garlic and green chili paste and keep aside.
Making Pav Bhaji Bhaji
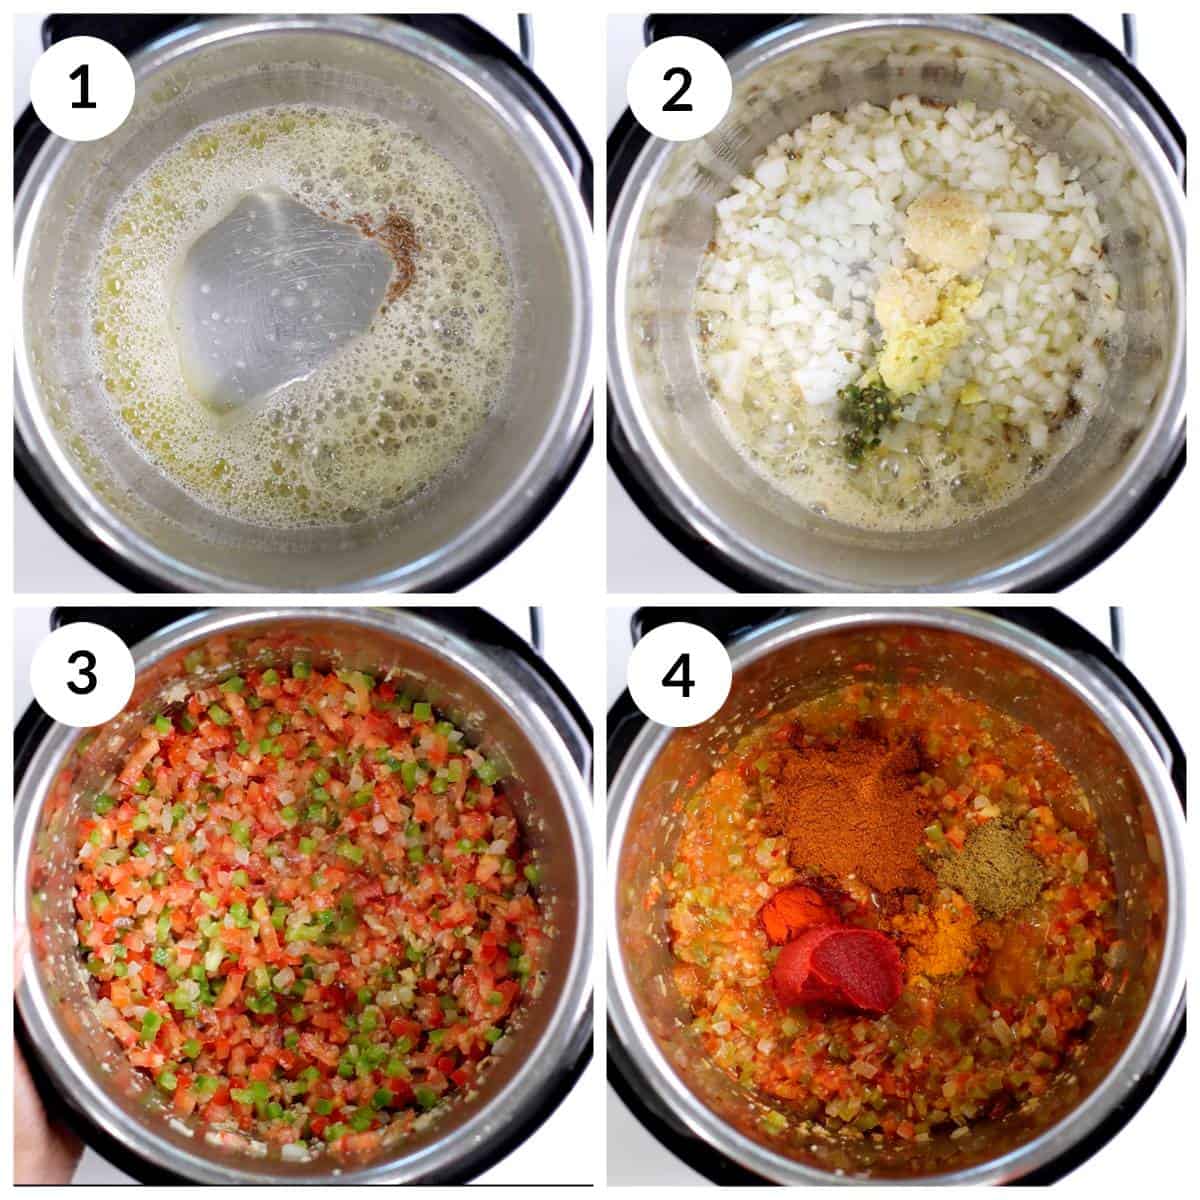
1 - Start Instant Pot on Saute (normal). Add 2 tablespoons of butter and oil each. Once the butter melts, add the cumin seeds and let them sizzle.
2 - Now stir in the onions, ginger, garlic and green chili, and saute until onions are translucent.
3 - Add bell pepper, tomatoes, and salt. Mix well. Cover and cook until tomatoes are soft and mushy.
4 - Add tomato paste, and spices like turmeric powder, Kashmiri red chili powder, coriander powder, and Pav Bhaji Masala. Mix and sauté for 1-2 minutes.
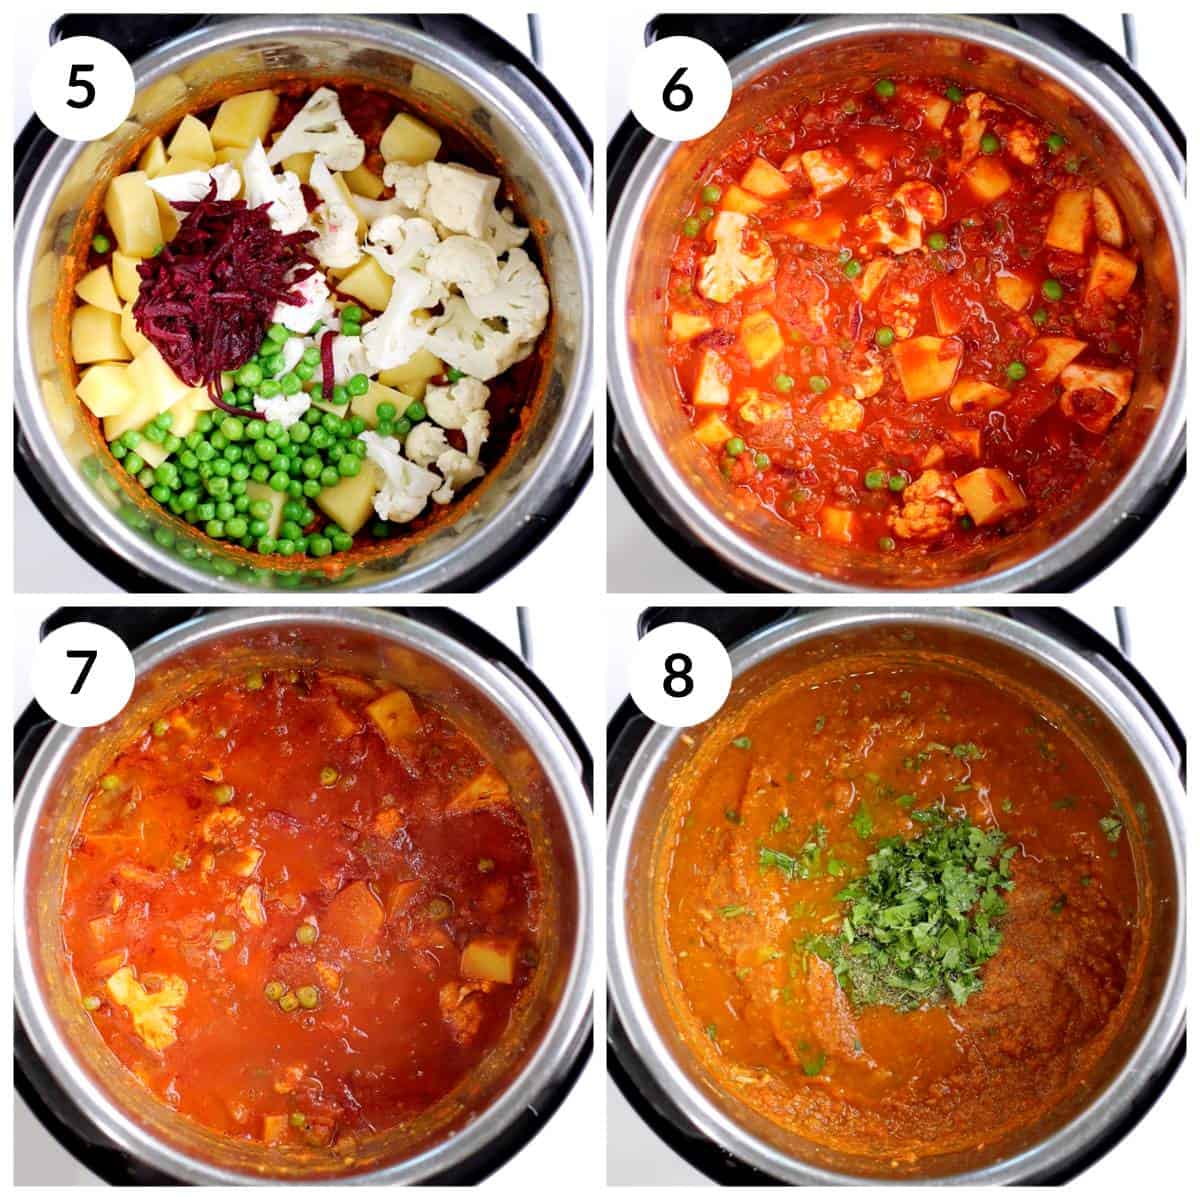
5 - Stir in the chopped veggies - potatoes, cauliflower, green peas, and beetroot
6 - Add 2 cups of water and mix well. Turn off the Instant pot, and close the lid with a vent in the sealing position.
7 - Pressure cook at high pressure for 8 minutes. Once cooking completes, allow a natural release (pin drops). Open the lid, start Instant Pot on saute again.
Mash the Bhaji with a potato masher or use an immersion blender to get a puree-like consistency. It should neither be too thick nor too thin so adjust the consistency using water as needed. I added 1.5 cups more.
Taste test and add more salt or red chili powder or more pav bhaji masala as per taste.
8 - Crush Kasuri methi between your palms and add it to bhaji along with lemon juice, more butter (1-2 tablespoons), and cilantro. Mix well, and cover with a glass lid to prevent bhaji from splattering. Simmer for 5 more minutes or until heated through. Pav Bhaji is ready to serve.
Toasting Pav (Dinner rolls)
While the bhaji is simmering, Toast the pav.
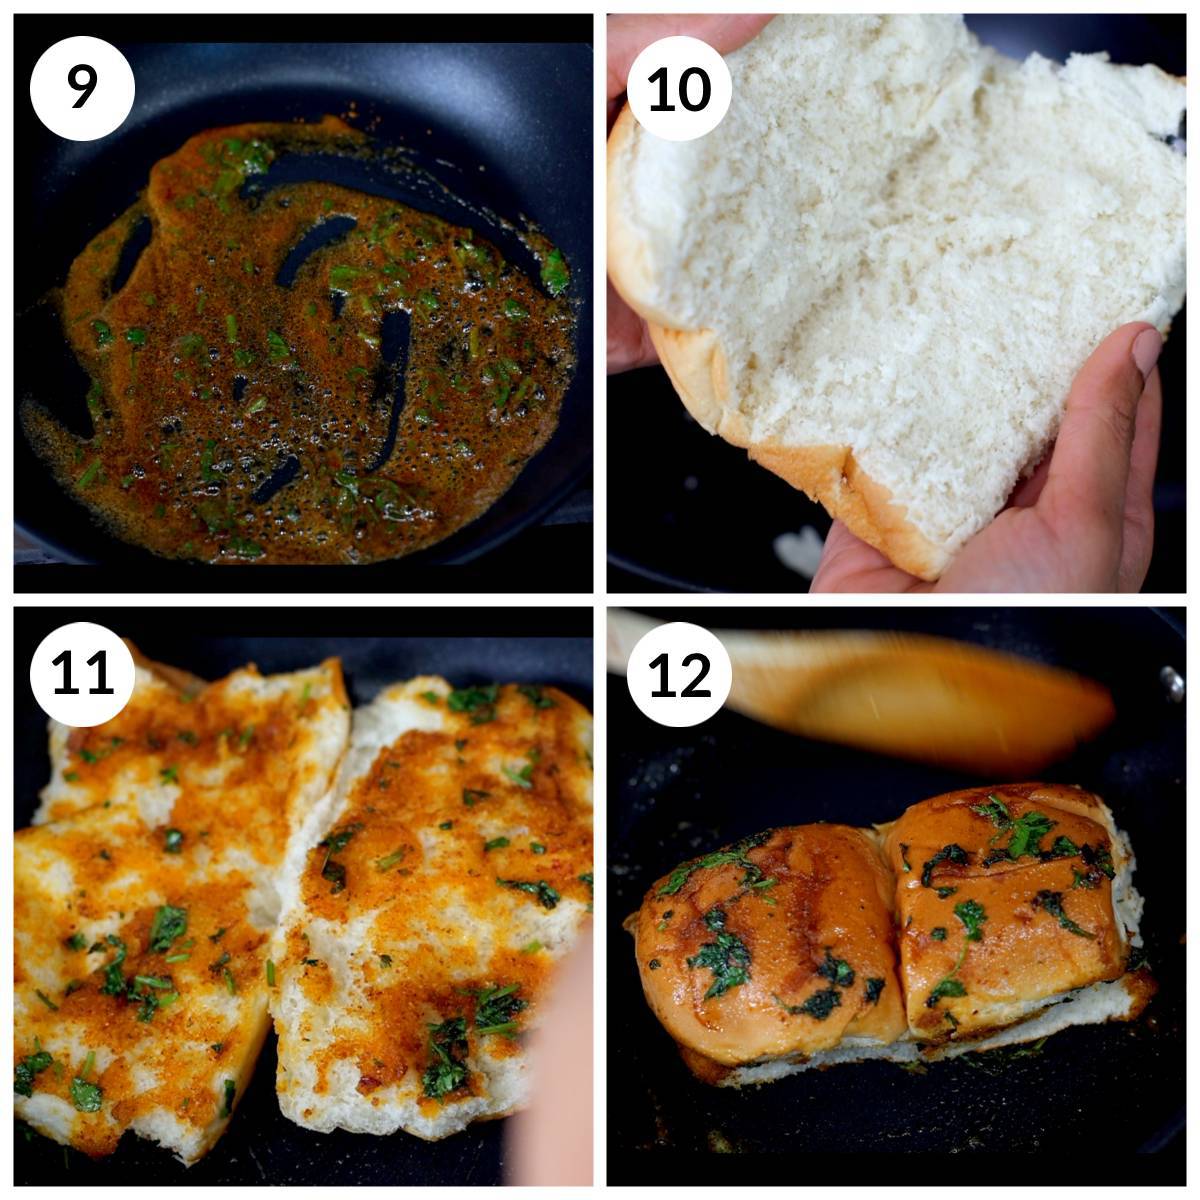
9 - Heat up a tawa or frying pan on low heat and add 1-2 tablespoons of butter to it. Once the butter melts, add Pav Bhaji Masala (optional), and cilantro, and mix well. Spread evenly on the pan.
10 - Slice the pav (dinner rolls) in half such that it opens up giving two equal parts. Place the pav (open side white portion) on the butter.
11 - Press gently and move the pav so it absorbs the butter and is evenly coated. Now you can apply more butter on top and flip so the tops are toasted too.
12 - Keep flipping and pressing gently until done. Remove on a plate. Tossing the pav in butter makes them soft and easy to scoop with bhaji. If you prefer crispy, toast them longer.
How To Make Pav Bhaji on Stovetop
The only difference between making pav bhaji in a pressure cooker (Instant pot or traditional one) Vs on the stovetop is boiling the veggies like potato, cauliflower, green peas, and beetroot separately and then adding them to the bhaji.
The rest of the recipe and steps remain the same as shown in the Instant pot method.
For detailed stepwise instructions please refer to the recipe card.
Serving Suggestions
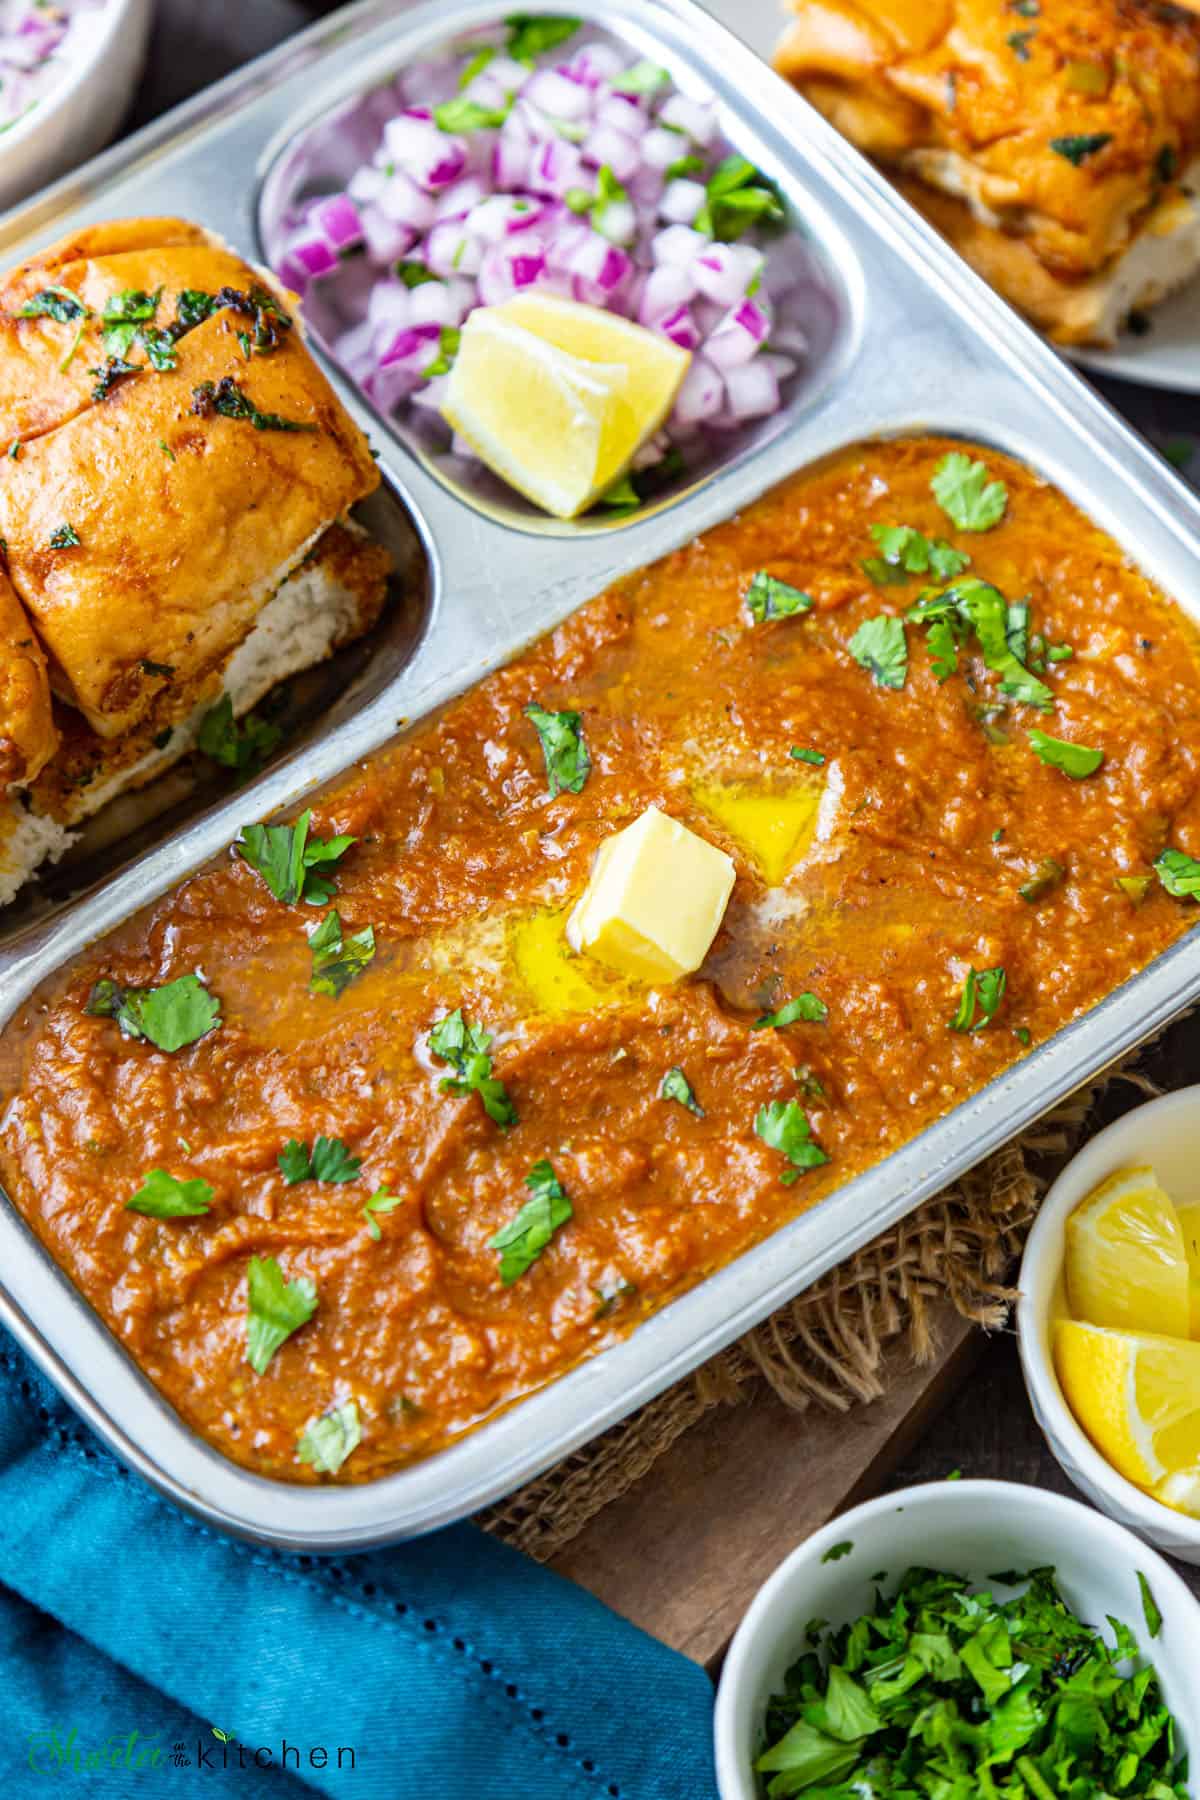
Pav bhaji is best served hot. I like serving it in stainless steel plates with dividers (as seen in pic) just as served by Mumbai street vendors. But you can also serve it on a plate and bowl.
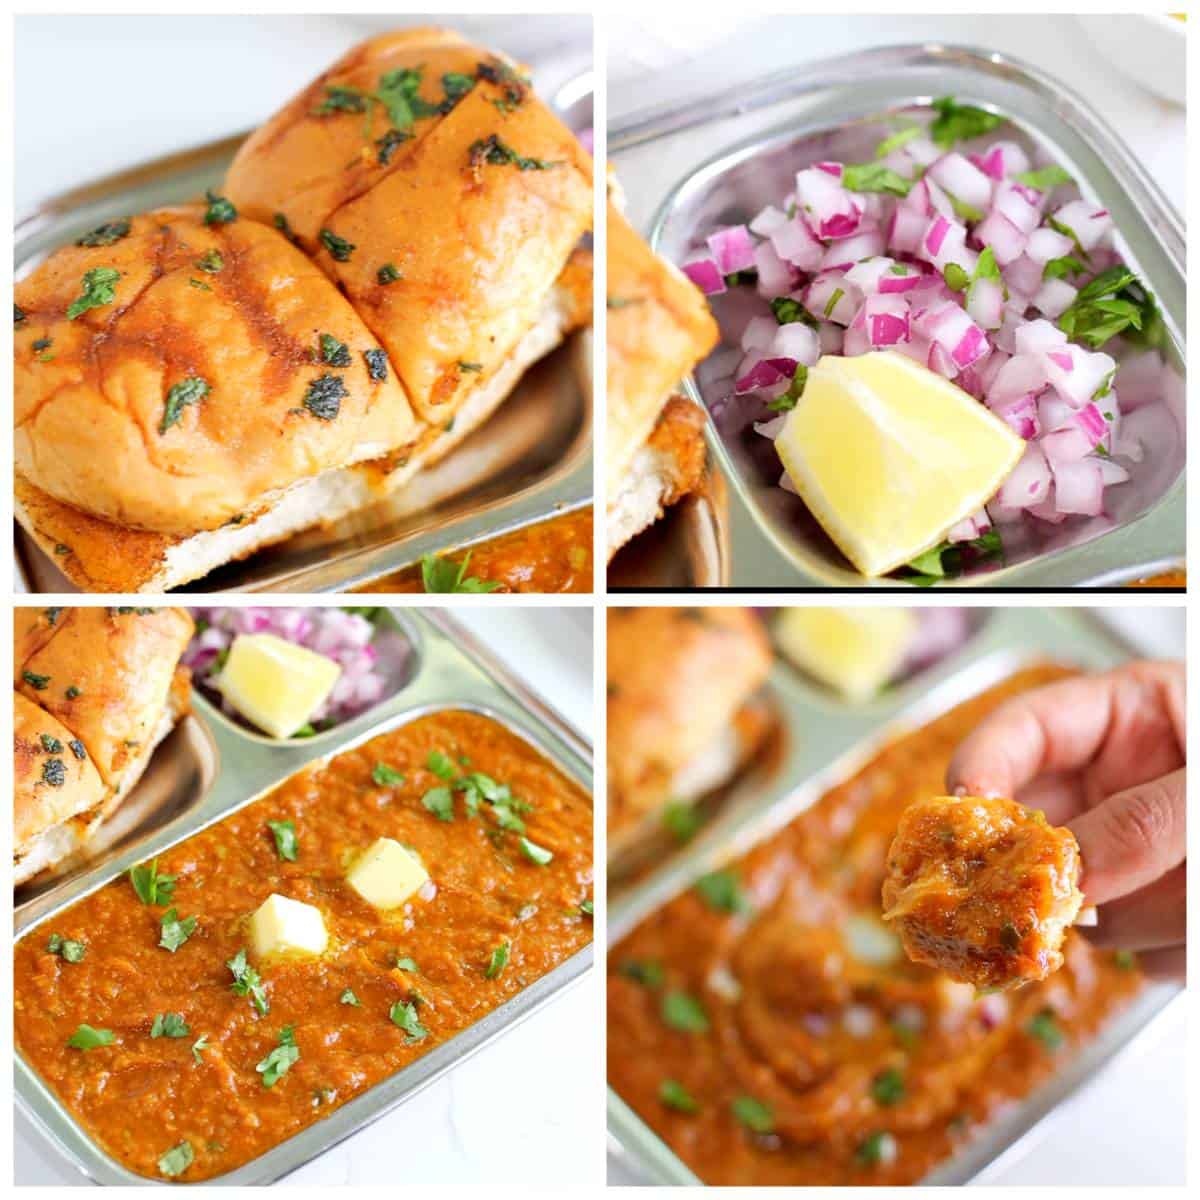
To serve, Start by placing the soft spongy pav in one section of the plate, and in the other add finely chopped red onions, cilantro, and lemon wedge.
Now in the bigger compartment or bowl, add a generous serving of bhaji and top it with 1-2 cubes of butter and a sprinkle of cilantro.
In addition, you can also serve chili garlic chutney on the side, to customize the bhaji to be more spicy and garlicky.
Pav bhaji is a full meal on its own and can feed a crowd but it pairs very well with Pulao and raita, especially for parties and get-togethers.
How To Eat Pav Bhaji
If you are new to this dish, here is how paav bhaji is typically eaten.
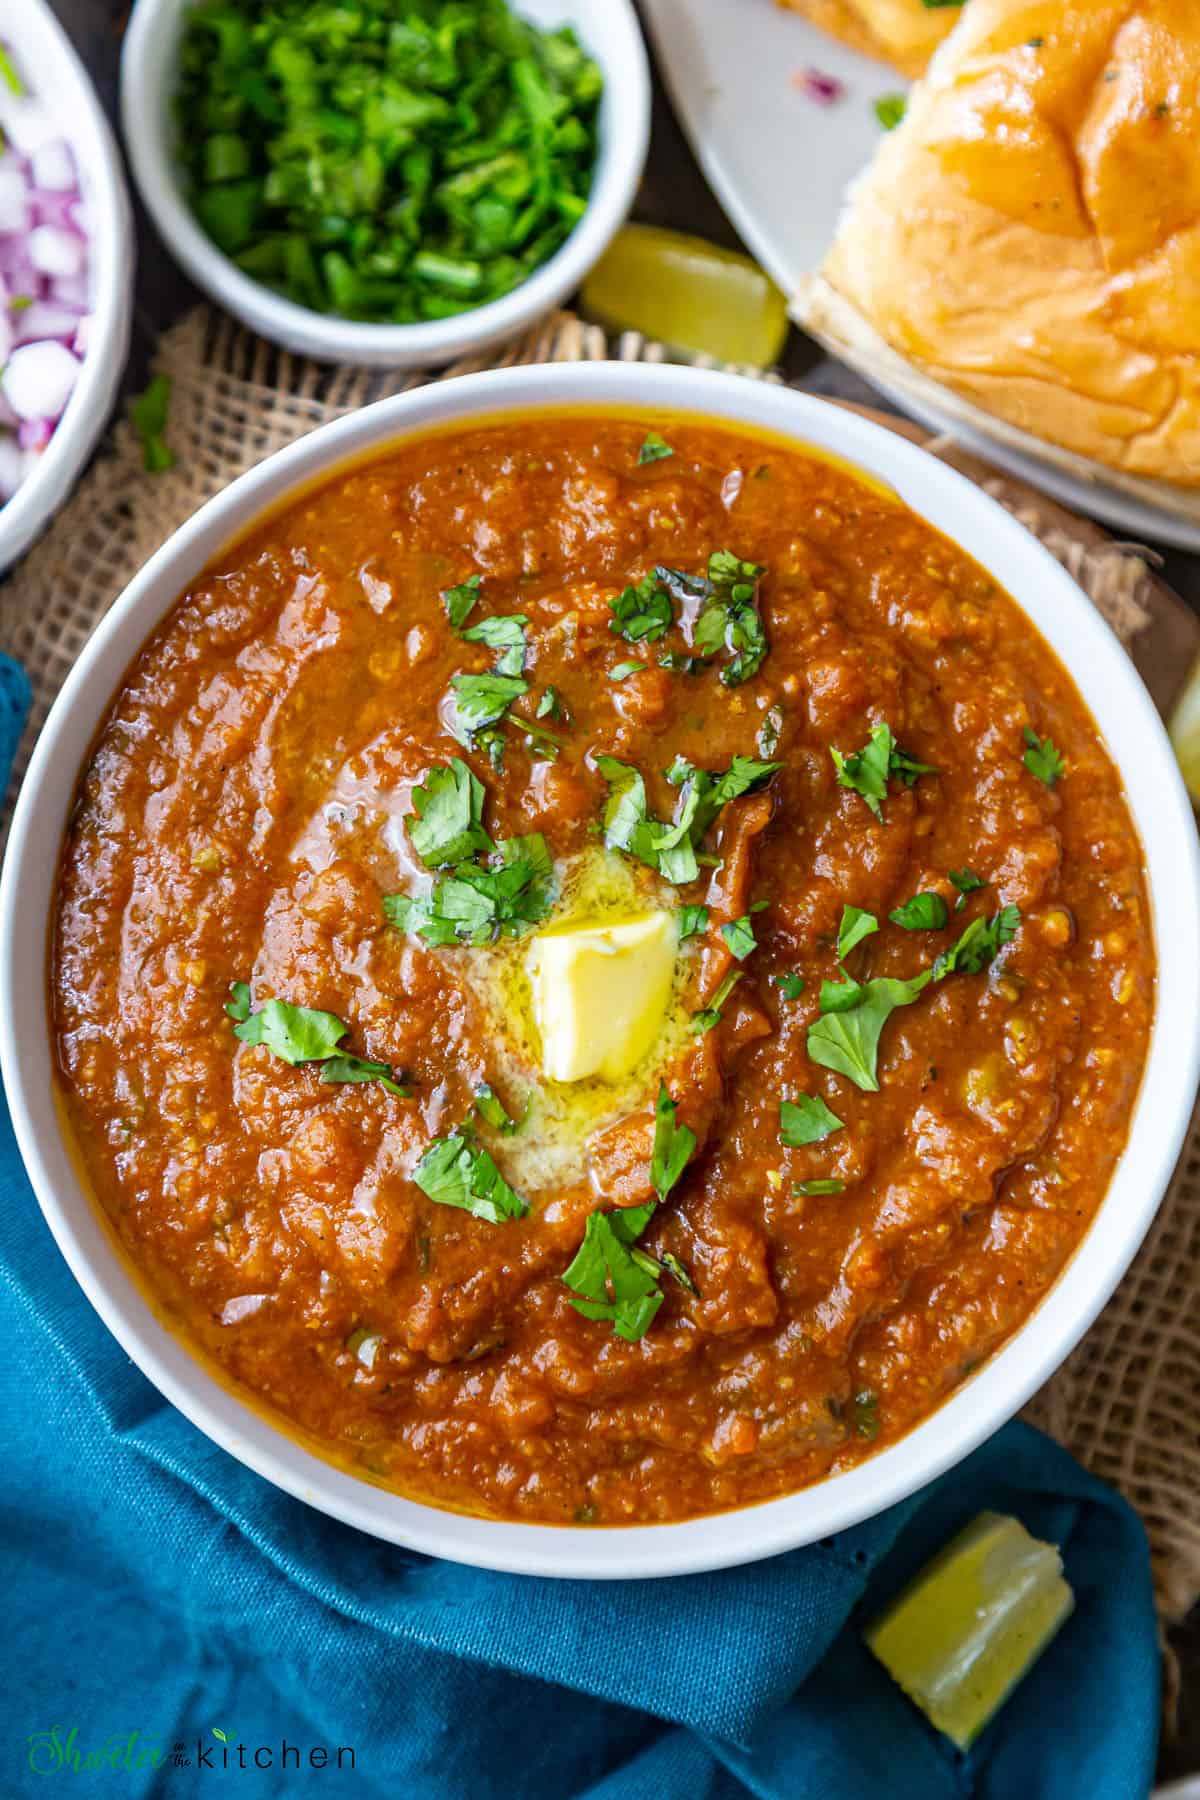
First, add the onions and cilantro (as much as you like) over the bhaji. The onions add a nice crunch to the overall smooth creamy bhaji. Then squeeze some lemon juice over and mix the bhaji with a spoon.
Break a portion of the pav and scoop a generous amount of bhaji on it and enjoy!!
Variations
Paneer Pav Bhaji - Top the bhaji with grated paneer before serving.
Cheese Pav Bhaji - Top the bhaji with lots of grated cheese of choice, mozzarella, or cheddar.
No onion no garlic - Simply skip the onion and garlic in this recipe. The rest of the recipe remains the same.
Recipe Tips
Vegetables like potatoes, cauliflower, bell pepper, and green peas work best for making Paav Bhaji. Carrots can be added too but they will make the bhaji sweeter. I like adding beets as it gives a nice color to the bhaji but it is completely optional.
You can also use dry green peas instead of fresh ones. Just soak them overnight, pressure cook until done (30 mins in Instant Pot), and then use in the recipe.
For vegan Pav Bhaji, substitute butter with neutral oil or vegan butter.
For gluten-free options, substitute pav with gluten-free dinner rolls or bread. The bhaji is gluten-free.
You can adjust the spice levels of bhaji by adding more or less Paav Bhaji Masala, red chili powder, or green chili.
While making bhaji in an instant pot or pressure cooker, just chop all the veggies, no need to boil.
Frequently Asked Questions
There are many brands of pav bhaji masala powder available in Indian grocery stores but I prefer either Badshah or Everest or the MDH brand of Pav Bhaji Masala.
The street-style paav bhaji has a nice reddish orangish color; you can get that without using artificial color. To get that reddish-orange color use, beetroot Kashmiri red chili powder and tomato paste/puree in your bhaji.
You can serve bhaji with more pav or use leftover bhaji to make Tawa pulao or masala pav.
Pav bhaji masala is very readily available in most Indian grocery stores and online but in a pinch, you can mix the following spices to make paav bhaji masala - garam masala, coriander powder, Kashmiri red chili powder, amchur powder (dry mango powder), and cumin seeds powder. The taste will be different (not authentic) but still delicious!!
Leftover bhaji and butter-toasted pav can be stored separately in an air-tight container in the refrigerator for 2-3 days. For serving, heat up on the stovetop or in the microwave until hot. Adjust the consistency of bhaji with water if needed.
More Mumbai Street Food Recipes
Hope you enjoy this Mumbai Style Pav Bhaji Recipe !! If you try this recipe, please rate by clicking stars ⭐️ on the recipe card. Thank you ❤️! You can also follow me on Facebook and Instagram to see what’s cooking in my kitchen!!
Recipe Card
Pav Bhaji Recipe
Ingredients
For Bhaji
- 3 tablespoons butter Amul butter preferably, divided
- 2 tablespoon oil
- 1 teaspoon cumin seeds
- 1 onion finely chopped 1 cup chopped
- 1 tablespoon ginger minced.
- 1.5 tablespoons garlic minced
- 1 teaspoon green chili paste adjust to taste
- 1 green bell pepper chopped approximately 1 cup chopped
- 3-4 Roma tomatoes 500gms tomatoes, 2.5 cups chopped)
- 1 cup cauliflower florets
- 3 potatoes 500 gms, 2.5 cups roughly chopped
- ½ cup green peas
- ½ cup beet root peeled and grated
- 2 tablespoons tomato paste
- 2-3 tablespoons Pav Bhaji Masala adjust to taste
- ¼ teaspoon turmeric powder
- 1 teaspoon Kashmiri red chili powder optional and to taste
- 1 teaspoon coriander powder
- 1 teaspoon Kasuri Methi dry fenugreek leaves
- 1.5 teaspoon salt adjust to taste
- 2 cups water plus as required to adjust consistency.
For Toasting Pav
- 12 Pav dinner rolls
- 6-8 tablespoons butter
- 1-2 tablespoon Pav Bhaji Masala optional
- Some cilantro
For Serving
- 1 medium red onion finely chopped
- 1-2 tablespoon butter cut into cubes
- ¼ cup cilantro
- 1 lemon cut into wedges or slices
Instructions
Prep work
- Rinse all the veggies. Finely chop veggies like onions, bell pepper, and tomatoes. You can also puree the tomatoes in which case roughly chop them.
- Make fresh ginger garlic and green chili paste and keep aside.
- For Instant Pot (pressure cooking) - Peel and roughly chop potatoes, peel and grate beetroot and cut cauliflower into medium size pieces.
- For Stove top - Boil, peel and mash or grate potatoes, green peas, beetroot and cauliflower
Making Instant Pot Pav Bhaji
- Start Instant Pot on Saute (normal). Add 2 tablespoons butter and oil each. Once the butter melts, add the cumin seeds and let them sizzle.
- Now stir in the onions, ginger, garlic and green chili, and saute until onions are translucent.
- Add bell pepper, tomatoes, and salt. Mix well. Cover and cook until tomatoes are soft and mushy.
- Add tomato paste, and spices like turmeric powder, Kashmiri red chili powder, coriander powder, and Pav Bhaji Masala. Mix and sauté for 1-2 minutes.
- After this follow one of the cooking method using Instant Pot, sove
- Stir in the chopped veggies - potatoes, cauliflower, green peas, and beetroot Add 2 cups of water and mix well.
- Turn off the Instant Pot, close the lid with a vent in sealing position. Pressure cook at high pressure for 8 minutes. Once cooking completes, allow a natural release (pin drops). Open the lid, start Instant Pot on saute again.
- Mash the Bhaji with a potato masher or use an immersion blender to get a puree-like consistency. It should neither be too thick nor too thin so adjust the consistency using water as needed. I added 1.5 cups more.
- Taste test and add more salt or red chili powder or more pave Bhaji Masala as per taste.
- Crush Kasuri methi between your palms and add it to bhaji along with lemon juice, more butter (1-2 tablespoons), and cilantro. Mix well, cover with a glass lid to prevent bhaji from splattering. Simmer for 5 more minutes or until heated through. Pav Bhaji is ready to serve.
How To Make Pav Bhaji On Stove top
- In a pan, heat the butter and oil on medium heat. Add cumin seeds and allow them to sizzle.
- Then add the onions, and sauté until the onions are translucent. No need to brown them.
- Stir in the ginger garlic green chili and sauté for a few seconds until fragrant, Take care not to burn the garlic.
- Add bell pepper, tomatoes, tomato paste, and salt. Mix well and cover and cook until tomatoes are soft and mushy.
- Now add spices like turmeric powder, red chili powder, coriander powder, and Pav Bhaji Masala. Mix and sauté for 1-2 minutes.
- Stir in the boiled veggies, cauliflower, green peas, potato, and beetroot. Mix well.
- Using a potato masher, mash the veggies until well mixed with masala.
- Add ½ to 1 cup water and mash. Keep simmering, adding little water at a time, and mashing for the next 10 mins or until the veggies are nicely mashed and mixed with the masala and the bhaji is almost smooth.
- You can also use an immersion blender to make a puree-like consistency. It should neither be too thick nor too thin so adjust the consistency using water as needed.
- Taste test and add more salt or red chili powder or more pave Bhaji Masala as per taste.
- Crush Kasuri methi between your palms and add it to bhaji along with lemon juice, more butter, and cilantro. Mix well, simmer for 2-5 more minutes and Pav Bhaji is ready to serve.
Pav bhaji in Traditional Pressure Cooker
- Heat the pressure cooker on medium heat. Follow the same steps as mentioned above for Instant Pot.
- For cooking, close the lid with the weight on. Cook for 5-6 whistles or about 15 mins.
- Once the pressure releases, mash the bhaji using potato masher or immersion blender.
- Crush Kasuri methi between your palms and add it to bhaji along with lemon juice, more butter, and cilantro. Mix well, simmer for 2-5 more minutes and Pav Bhaji is ready to serve.
Toast Pav
- While the bhaji is simmering, Toast the pav.
- Heat up a tawa or frying pan on low heat and add 1-2 tablespoons of butter to it. Once the butter melts, add Pav Bhaji Masala (optional), and cilantro, and mix well. Spread evenly on the pan.
- Slice the pav (dinner rolls) in half such that it opens up giving two equal parts. Place the pav (open side white portion) on the butter.
- Press gently and move the pav so it absorbs the butter and is evenly coated. Now you can apply more butter on top and flip so the tops are toasted too.
- Keep flipping and pressing gently until done. Remove on a plate. Tossing the pav in butter makes them soft and easy to scoop with bhaji. If you prefer crispy, toast them longer.
Serving suggestion
- Serve bhaji hot topped with butter, cilantro with side of butter toasted pav, chopped onions and lemon.
- To eat, first top bhaji with onions and cilantro (as much as you like).Then squeeze some lemon juice over and mix the bhaji with a spoon. Break a portion of the pav and scoop a generous amount of bhaji on it and enjoy!!
Video
Notes
Nutrition
Update Notes: This post was originally published on Sep 30, 2012, but was republished with, step-by-step instructions, new photos, tips, and a video in July of 2022.



I like Pav Bhaji Recipe. Awesome cooking tips. thank you so much for sharing.
Thanks Deepti. Glad you liked it.
Mouth watering recipe for winter season nice pictures
Yummy..and really it's easy procedure..thanks for share thisIndian Fast Food Restaurant
Wow..thank you so much for the detailed explanation..i would love to try this one and tell you the experience..And i am a foodie..So kindly asking for some more fast food recipes..
Bangalore Restaurants
Thank you so much Kathleen for these kind words,truly appreciate it 🙂
I swear, Shweta, you have the best photos I've seen on Blogspot. I like the clarity, the colors, the multiple pictures in one spot, and the size of them (I can never get mine that large on Blogspot!). You are a photo pro. Beautiful job with the Pav Bhaji.
Lovely Presentation. All-time favourite
Love these ! Good one .
Today's Menu - Mushroom Pepper Fry
Wow looks pillow soft pav bhaji..yumm yumm,Great job!!
Join my ongoing EP events-Rosemary OR Sesame @ Now Serving
Wow.. looks so nice. Pav bhaji on a cold rainy day like today over here... Hmmmmm.. Lovely presentation of pav bhaji too, thnx for linking these beautiful dish
My fav pav bhaji ...looks nice & Lovely pics
Delicious pav bhaji Shweta. In my house my hubby makes it. Thanks for linkingFavorite recipes event: Vegetarian recipes
Hi Shweta
Delicious pav bhaji and your beautiful photographs make it more tempting and yummy. I want to have it today.
wow gorgeous looking shwetha dear... so so yummy...
Join in my first event - FEAST FOR YOUR GURU
VIRUNTHU UNNA VAANGA
Wow... this looks tempting and yummy.., looks absolutely delicious.