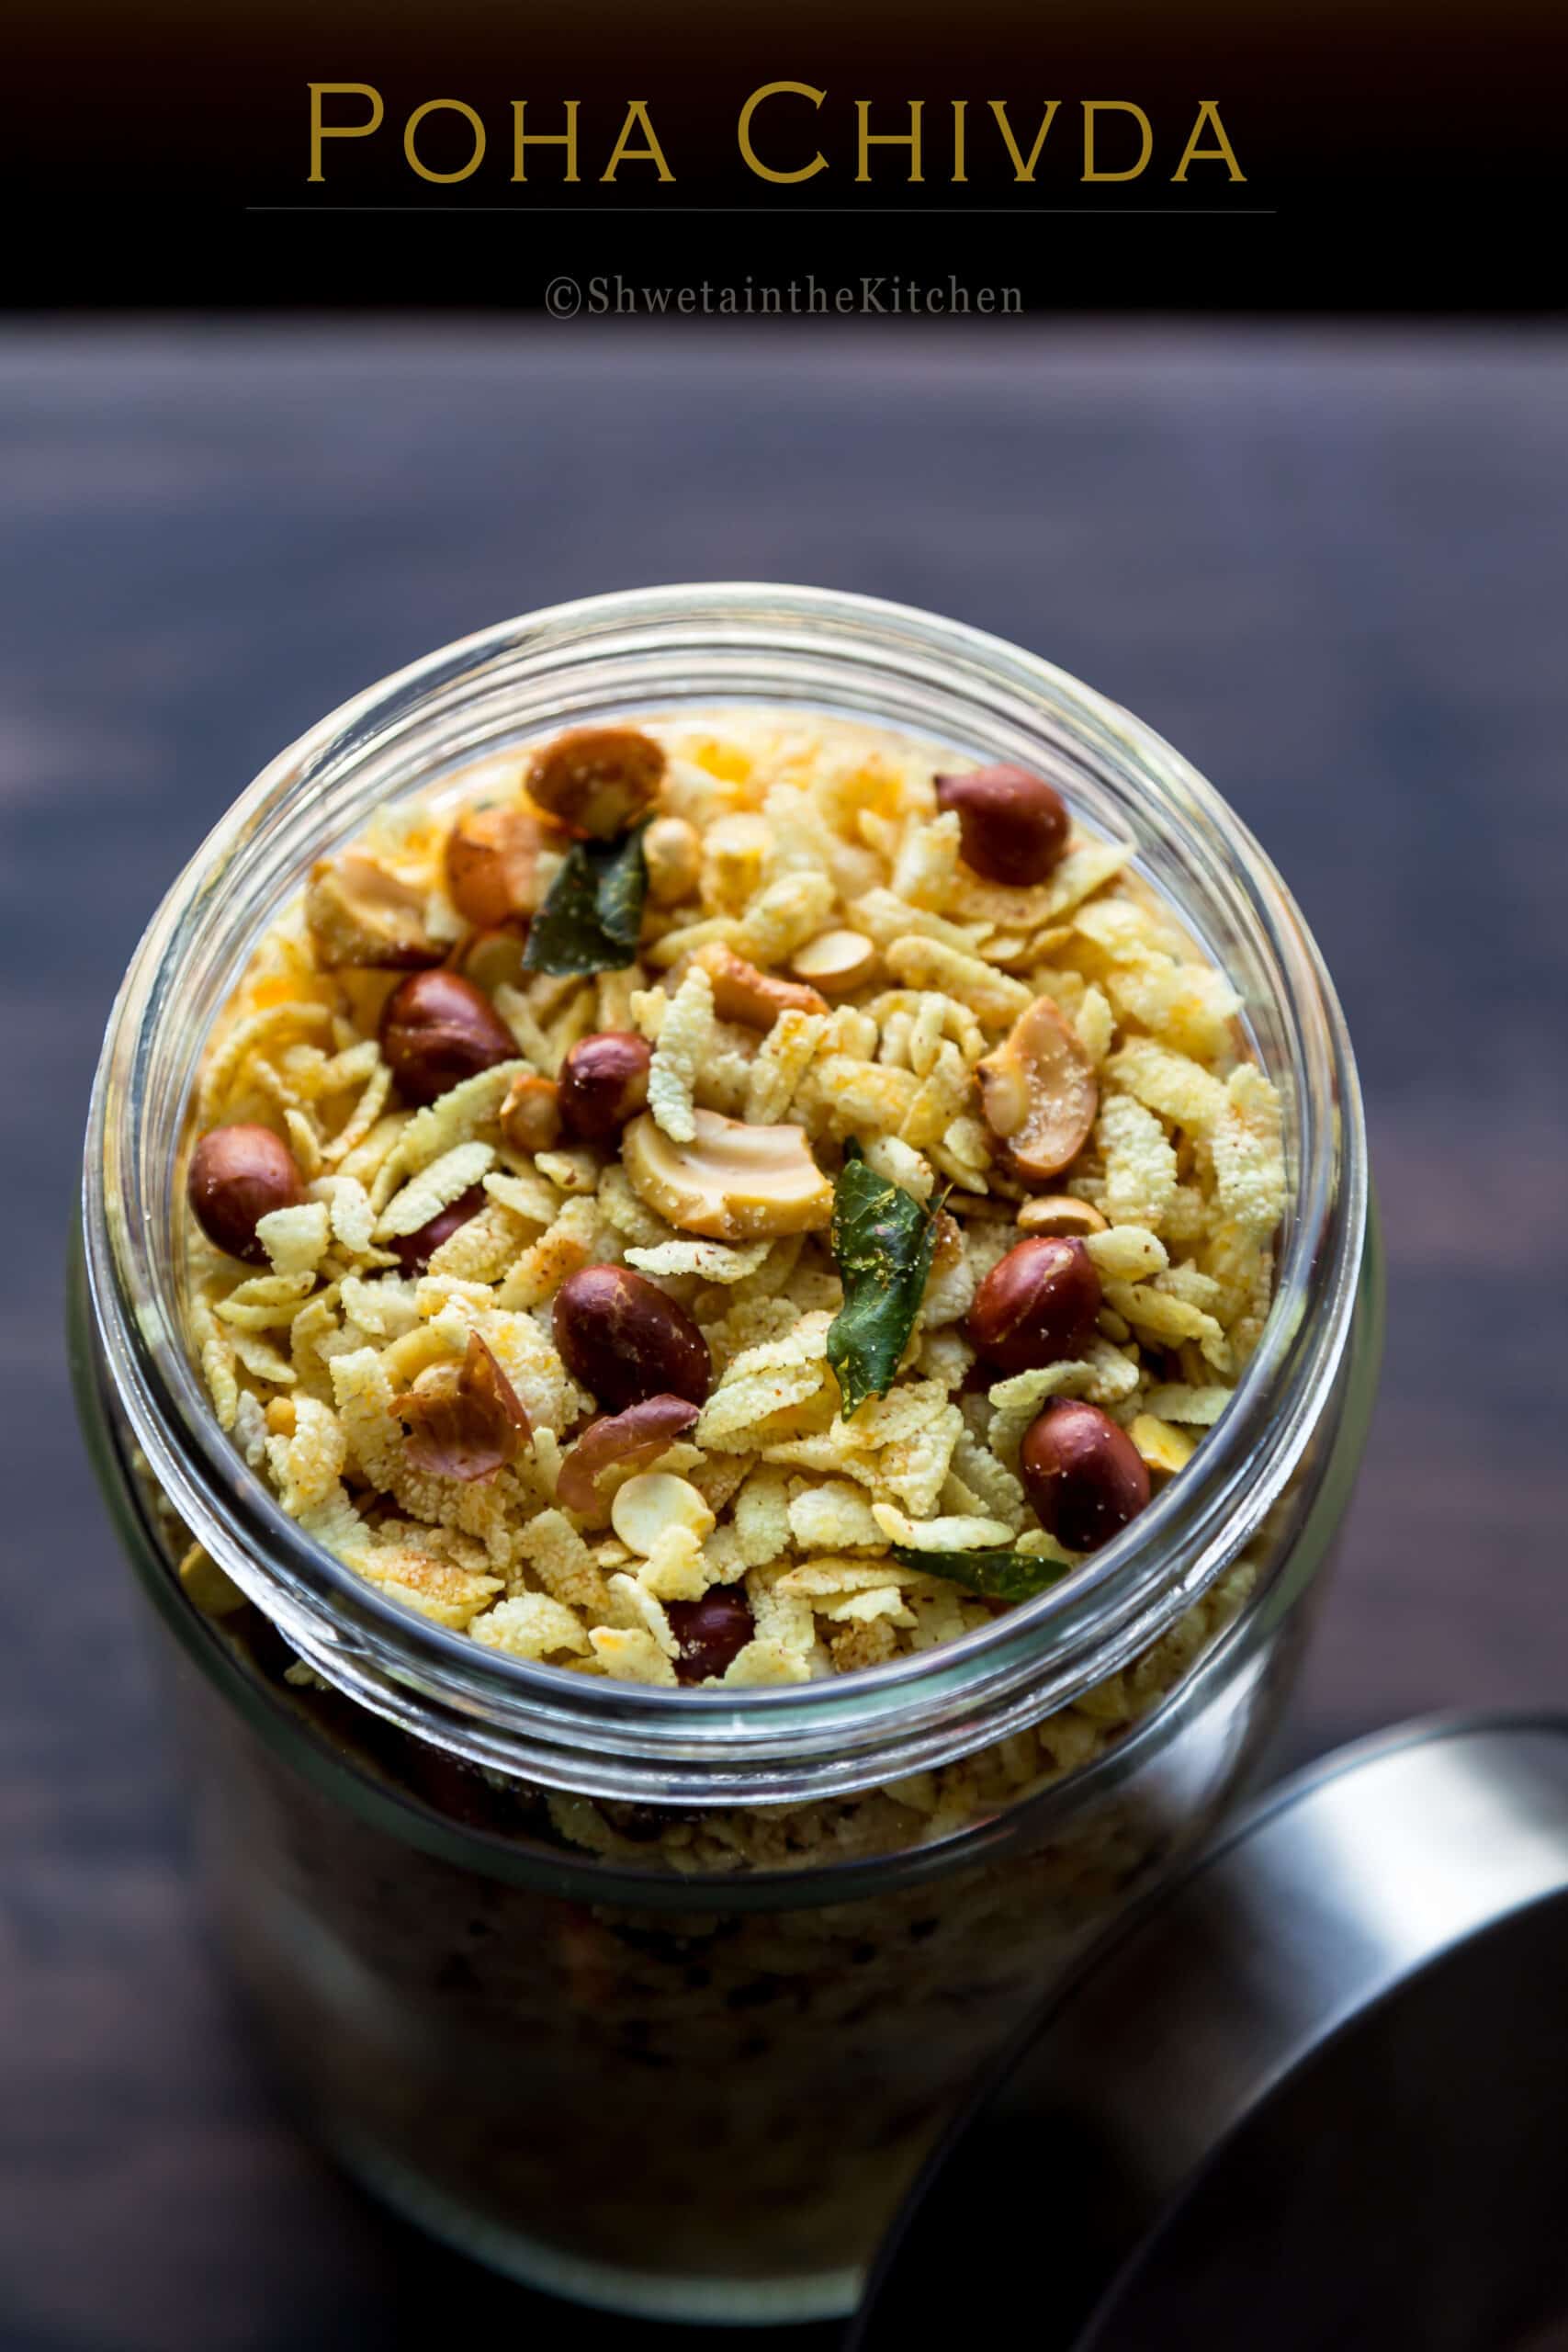
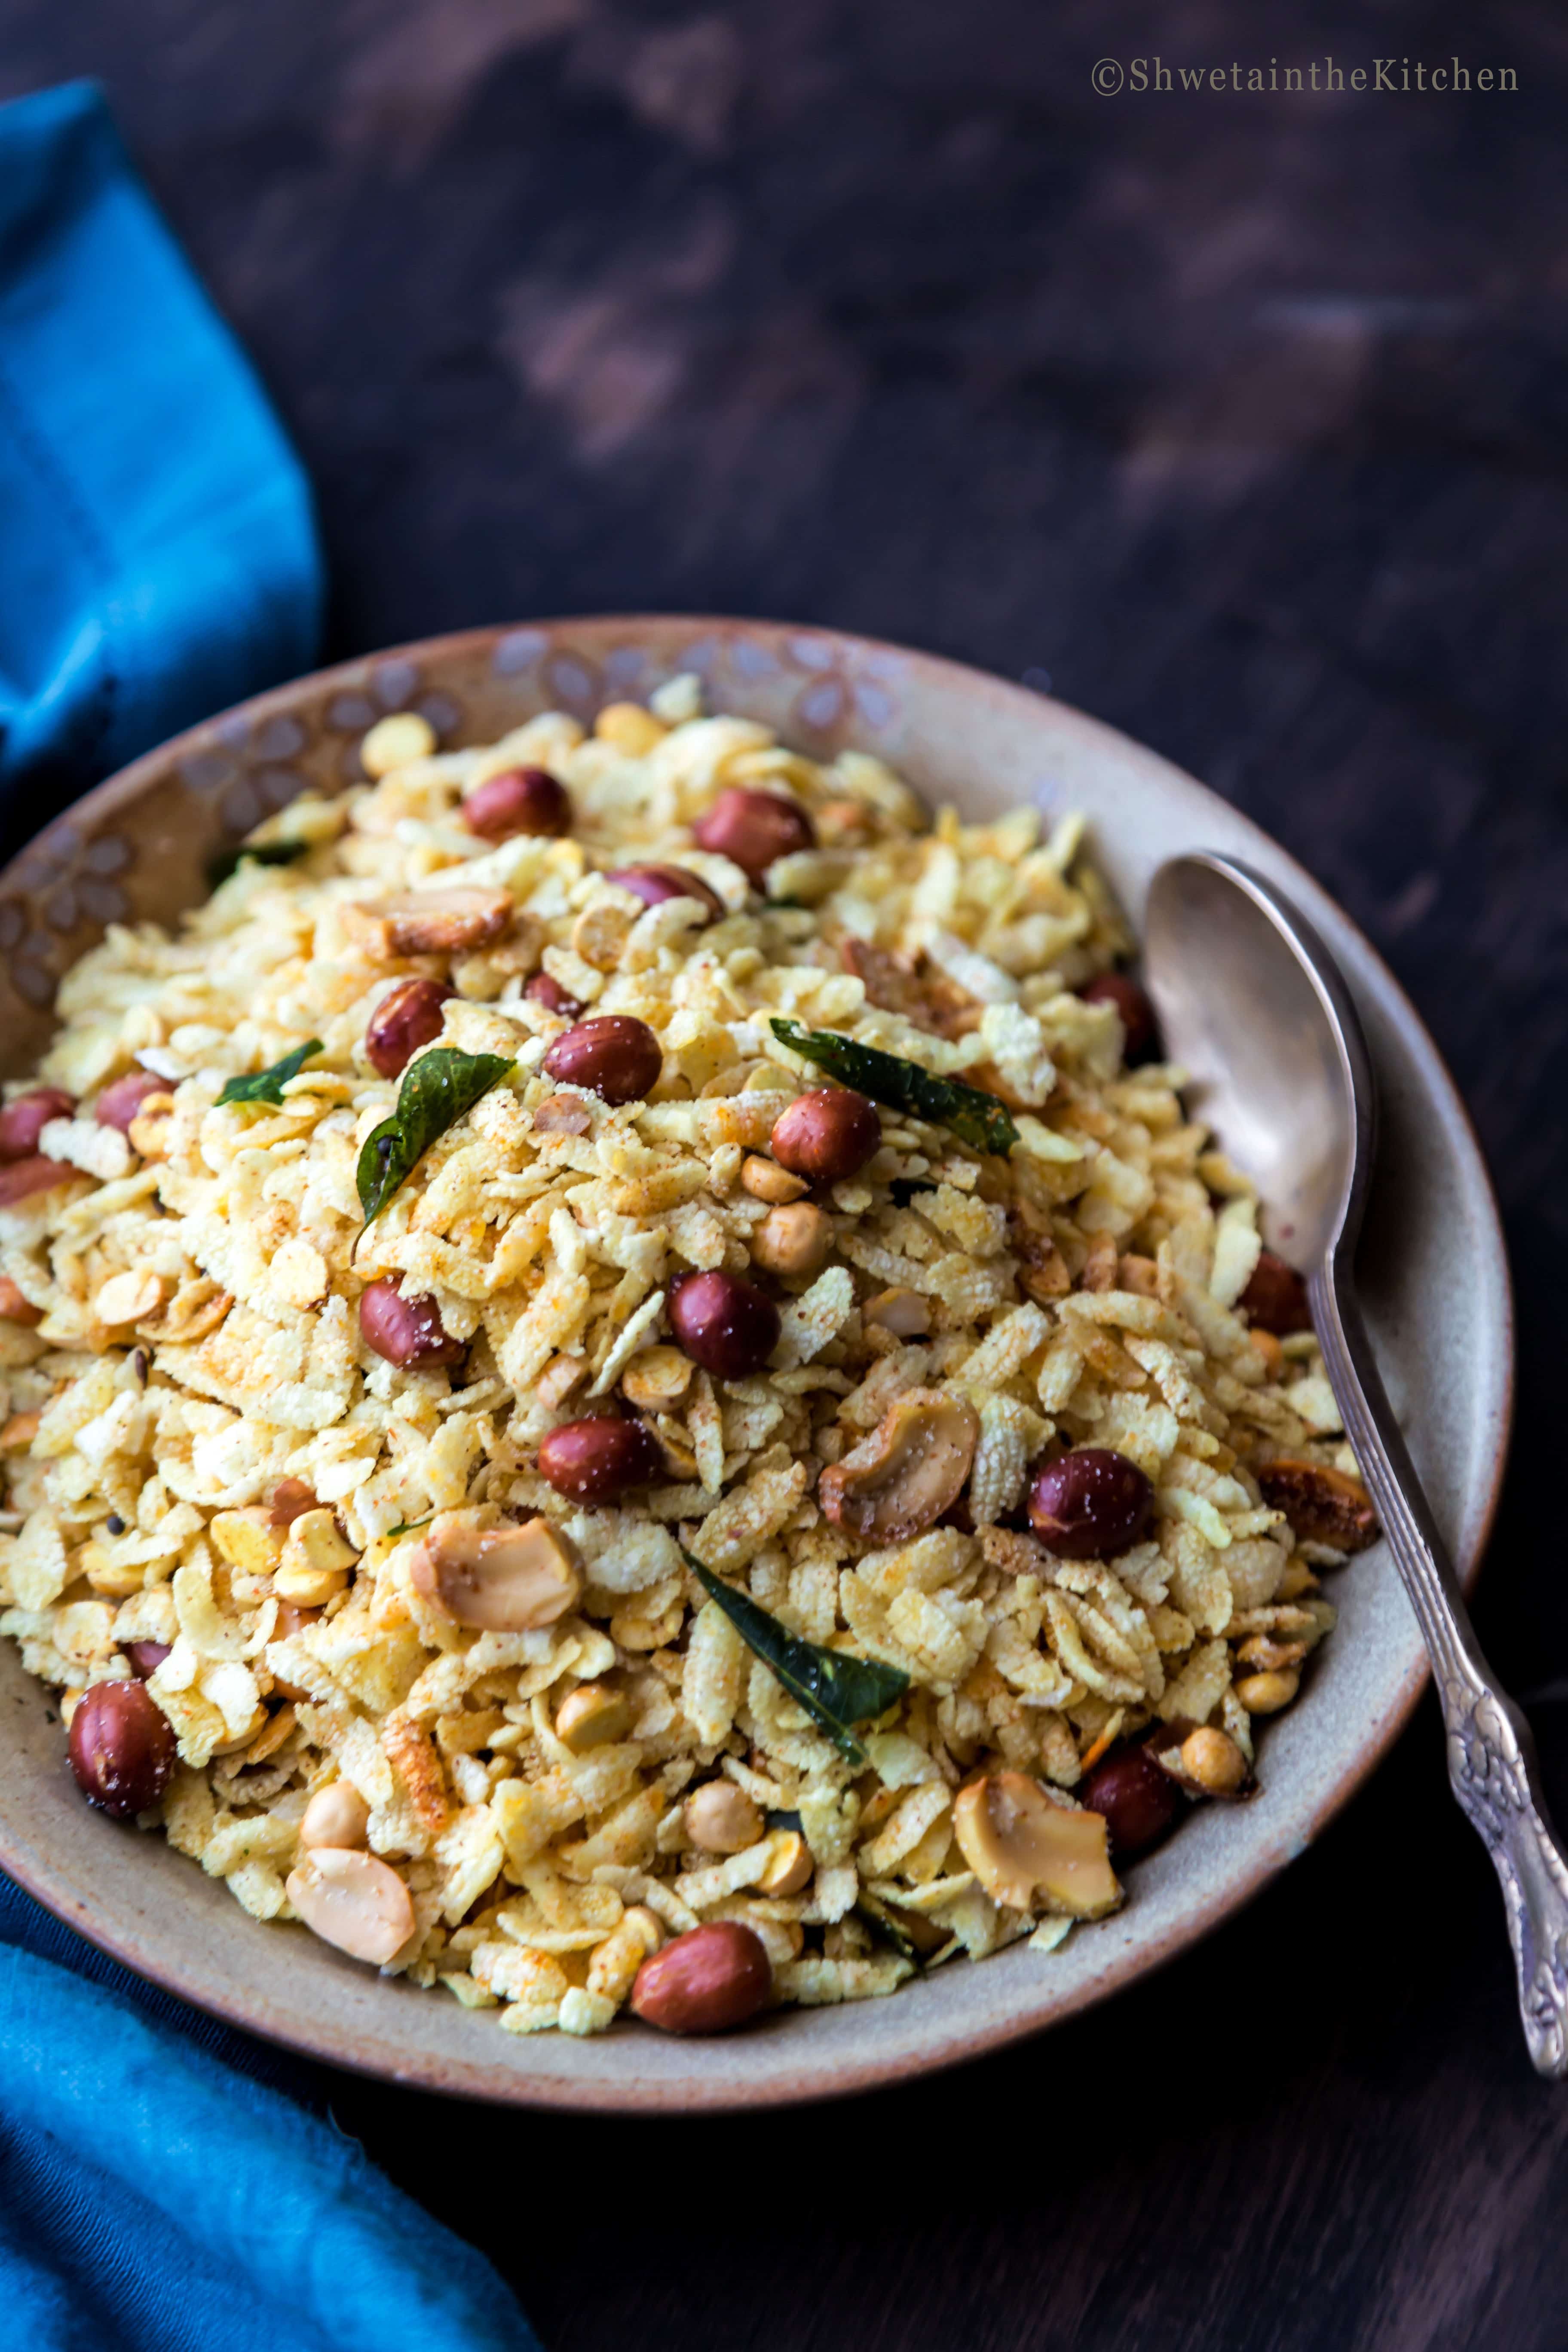
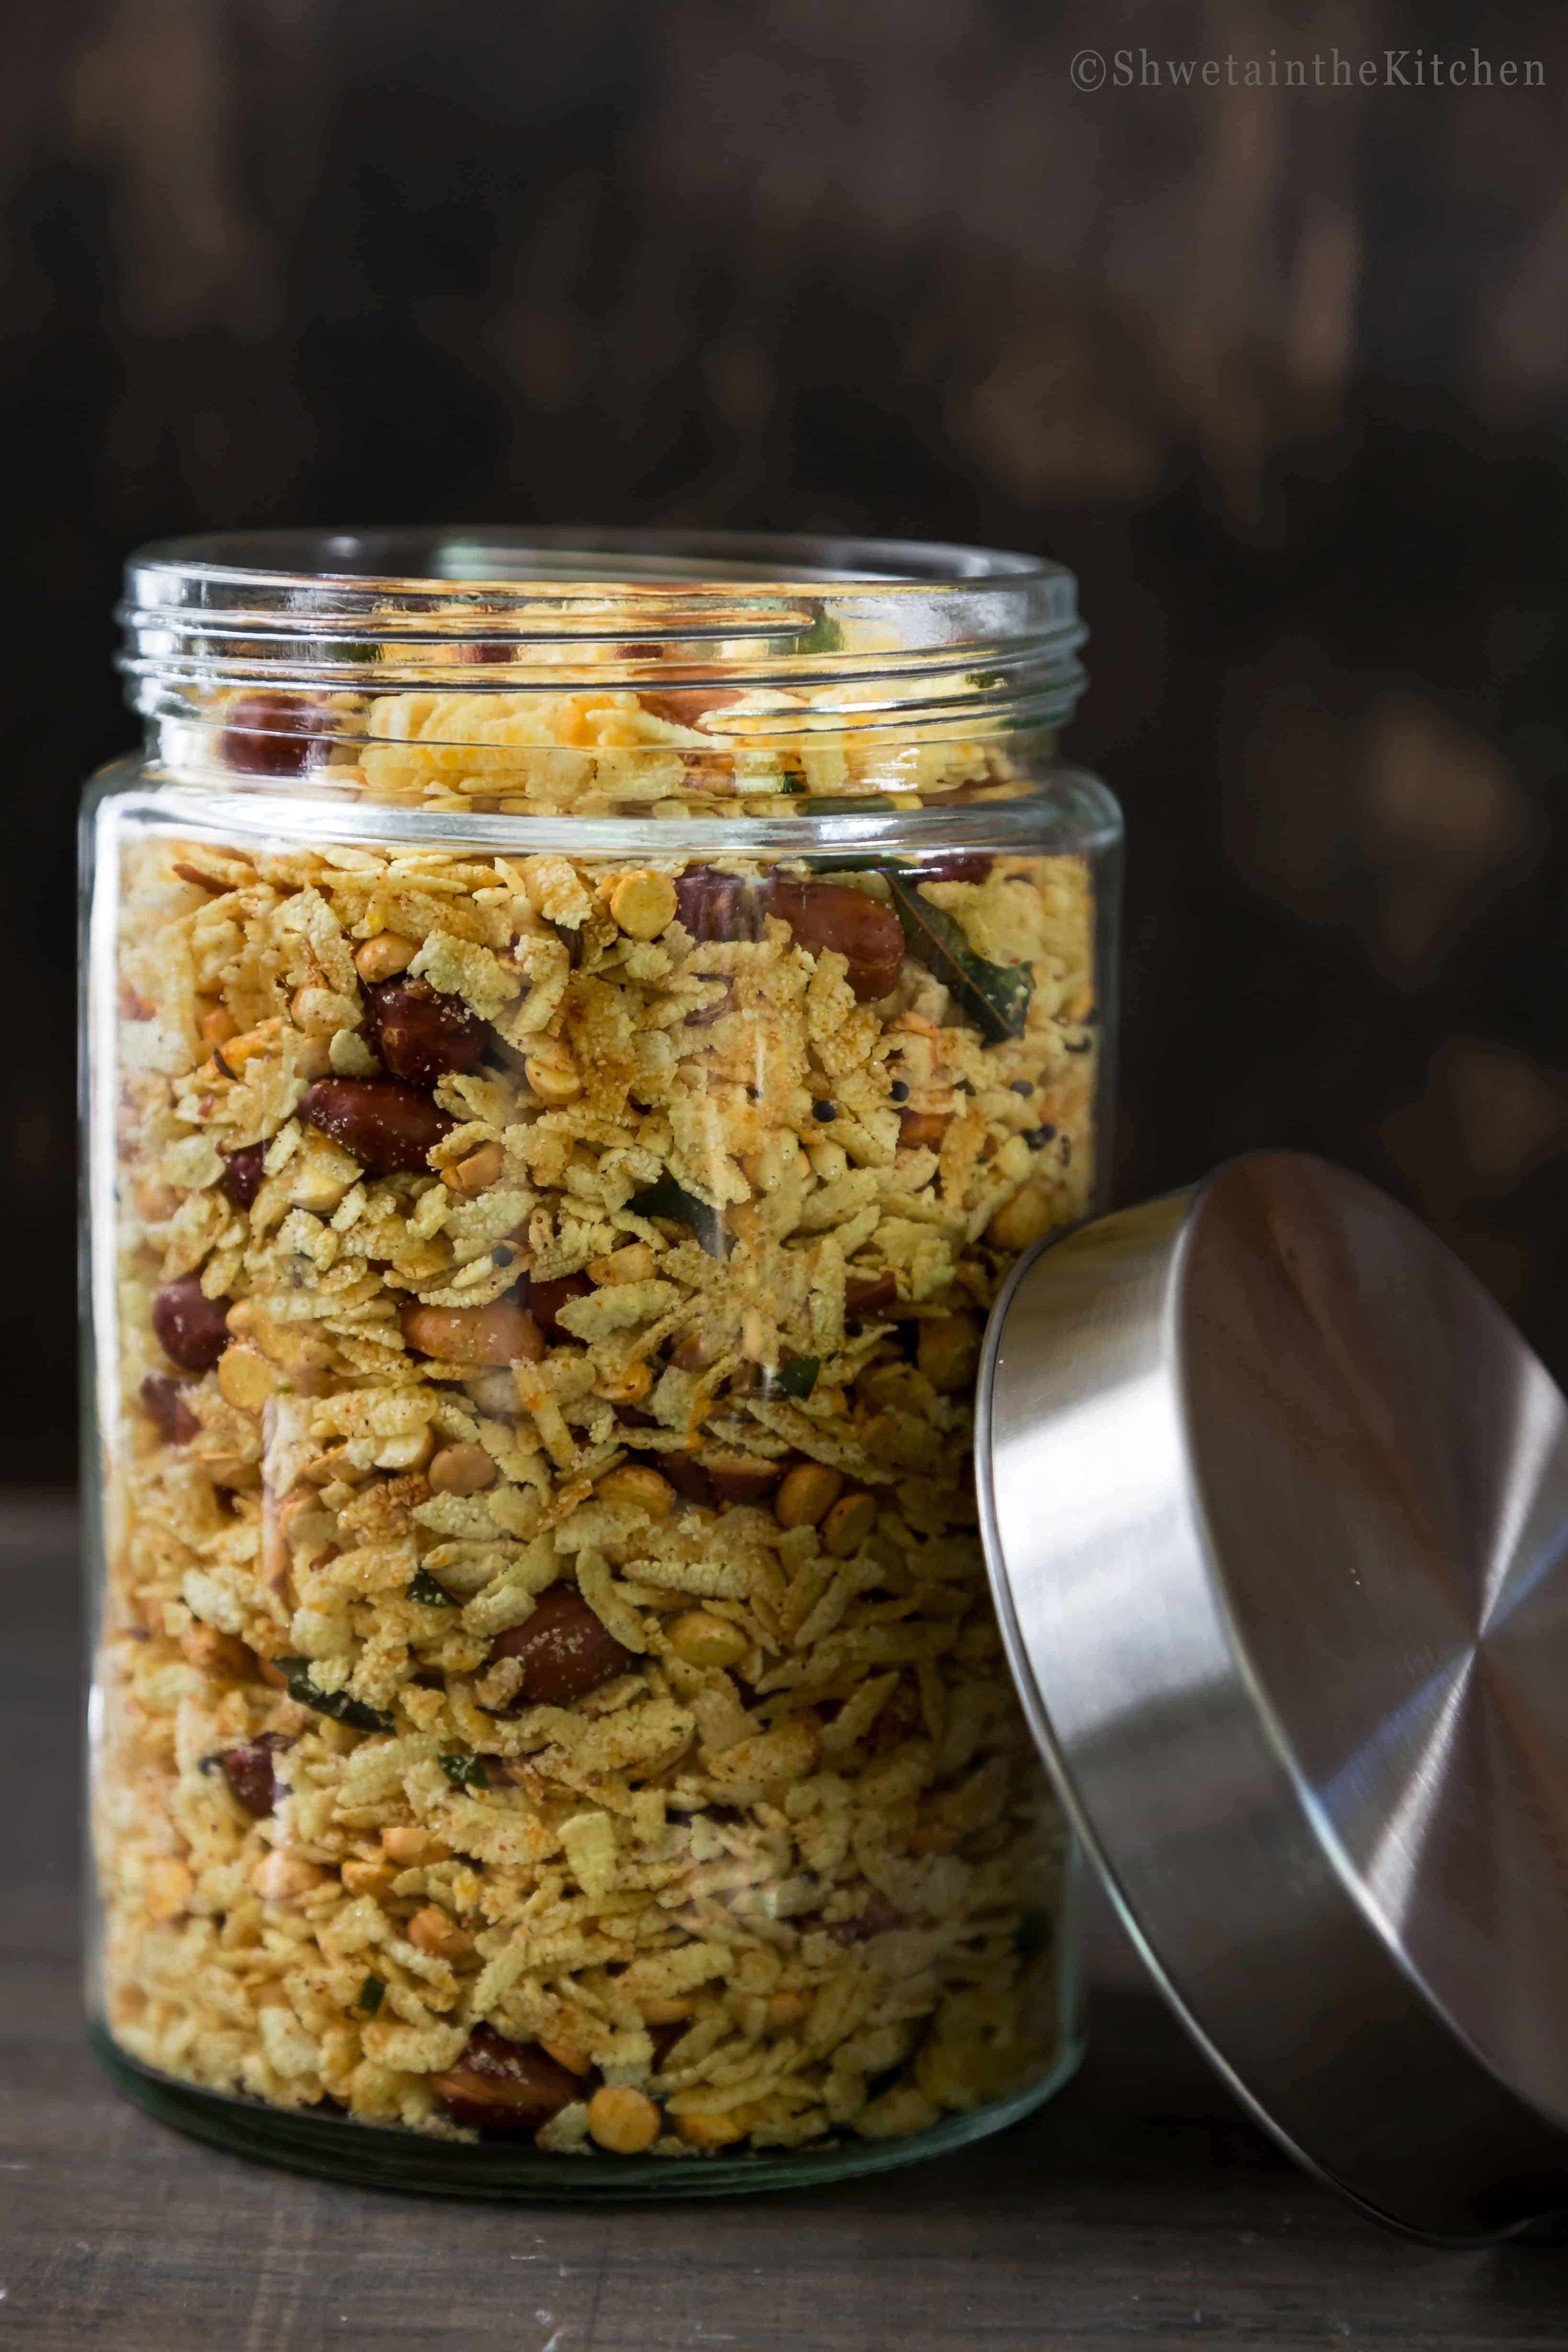
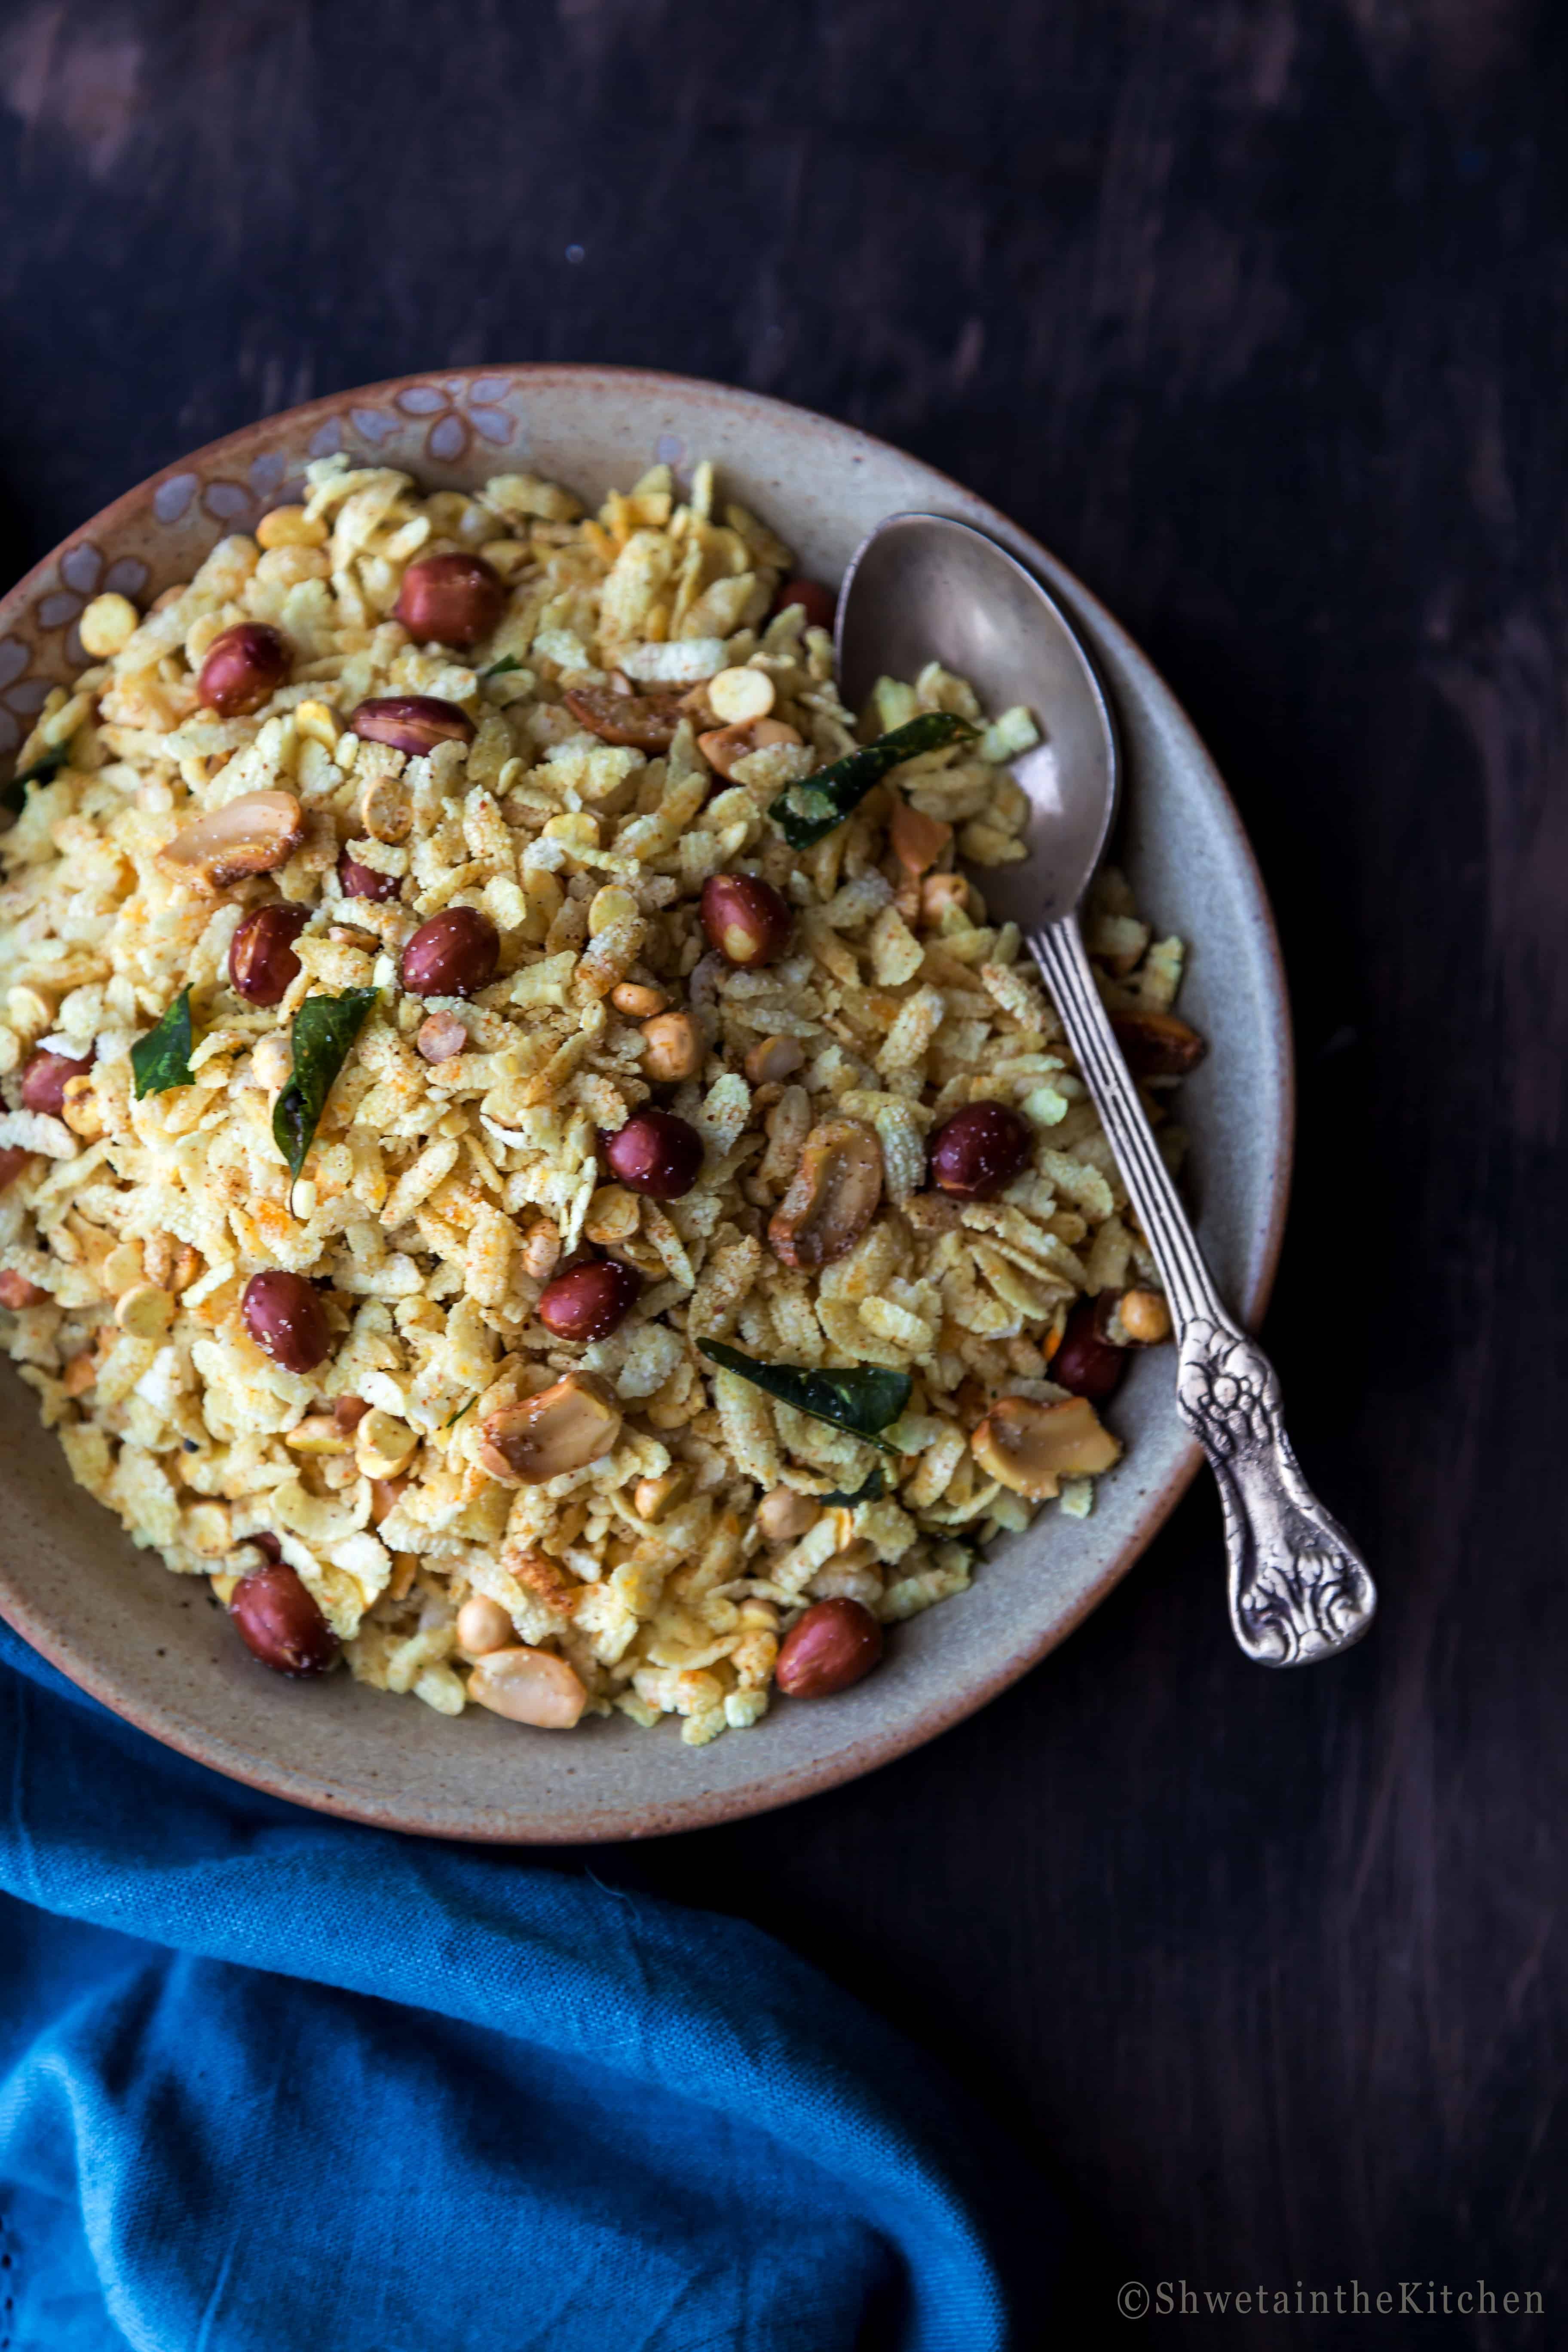
Thick Poha Chivda (namkeen) is a Marathi crunchy snack mix made of poha (flattened rice), peanuts, cashews, curry leaves, and spices.
In this post, sharing three stepwise methods to make Poha chivda using either deep frying, baking in oven or air-fryer method.
Want to save this recipe?
Diwali without Faral is as incomplete as Diwali without lights. I always try to make something sweet and savory each Diwali.
Although I make both sweet and savory Diwali faral recipes, I prefer the savory ones.
Among savory, my Mom's Poha Chivda recipe is my absolute favorite. It's a keeper and super easy one so had to share it with you all.
This Chivda is
- Made from thick poha
- super easy to make
- the perfect balance of spicy and sweet
- crunchier and healthier than storebought
- has a great shelf life
- makes the perfect tea time snack
- Vegan and gluten-free
Chivda, also known as Namkeen is an Indian snack mix or a spicy trail mix.
It usually a mix of dry fruits, nuts, some more fried crispy ingredients and the main ingredient which can be either oats, cornflakes, rice flakes tossed together and tempered with spices and curry leaves.
Today's post is a quick and easy Maharashtrian chivda recipe made from poha, and hence the name Poha Chivda.
Poha is also known as beaten rice, rice flakes, or flattened rice and is flat, dry, and light. It is naturally gluten-free.
There are three varieties of Poha - thin, thick, and dagdi but we will be using thick poha for this recipe.
So lets see how to make thick poha chivda
Recipe Ingredients
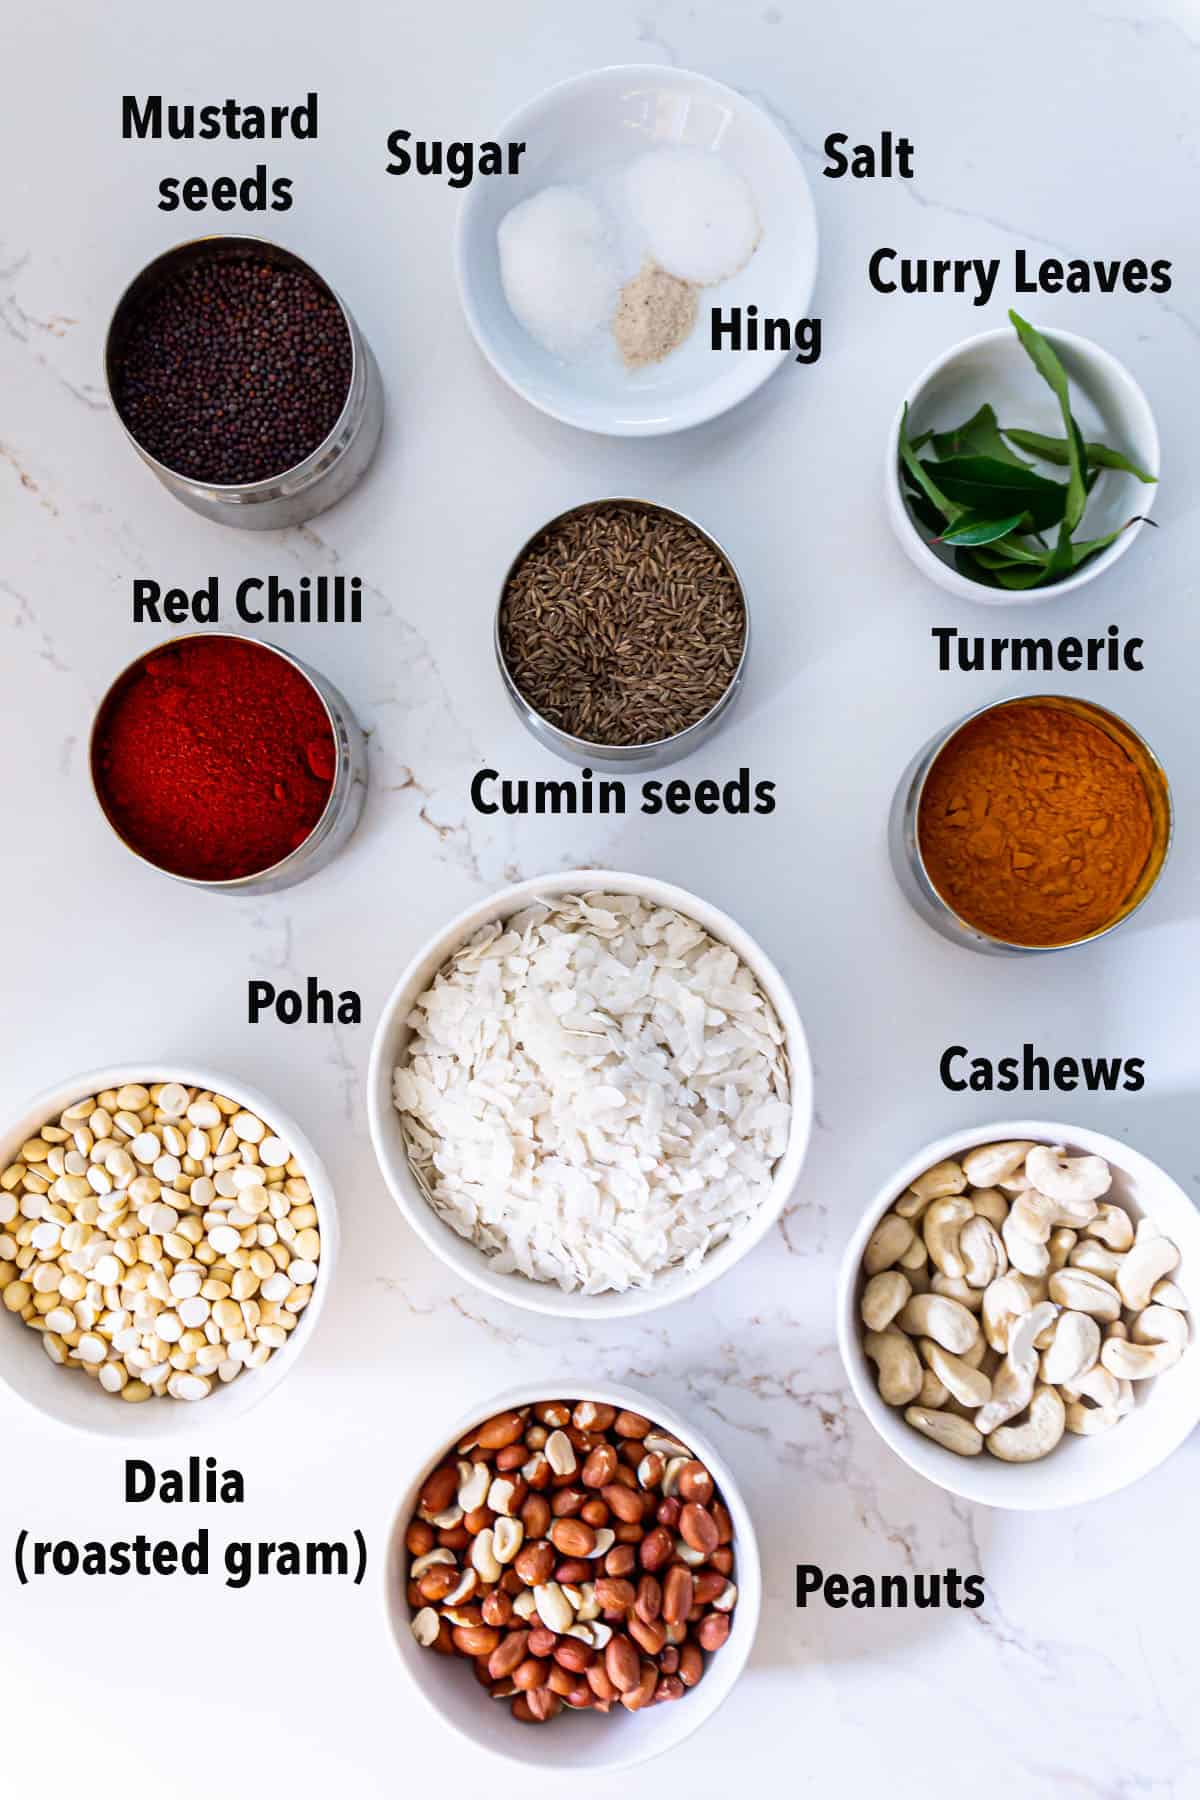
- Poha - also known as beaten or flattened rice. This is the main ingredient and I use thick poha (Jada Poha) for this recipe.
- Nuts - cashews, peanuts, and some dalia, also known as roasted gram/chana.
- Spices - mustard seeds (rai), cumin seeds (zeera), asafoetida (hing), turmeric powder, red chilli powder, salt, and sugar
- Curry leaves - Use fresh for more flavor.
- Oil - for frying and tadka (tempering). I prefer using peanut oil for frying.
Step by Step Method
(Deep frying)
In a Kadhai, or wok heat sufficient oil until hot. Test the readiness by adding a few poha flakes, they should immediately sizzle to the top. That's when you know the oil is ready.
Using a sieve that can comfortably fit in your wok start frying. Line a plate with paper towel and have it ready!

1 - Begin with poha, add about ½ cup at a time to the sieve (or as much it can hold).
2 - Insert the sieve with poha into the hot oil and fry until they expand and get crunchy, a minute or less approximately. Do not brown them.
3 - Remove from oil and hold above the wok for few seconds to drain the access oil.
4 - Transfer to the paper towel-lined plate. Repeat these frying steps for the remaining poha.
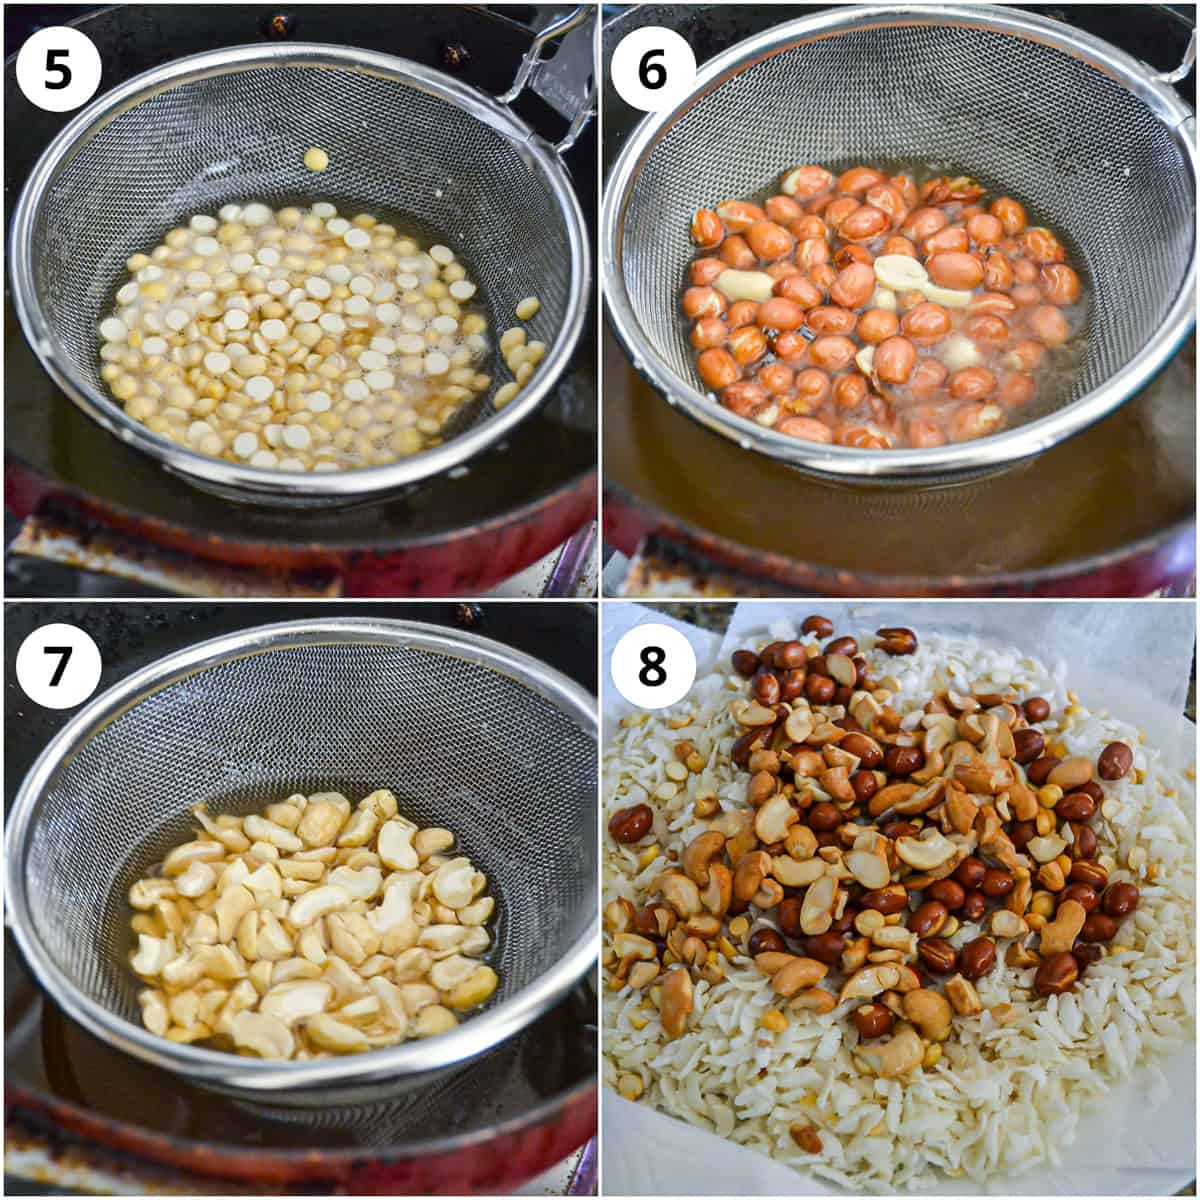
5 to 8 - Similarly fry the peanuts, Dalia, and cashews and remove them on the same plate as poha.
9 and 10 - While all these fried things are still warm add the salt, sugar and red chilli powder to them. You can either transfer to a bowl or on the same plate and stir to combine.
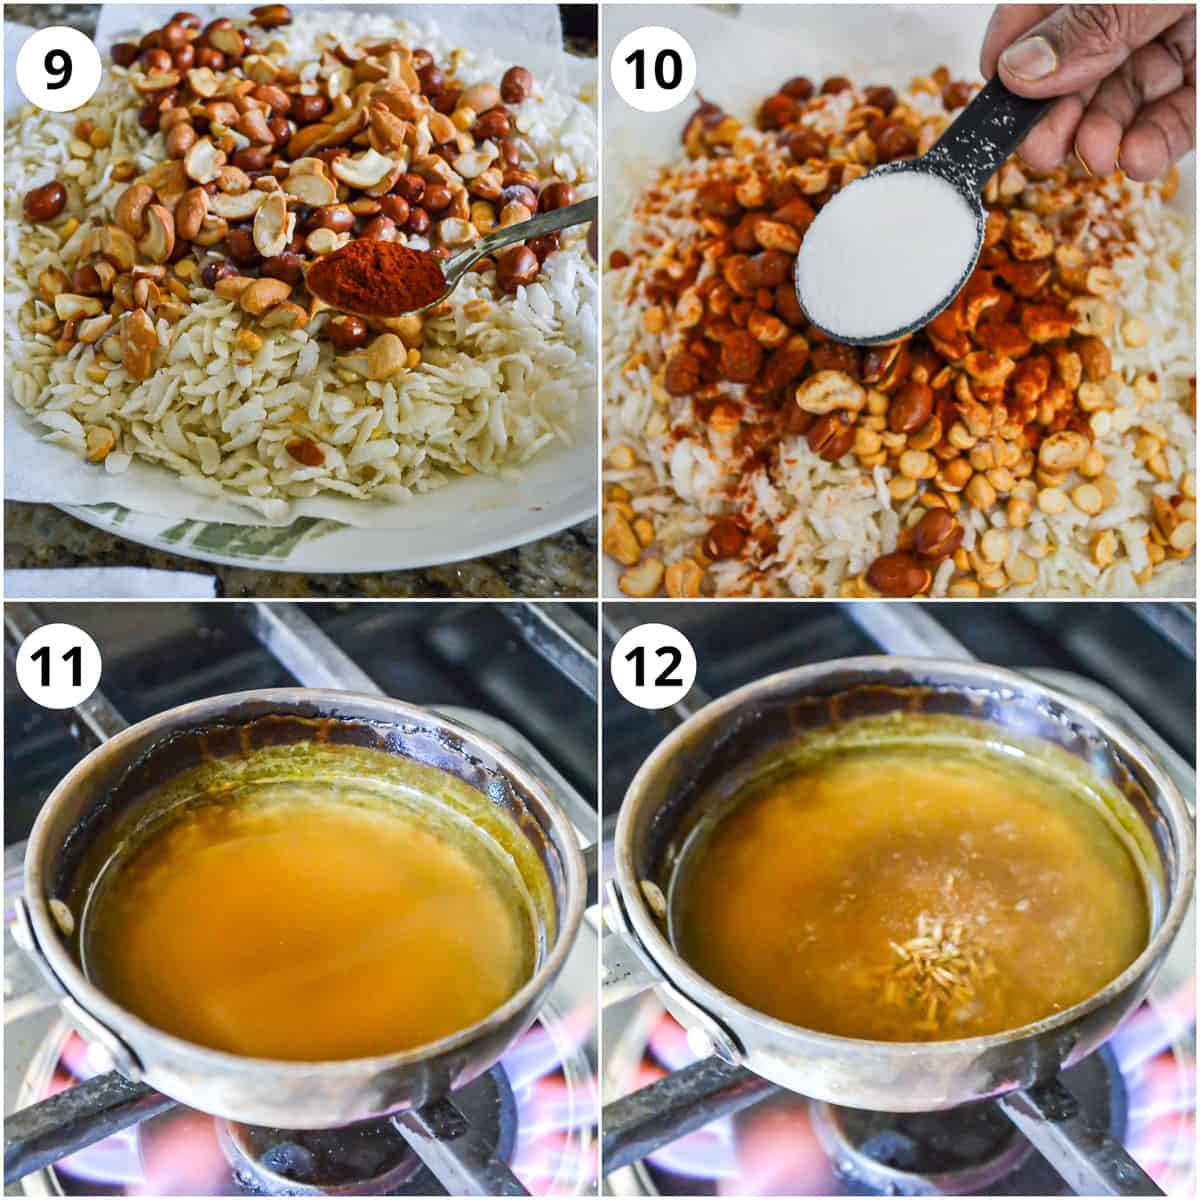
11 and 12 - For Tadka (tempering)- heat oil in a small pan for tadka. Once hot add the zeera and allow to splutter.
13 and 14 - Quickly add the turmeric followed by curry leaves. Mix and turn off the heat once the curry leaves are crisp.
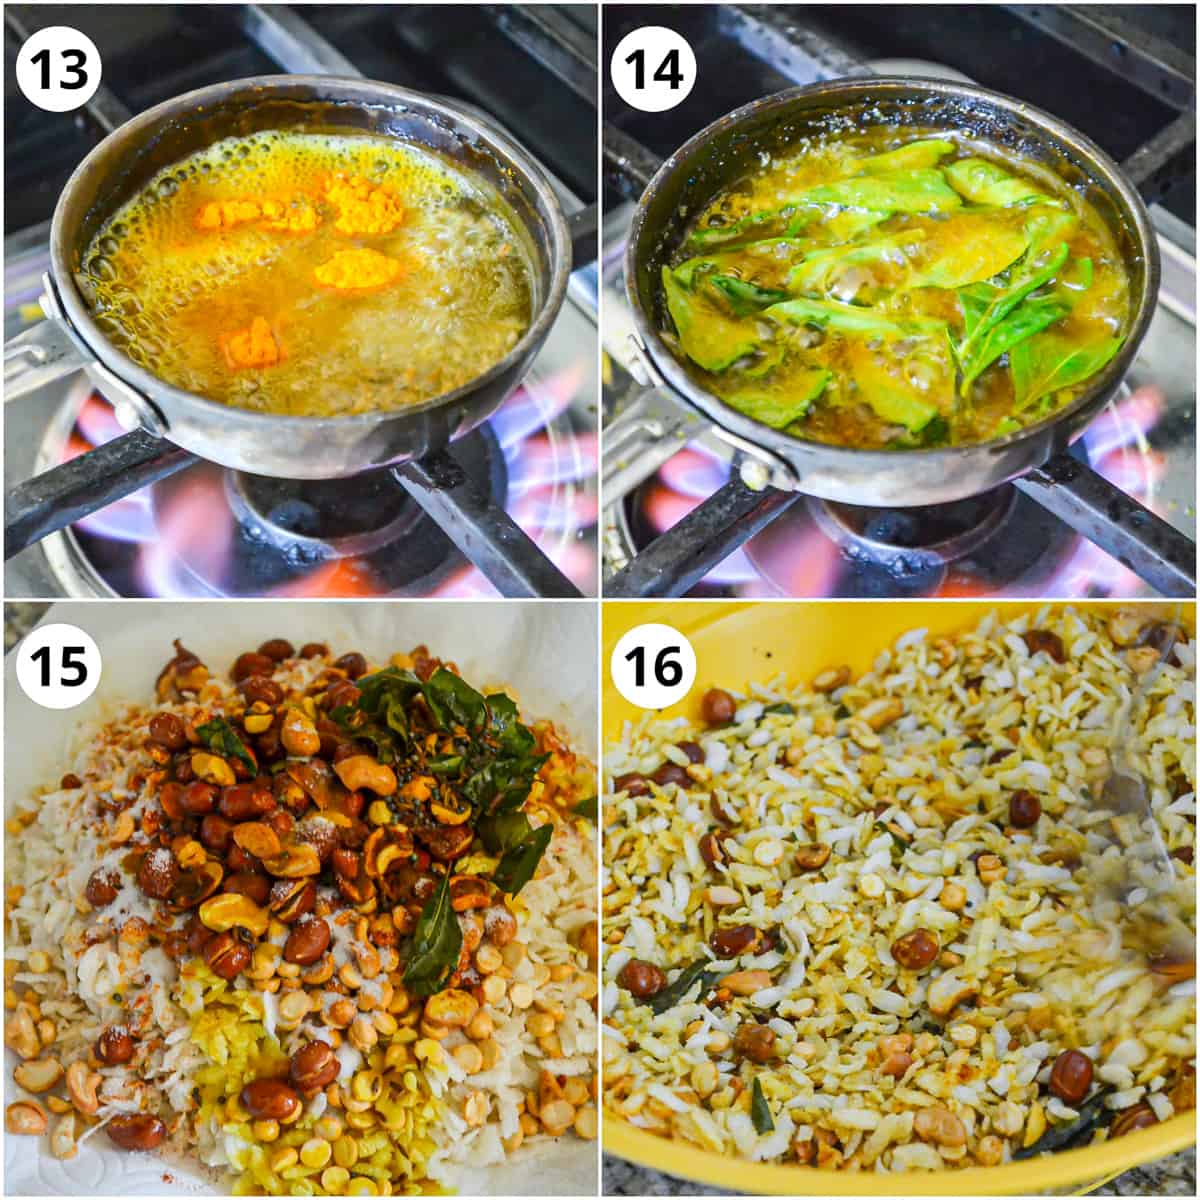
15 and 16 - Add this Tadka tempering to the poha in the bowl and give it a good mix so that everything is well combined.
Let it cool and come to room temperature at which you can store this in an airtight container.
Baking
To make thick poha chivda in the oven, line a baking tray with parchment paper or foil.

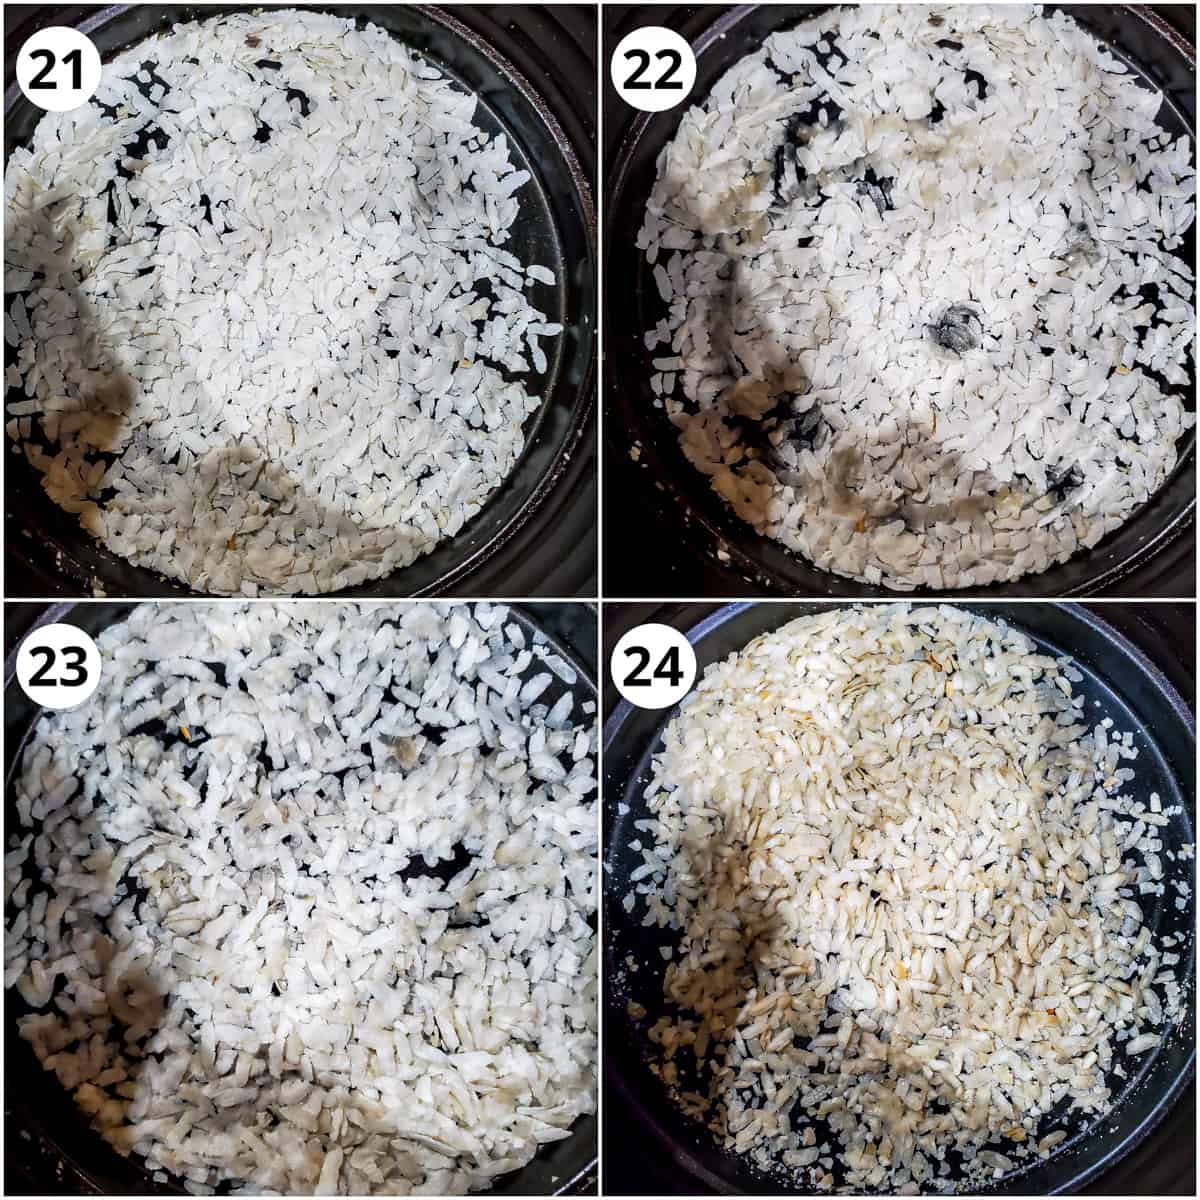
17 - Add thick poha to the lined baking tray. Work with 1 to 1.5 cups or as much the baking tray can hold at a time without overcrowding. So you will need to bake poha in multiple batches. I baked mine in two.
18 - Drizzle some oil (about 1 tbsp).
19 - Mix well so the oil is evenly distributed and spread into an even layer.
20 - Bake at 350°F for 15 mins stir/mix after 5mins. Remove from the oven and allow to sit in the pan for 5-10 mins which should help them crisp up further.
Bake at 350°F - cashew for 10-12 mins, peanuts for 15-20 mins and dalia for 20 to 25 mins or until crisp.
Follow the same steps as mentioned for tadka (steps 9-16) in deep-frying section.
Air frying
To make thick poha chivda in the air fryer I add the poha in the main basket and don't use the grill pan.
21 - Work with half to 1 cup or as much the air fryer tray can hold at a time without overcrowding. Air fry in multiple batches.
22 and 23 - Drizzle some oil (1 tsp) and mix well so the oil is evenly distributed. spread into an even layer.
24 - Air fry at 370°F for 5-7 mins or until crisp. Shake it up once.
Remove and allow to sit in the air fryer for 5 min. That should crisp them further. Repeat for the remaining poha.
Air fry at 370°F - cashew for 2 mins, peanuts for 3-5 mins and dalia for 5-7 mins or until crisp.
Follow the same steps as mentioned for tadka (steps 9-16) in deep-frying section.
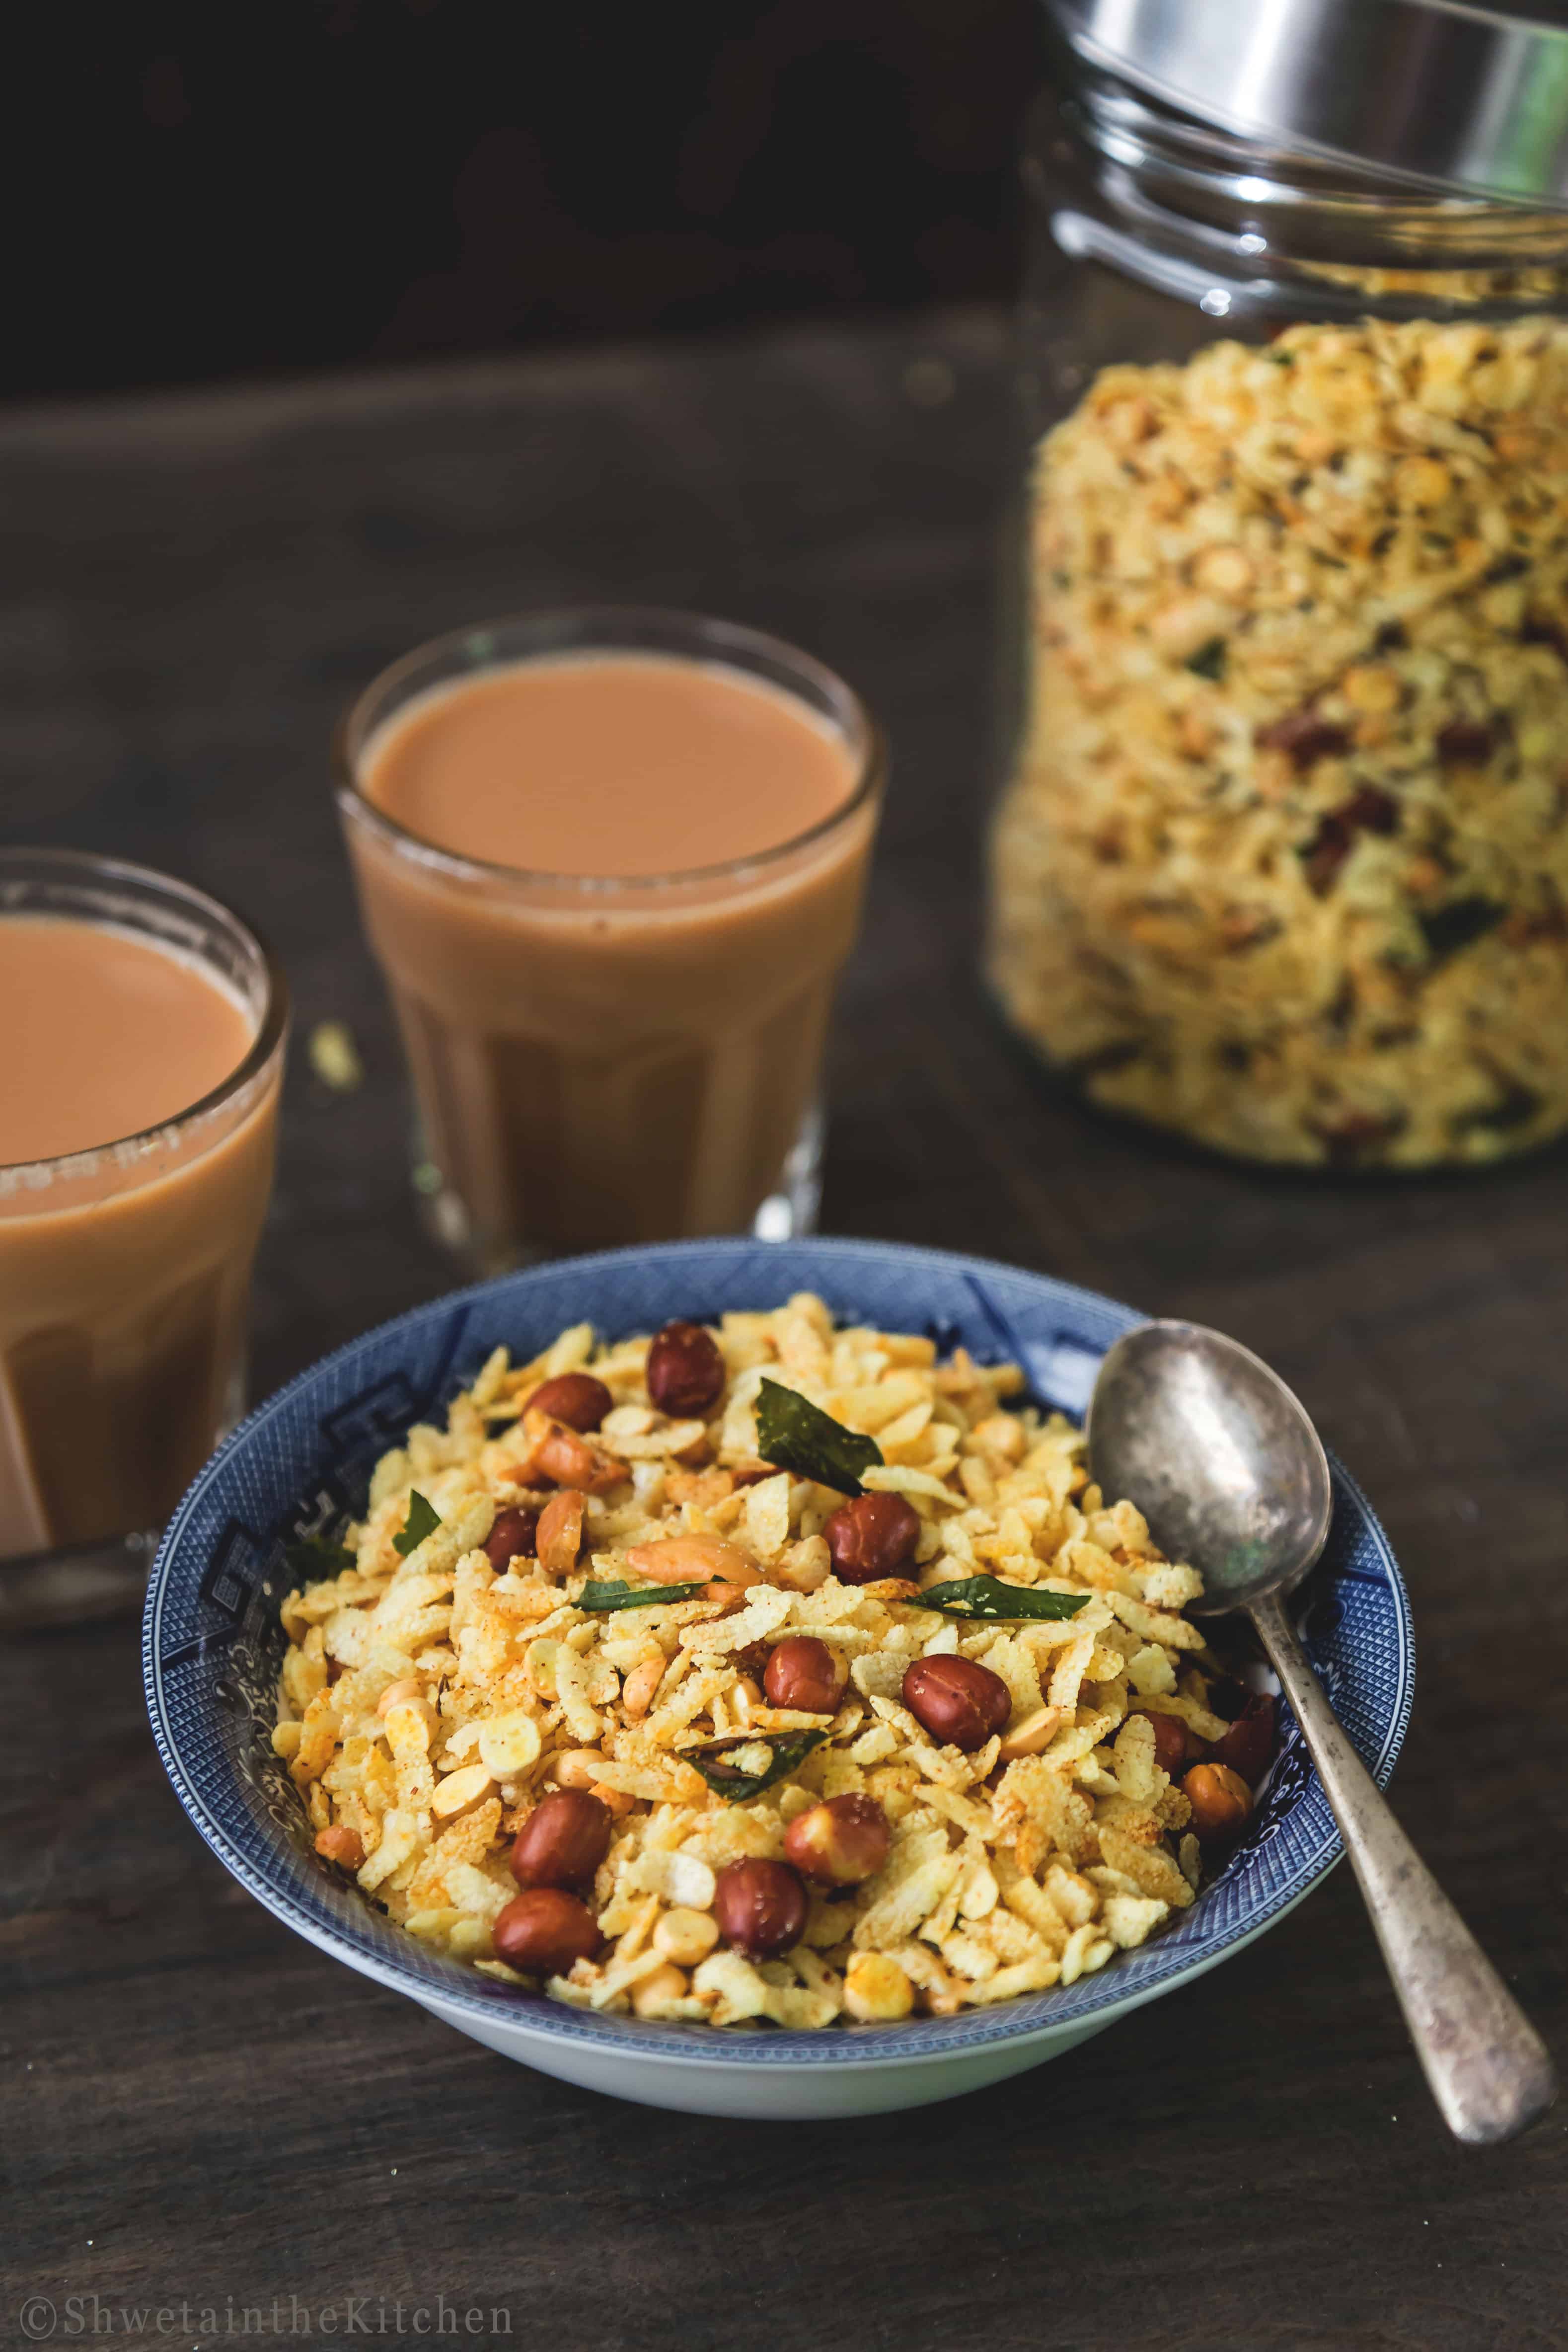
Our crunchy and spicy Poha Chivda is ready! Serve it as a side with your evening tea. Enjoy!
Recipe tips and notes
- Have all the ingredients ready and portioned especially while deep frying as the process goes really fast if you have them ready!
- Deep fry or bake or air fry each ingredient separately before mixing together. Each one has a different cooking time so mixing and frying/roasting will not yield the best results.
- Use a fine sieve to fry the poha and other ingredients. It truly makes the frying and draining process easy and quick. Also helps even roasting as you are not scrambling to get those leftover bits out which brown more as a result.
- If you don't have a sieve, just add the poha to oil and drain using a slotted spatula.
- Don't skip the sugar, it balances and brings all the flavors together.
- I've used peanuts with the skin but you can use without skin too.
- If in rush, use store-bought roasted cashews and peanuts. Saves time as you don't have to fry or bake them.
- You can also add coconut flakes and raisins to this poha chivda. I don't prefer to add it so I skipped them. Fry them along with nuts one after the other. The raisins will plump up.
- Don't add red chili powder to the tadka as it burns very quickly.
FAQ's
Yes, to make thick poha chivda without frying you can either bake in oven or air fry the poha.
It is important to note that with both these methods, the poha will not expand like during the deep-frying method. Rather it may shrink a bit. It will also brown a little but turns out more crunchy almost like the thin poha chivda.
To make Poha chivda healthy, skip deep frying, and use the bake or air fry method. They use less oil in comparison to deep frying. Eating in moderation is the key here.
Poha chivda can be stored in airtight container at room, temperature and can easily last for up-to a month.
More Diwali Snacks:
Hope you enjoy this Thick Poha Chivda as much as we do!! If you give this recipe a try, we did love to hear your feedback ❤️ Please rate by clicking stars ⭐️in the recipe card. Thank you! You can also find me on Facebook Instagram Pinterest
Recipe Card

Poha Chivda
Ingredients
- 3 cups thick poha
- ¾ cup peanuts
- ¾ cup dalia roasted gram/chana
- ½ cup cashews roughly chopped
- 1-2 teaspoon red chilli powder adjust to taste
- 2 tablespoon sugar
- ¾ teaspoon salt adjust to taste
- Groundnut Oil for frying, as needed
For tempering:
- 2-3 tablespoon oil
- 1 teaspoon mustard seeds rai
- 1 teaspoon cumin seeds zeera
- ¼ teaspoon asafoetida hing
- ½ teaspoon turmeric powder
- 10-15 fresh curry leaves
Want to save this recipe?
Instructions
Deep fry Method:
- In a Kadhai, or wok heat sufficient oil until hot. Test the readiness by adding a few poha flakes, they should immediately sizzle to the top. That's when you know the oil is ready.
- Now using a sieve that can comfortably fit in your wok start frying. Also line a plate with paper towel and have it ready!
- Begin with Poha, add about ½ cup at a time to the sieve and fry until they expand and get crunchy, a minute or less approximately. Do not brown them.
- Remove from oil and hold above the wok for few seconds to drain the access oil. Transfer to the paper towel-lined plate.
- Repeat the avove steps for frying the remaining poha.
- Similarly fry the peanuts, dalia, and cashews and remove them onto the same plate as poha.
- Let it cool and come to room temperature at which you can store this in airtight container.
Baking (using oven)
- Preheat oven to 350°D and line a baking tray with parchment paper or foil.
- Add thick poha to the lined baking tray. Work with 1 to 1.5 cups or as much the baking tray can hold at a time without overcrowding. Bake poha in multiple batches. I baked mine in two.
- Drizzle some oil (about 1 tbsp). Mix well so the oil is evenly distributed and spread into an even layer.
- Bake at 350°F for 15 mins stir/mix after 5mins. Remove from the oven and allow to sit in the pan for 5-10 mins which should help them crisp up further.
- Bake at 350°F - cashew for 10-12 mins, peanuts for 15-20 mins and dalia for 20 to 25 mins or until crisp.
Using Air-fryer
- Add the poha in the main basket and don't use the grill pan. Work with half to 1 cup or as much the air fryer tray can hold at a time without overcrowding. So you will have to air fry in multiple batches.
- Drizzle some oil (1 tsp) and mix well so the oil is evenly distributed. spread into an even layer.
- Air fry at 370°F for 5-7 mins or until crisp. Shake it up once.
- Remove and allow to sit in the air fryer for 5 min. That should crisp them further. Repeat for the remaining poha.
- Air fry at 370°F - cashew for 2 mins, peanuts for 3-5 mins and dalia for 5-7 mins or until crisp.
For Tempering:
- While all these fried/baked things are still warm add the salt, sugar and red chilli powder to them. You can either transfer to a bowl or on the same plate and stir to combine.
- Heat oil in a small pan and once hot add the mustard seeds.
- When they begin to splutter add the cumin seeds, asafoetida, turmeric powder and curry leaves.
- Mix and take it off the flame once the curry leaves are crispy.
- Add to the Poha Chivda mixture.
Notes
- Deep fry or bake or air fry each ingredient separately before mixing together. Each one has a different cooking time so mixing and frying/roasting will not yield the best results.
- Use a fine sieve to fry the poha and other ingredients. It truly makes the frying and draining process easy and quick.
- If you don't have a sieve, just add the poha to oil and drain using a slotted spatula.
- Don't skip the sugar, it balances and brings all the flavors together.
- I've used peanuts with the skin but you can use without skin too.
- If in rush, use store-bought roasted cashews and peanuts. Saves time as you don't have to fry or bake them.
- You can also add coconut flakes and raisins to this poha chivda. I don't prefer to add it so I skipped them. Fry them along with nuts one after the other. The raisins will plump up.
- Don't add red chili powder to the tadka as it burns very quickly.


Ks says
Is the photograph of deep fried version or baked version?
Shweta Arora says
Deepfried