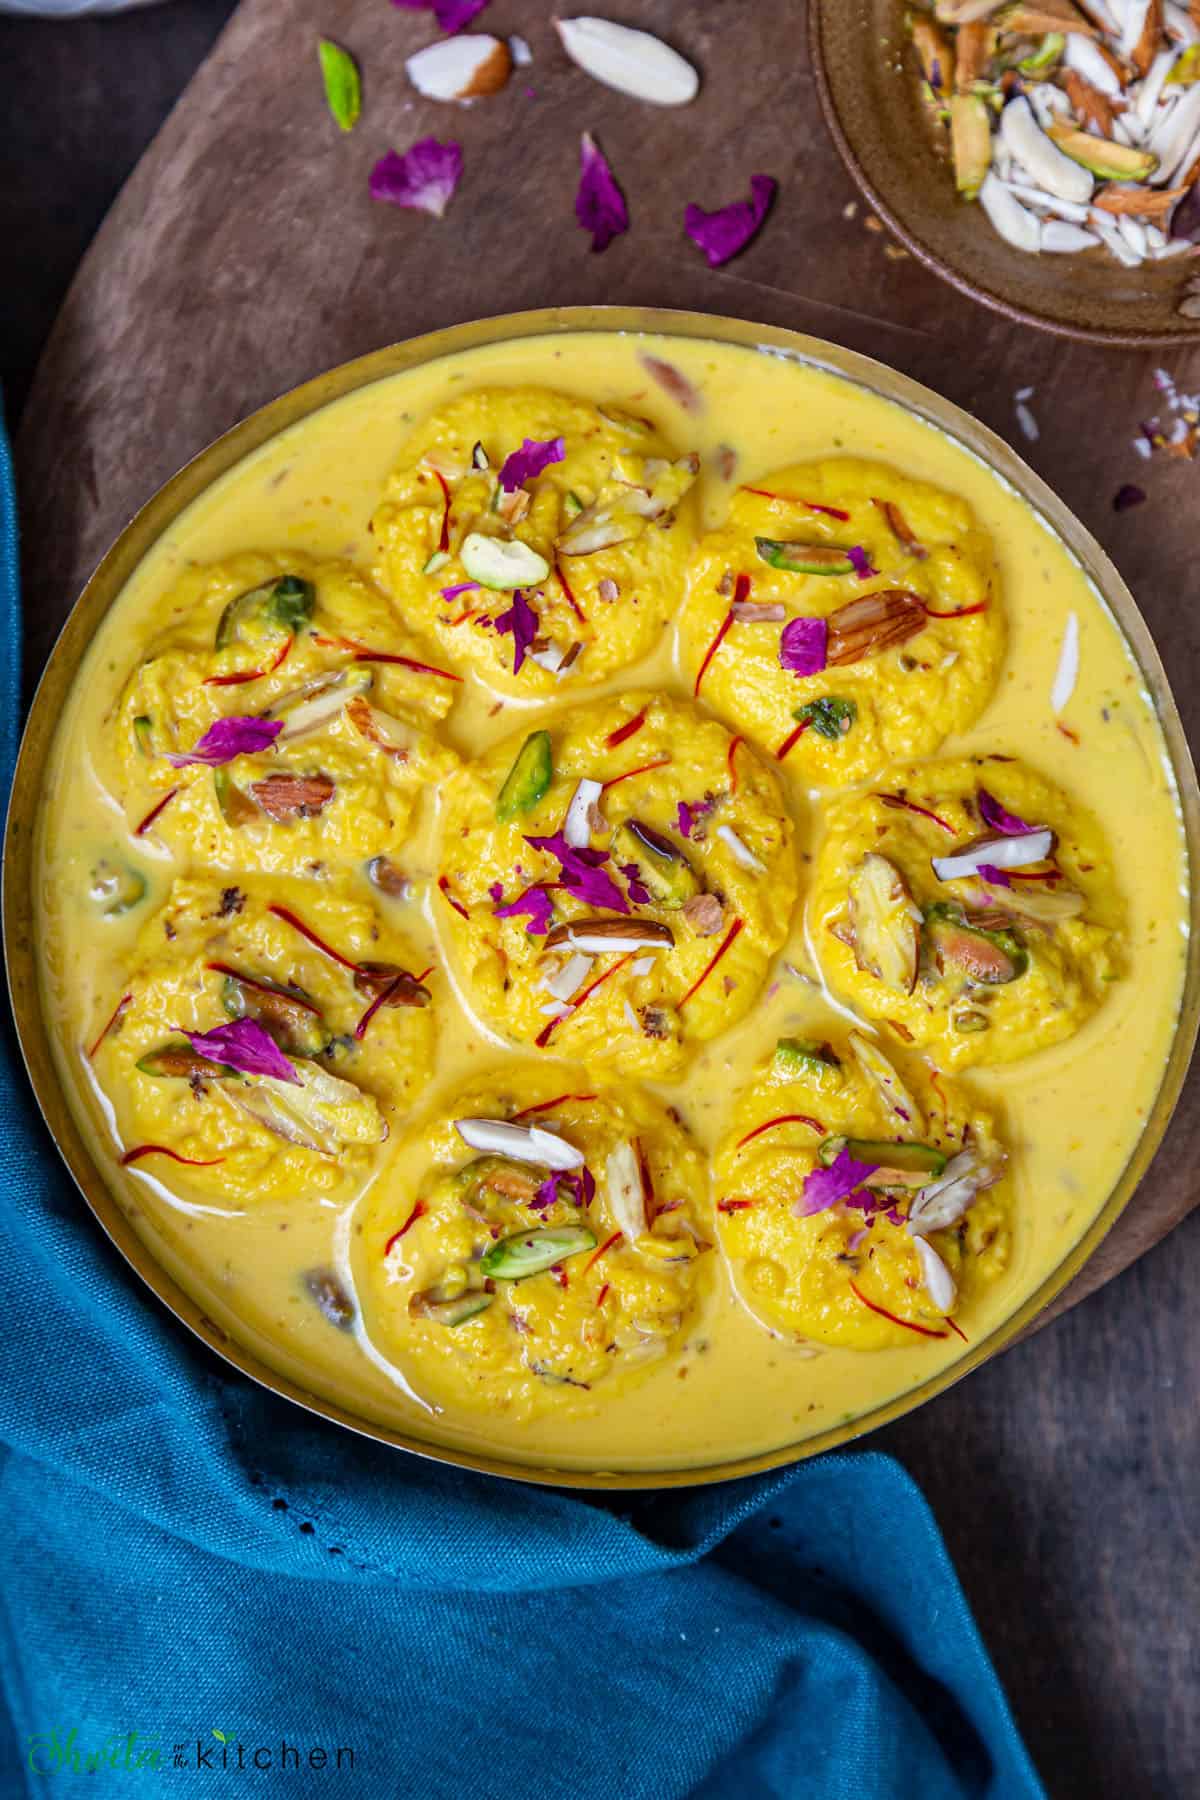
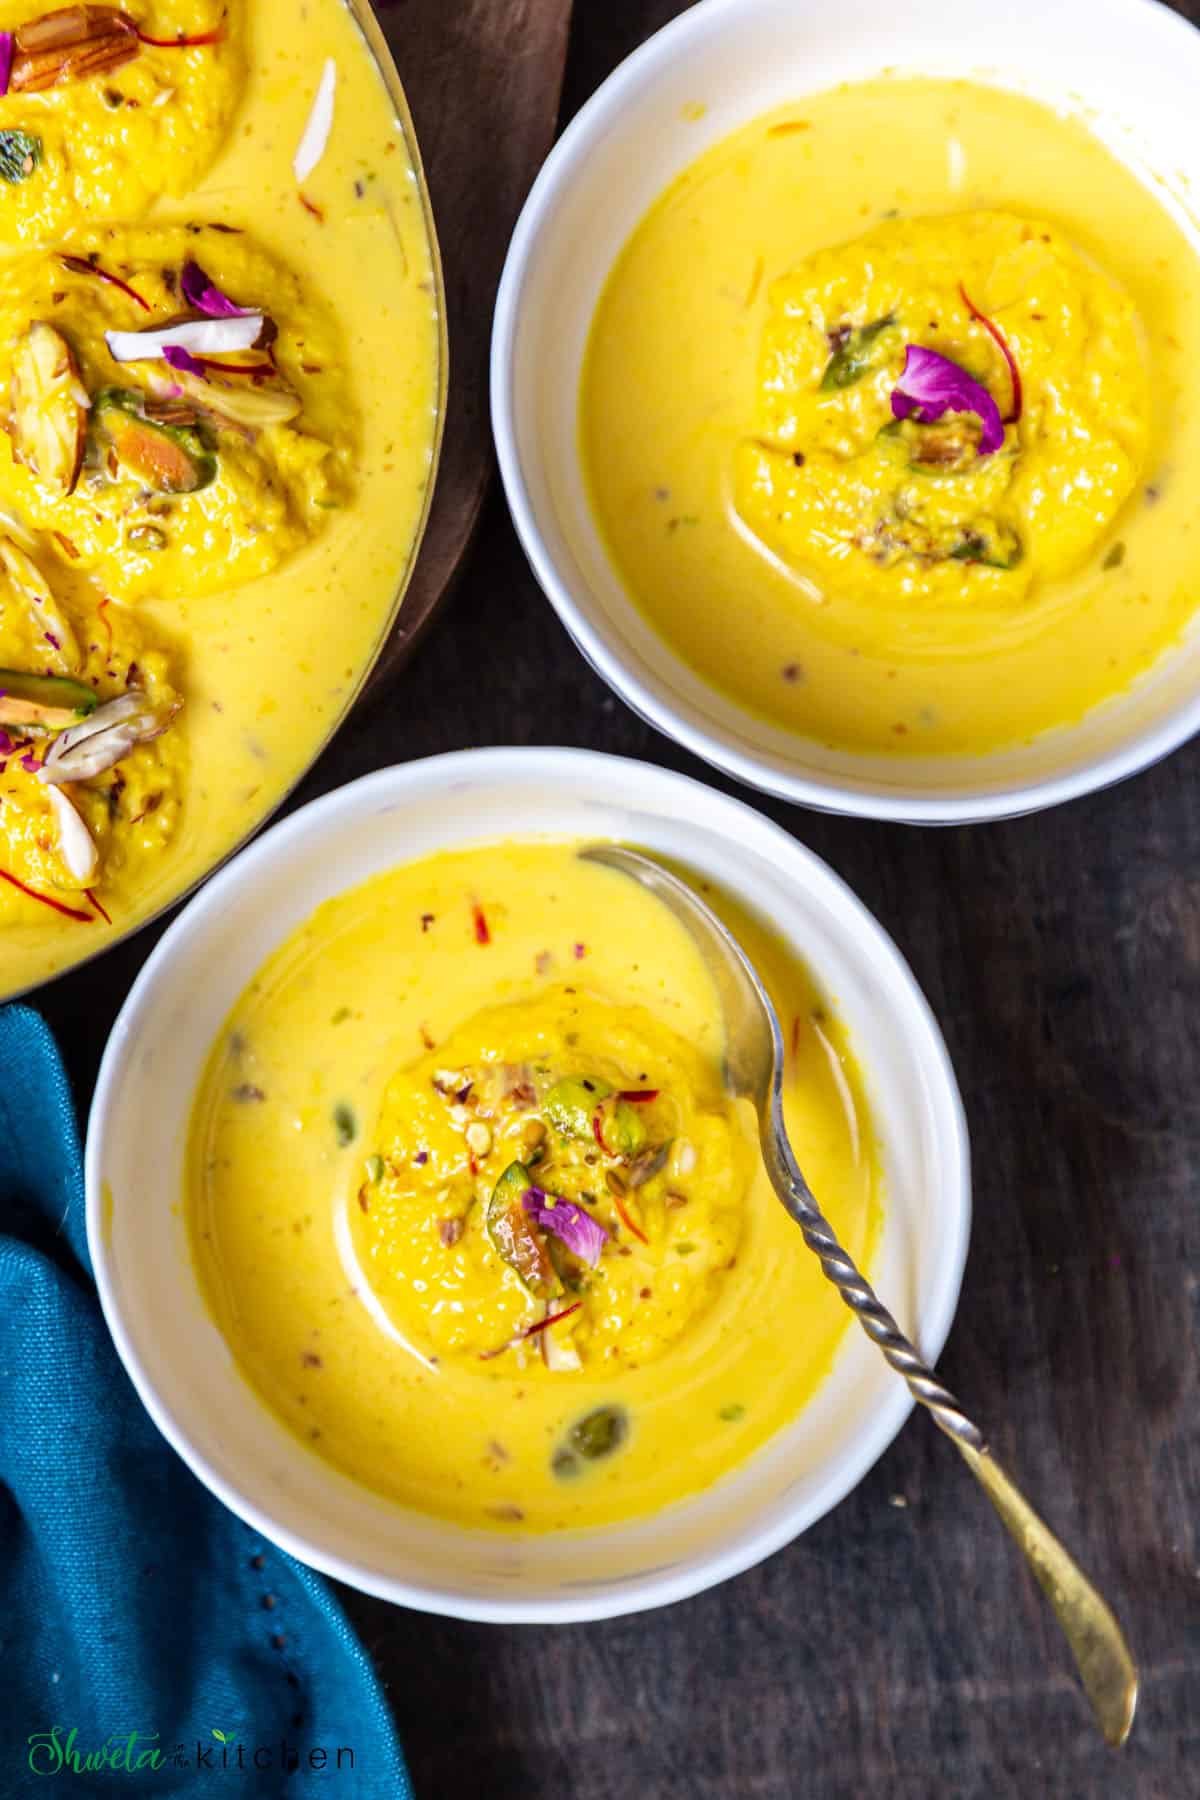
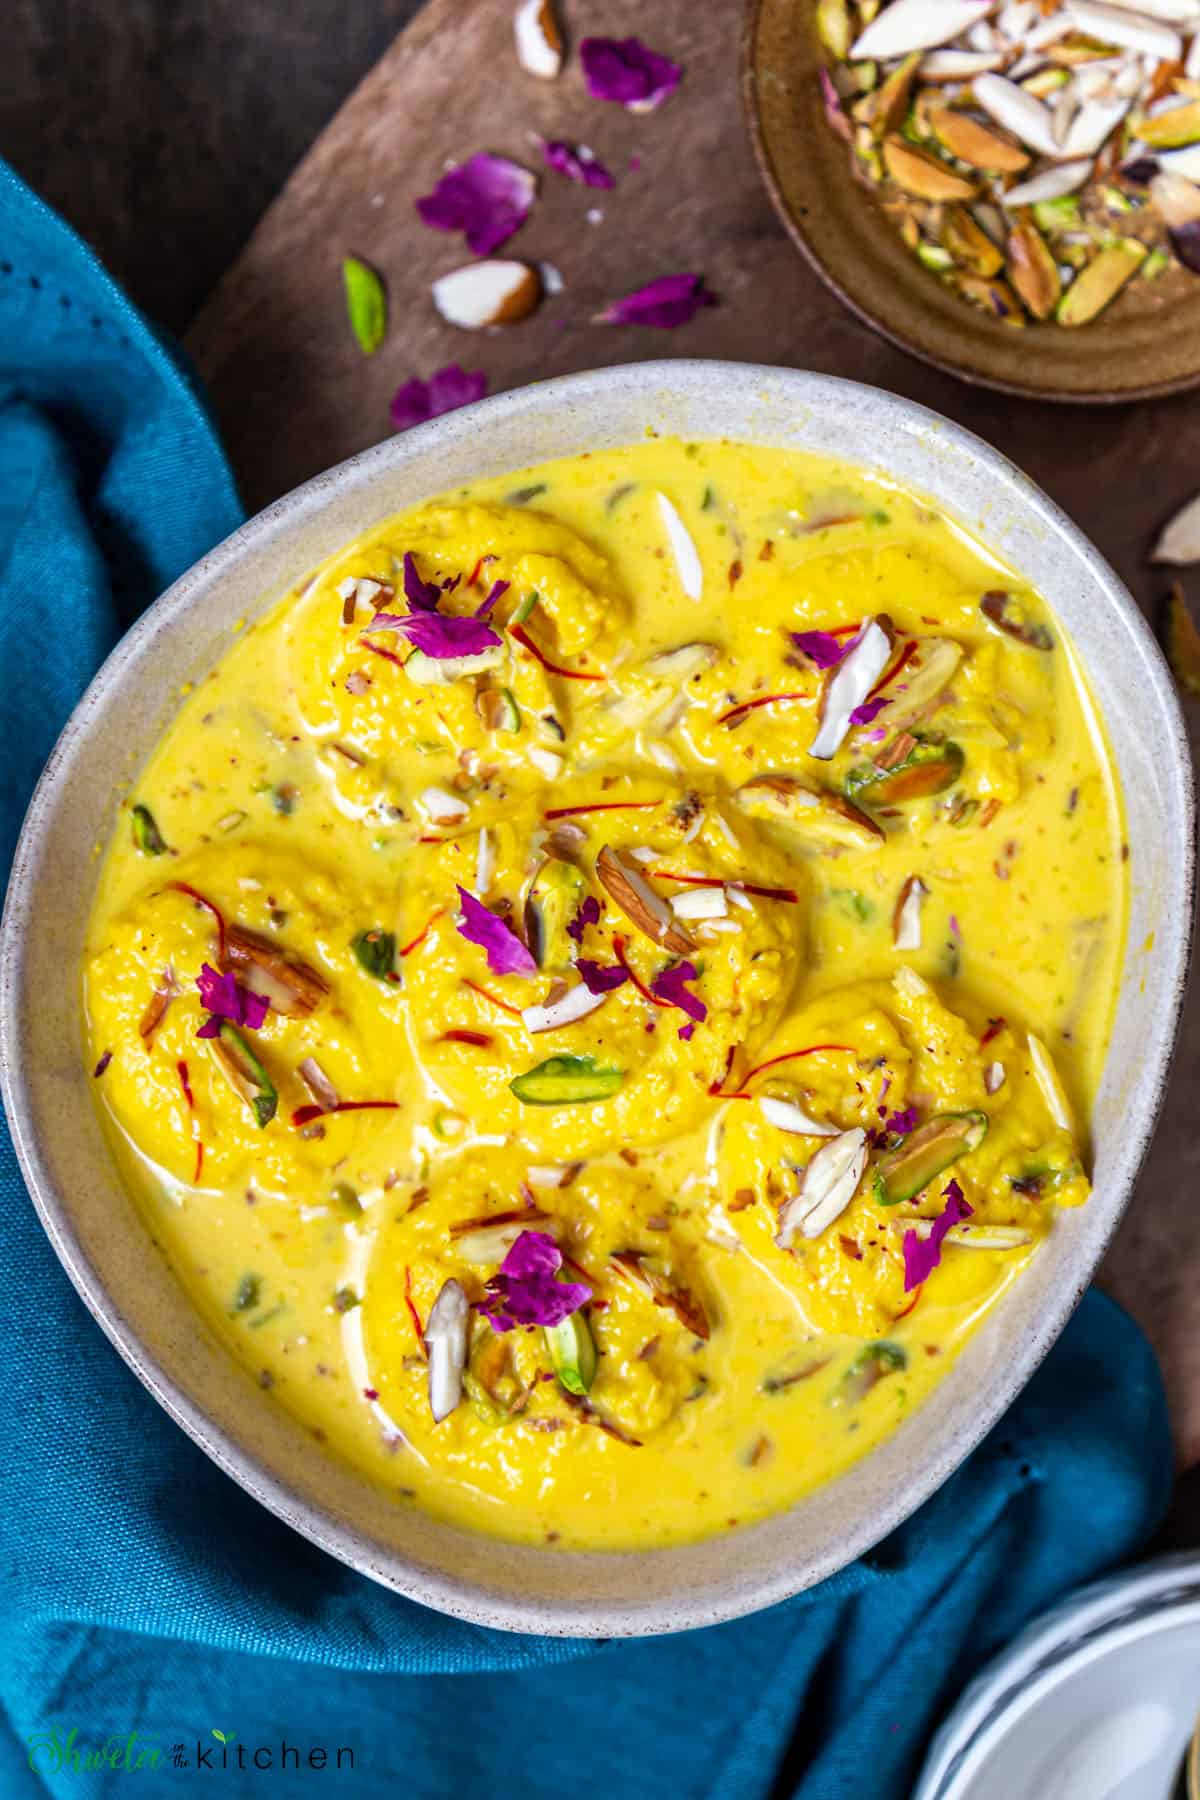
Rasmalai is a popular Indian dessert made from soft melt in mouth flattened paneer balls soaked in a thickened sweetened milk flavored with cardamom, saffron, and garnished with nuts.
In this post, sharing step by step method to make delicious soft homemade Rasmalai the traditional way on the stovetop and easy one with Instant Pot
Want to save this recipe?
Rasmalai has been a favorite dessert these days as the kids love the combination of soft paneer balls soaked in sweetened milk and those crunchy dry fruits.
Also it easy to make ahead and store in the fridge making it so convenient during festivals.
I'm not a big dessert fan but honestly, it's hard to stop eating these, they are that delicious!!
This post might seem a little long as I've tried to include all the details for stovetop and Instant pot both with tips, and hacks.
You don't need a lot of ingredients to make it but getting the right texture of the chenna is very important for that soft rasmalai. So please read all the tips before you make it.
Hope it helps to make that perfect rasmalai in the first go!!
What is Rasmalai
Rasmalai is also known as Rossomalai, Roshmolai, Rasamalei, and is a popular Bengali dessert.
Ras means juice and malai mean cream but this recipe is definitely more than that.
It is made of two components, the soft flattened and sweetened rasmalai balls and the sweetened thickened milk called ras also known as Rabdi or rabri.
The rasmalai balls are made by curdling the milk with vinegar or lemon juice to make "chenna" or "paneer" (milk solids separated from whey).
This drained paneer is then shaped into flat round balls and cooked in sugar syrup. They puff and expand on soaking the liquid.
These chenna balls in sugar syrup on its own is a delicacy called Rasgulla.
To make the ras (thickened milk), boil the milk until it's almost half and then sweeten it with sugar and flavor with cardamom and saffron.
The saffron in addition to flavor gives an amazing yellow color to the milk.
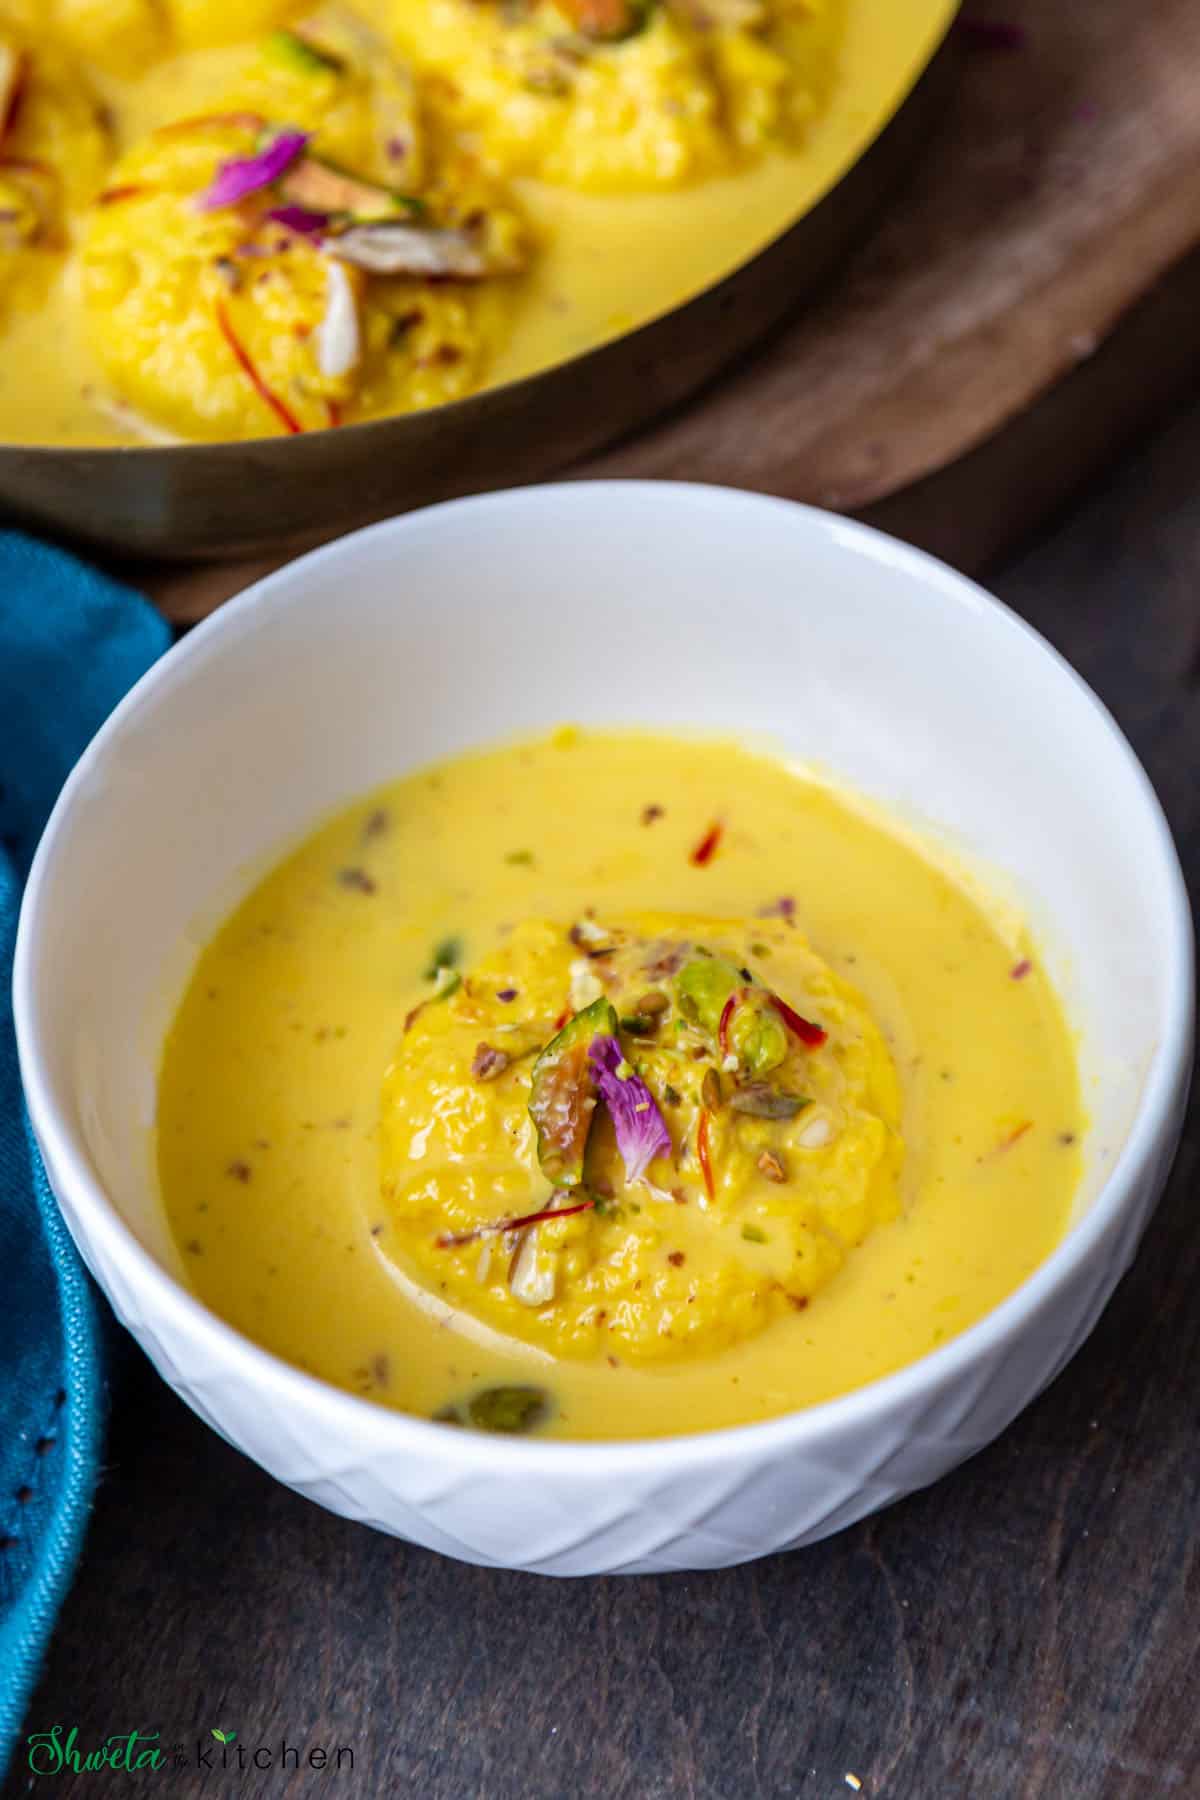
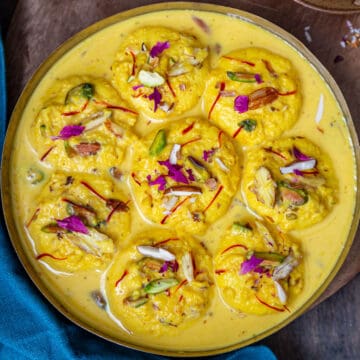
The juicy paneer balls are squeezed and dunked into the warm milk. They soak up the ras and turn melt in the mouth soft and delicious!!
Rasmalai is further garnished with nuts for that added texture and crunch. I also like to add dry rose petals for that added depth of flavor.
The ras or rabdi on its own is another delicacy so basically, we are combining two desserts to make one! Now that ought to be double delicious right!!
No wonders its served for special occasions, festivals, celebrations, and from local mithai (sweet shops) to high end restaurants.
Easy Rasmalai
Sometimes when we want to make rasmalai but don't have time or just simply feel lazy, here are a few shortcuts that will still yield delicious melt in mouth results .
- Use store-bought paneer instead of making chenna (paneer) from scratch.
- To make it even quicker, use store-bought rasgulla, squeeze them, and add to the warm thickened milk (ras). Saves the effort for making paneer and boiling in sugar syrup. All you have to do is make rabdi.
- Use evaporated milk in place of whole milk to achieve quicker results for thickened milk.
- Instead of cooking in sugar syrup, pressure cook paneer balls in milk directly in the Instant Pot. I've shared the details for how I make rasmalai in the Instant pot below.
Recipe Ingredients
For the ras malai balls
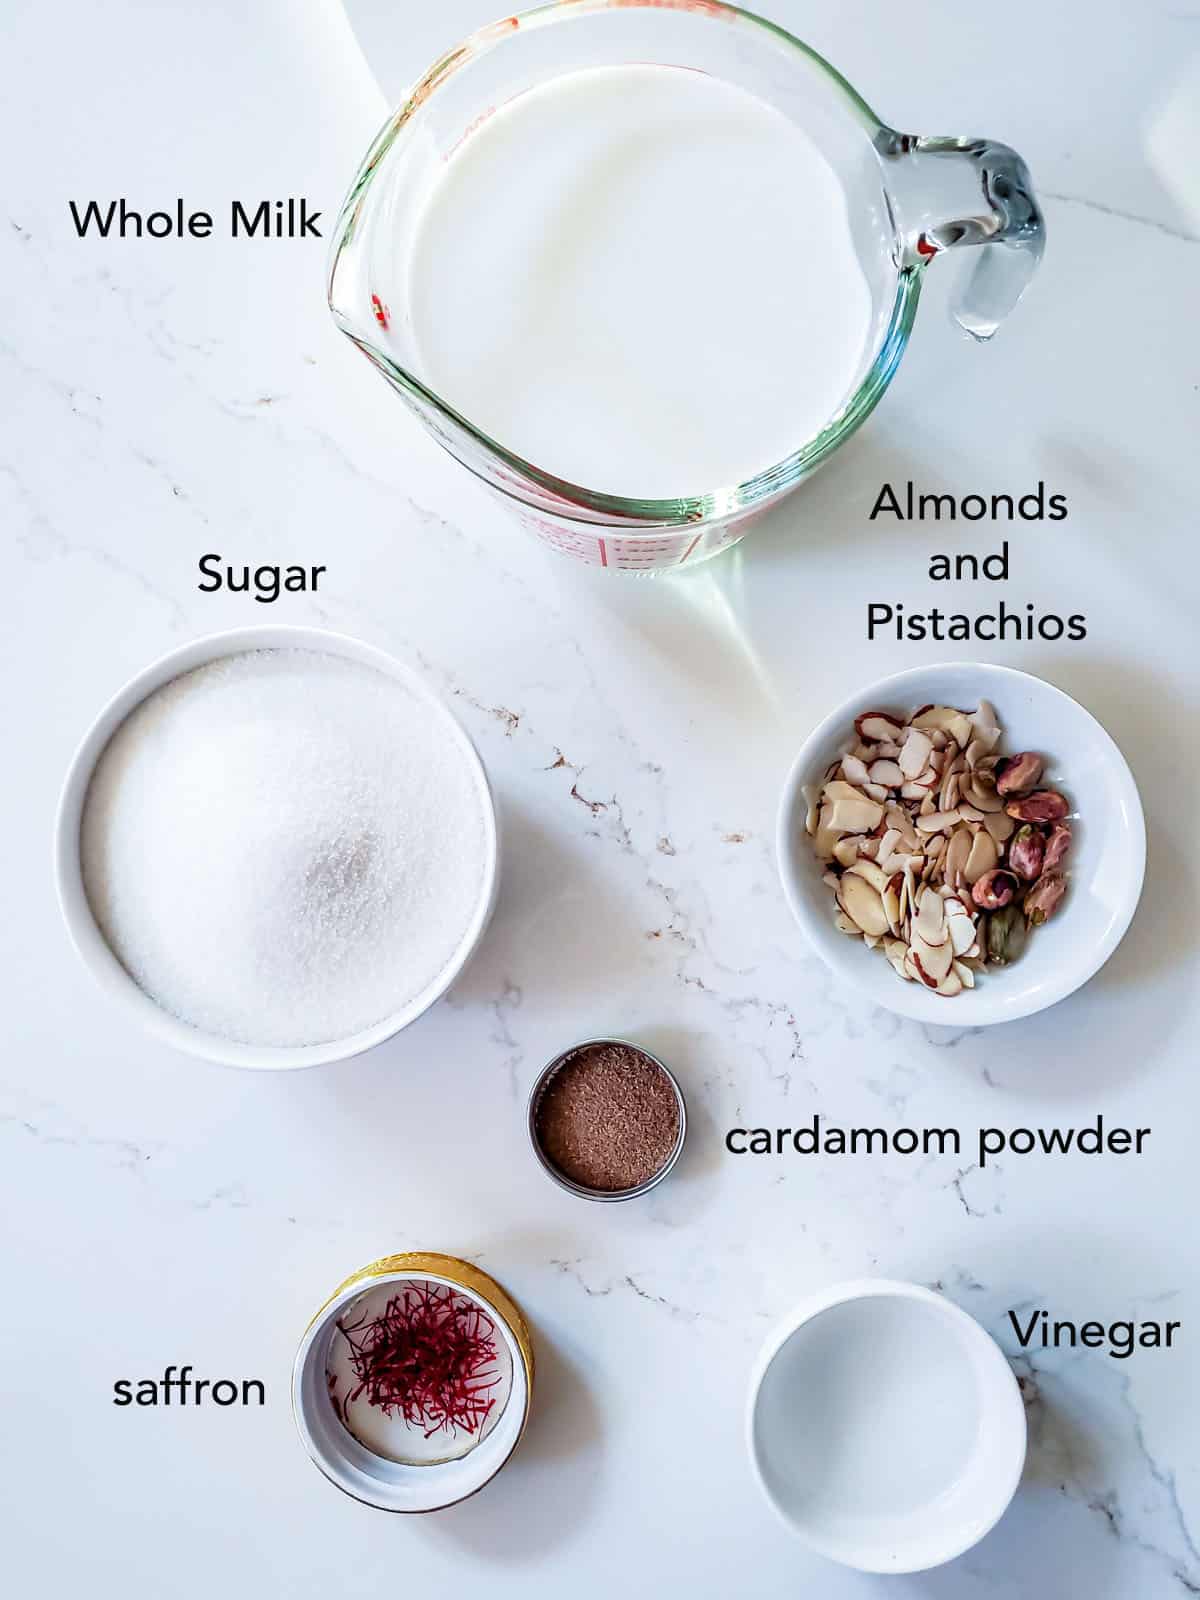
- Milk - use whole full-fat milk for best results. Low fat or skim milk will not work well.
- Vinegar or lemon juice - for curdling the milk
- Sugar and water - for the sugar syrup
For the thickened milk (ras)
- Milk - use full-fat whole milk or evaporated milk for cutting time
- Flavor - cardamom powder and saffron. Saffron along with flavor adds great color too so use good quality and a generous pinch. Rosewater can be used too.
- Sweetener - Sugar or condensed milk for a richer flavor. I prefer using a 50:50 ration for the best flavor
- Nuts - Sliced almonds and pistachios. dry rose petals add a nice subtle flavor and make such a great garnish.
Step by Step Method (stove top)
For Rasmalai balls
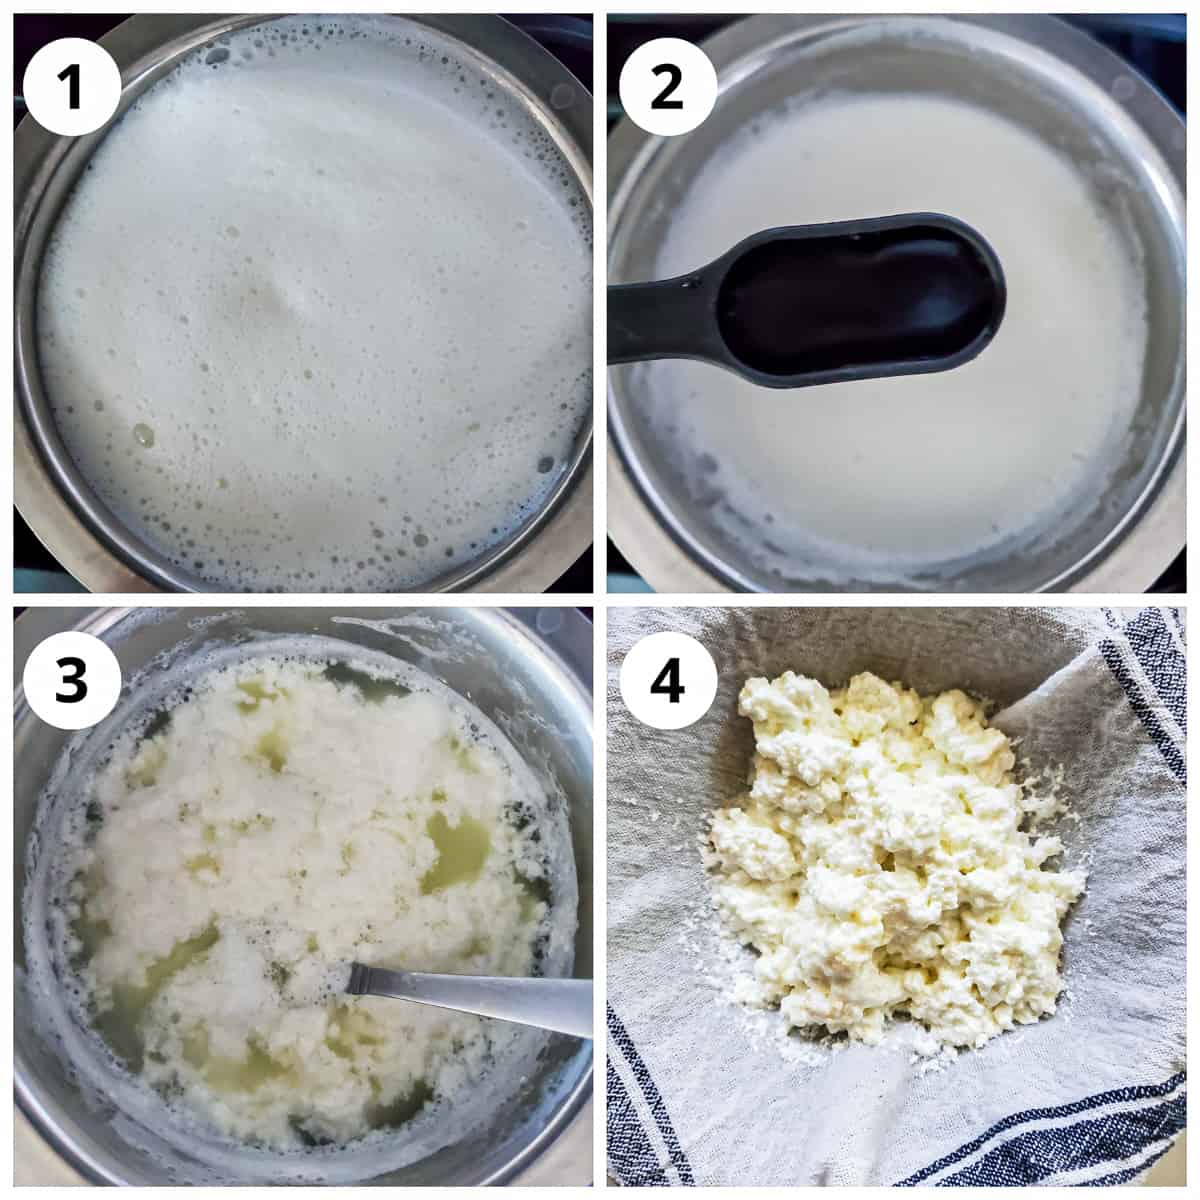
1 - In a thick bottom vessel, bring the milk to a boil stirring in between to avoid it sticking to the pan.
2 and 3 - Lower the heat, and add vinegar 1 tablespoon at a time and mix until you see all the milk has curdled (you see a clean greenish liquid, whey remaining). I used 3 tablespoon vinegar.
4 - Immediately add the ice cubes to stop any further cooking and line a muslin cloth to a strainer. Filter the whey out collecting the curdled milk in the muslin cloth.
Run some fresh water over it and rinse for a couple of times to get rid of the sour taste from the vinegar/lemon juice.
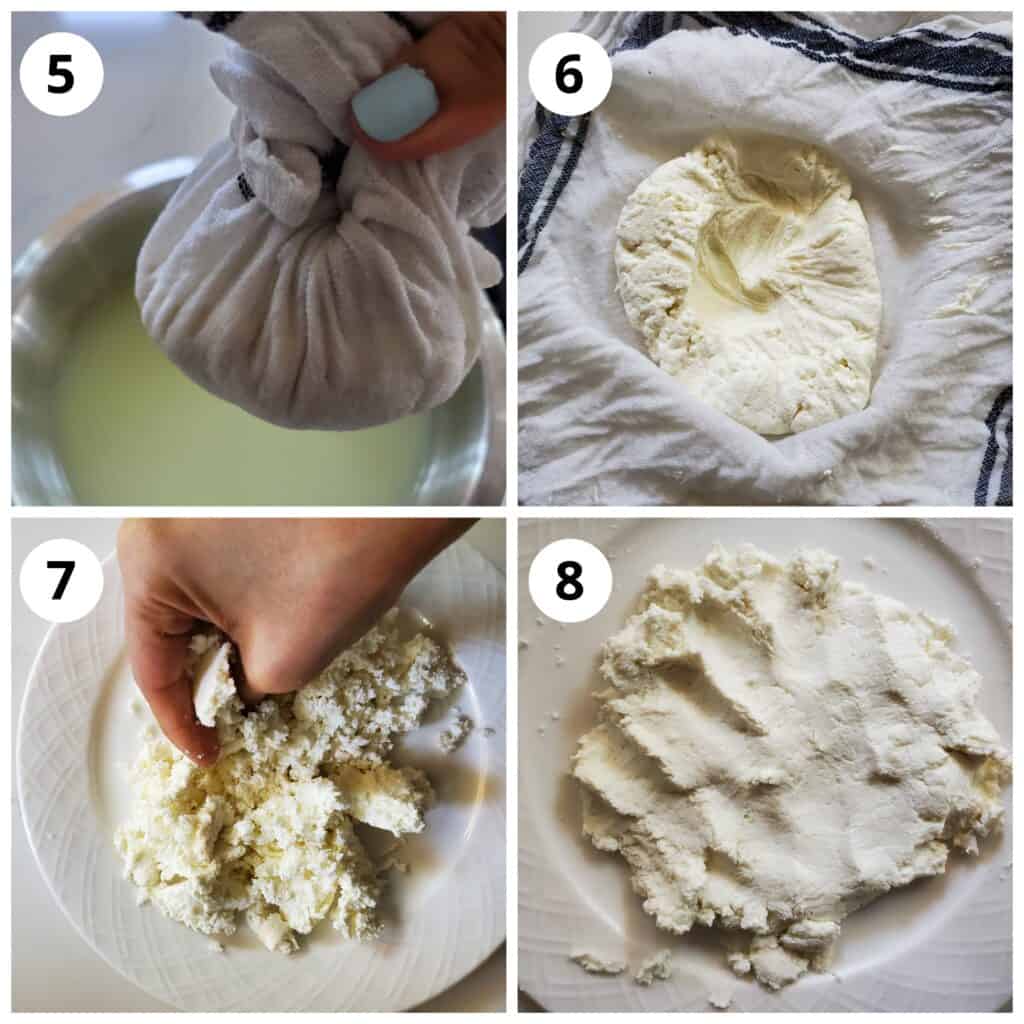
5 - Now gather the ends of cloth together and squeeze the liquid out as much as possible and hang it for 20-30 mins to drain the liquid further.
Note: We are looking for a chenna that is soft with no dripping water. We don't want it to be completely dry but not too wet either.
6 - Open the knot and transfer the block of paneer to a plate or bowl.
Hack - To cut time you can skip steps 1 to 6 and use store-bought paneer.Just make sure its soft and at room temperature.
7 and 8 - Crumble and knead with your palms for about 5-7 mins until it forms a smooth dough. Do not over-knead.
Alternately you can also knead it in a food processor, pulse for a minute or less. It will turn from crumby grainy to smooth and lump up on one side. Remove on to a clean plate.
The paneer is ready when it is smooth and soft and does not stick to your hand.
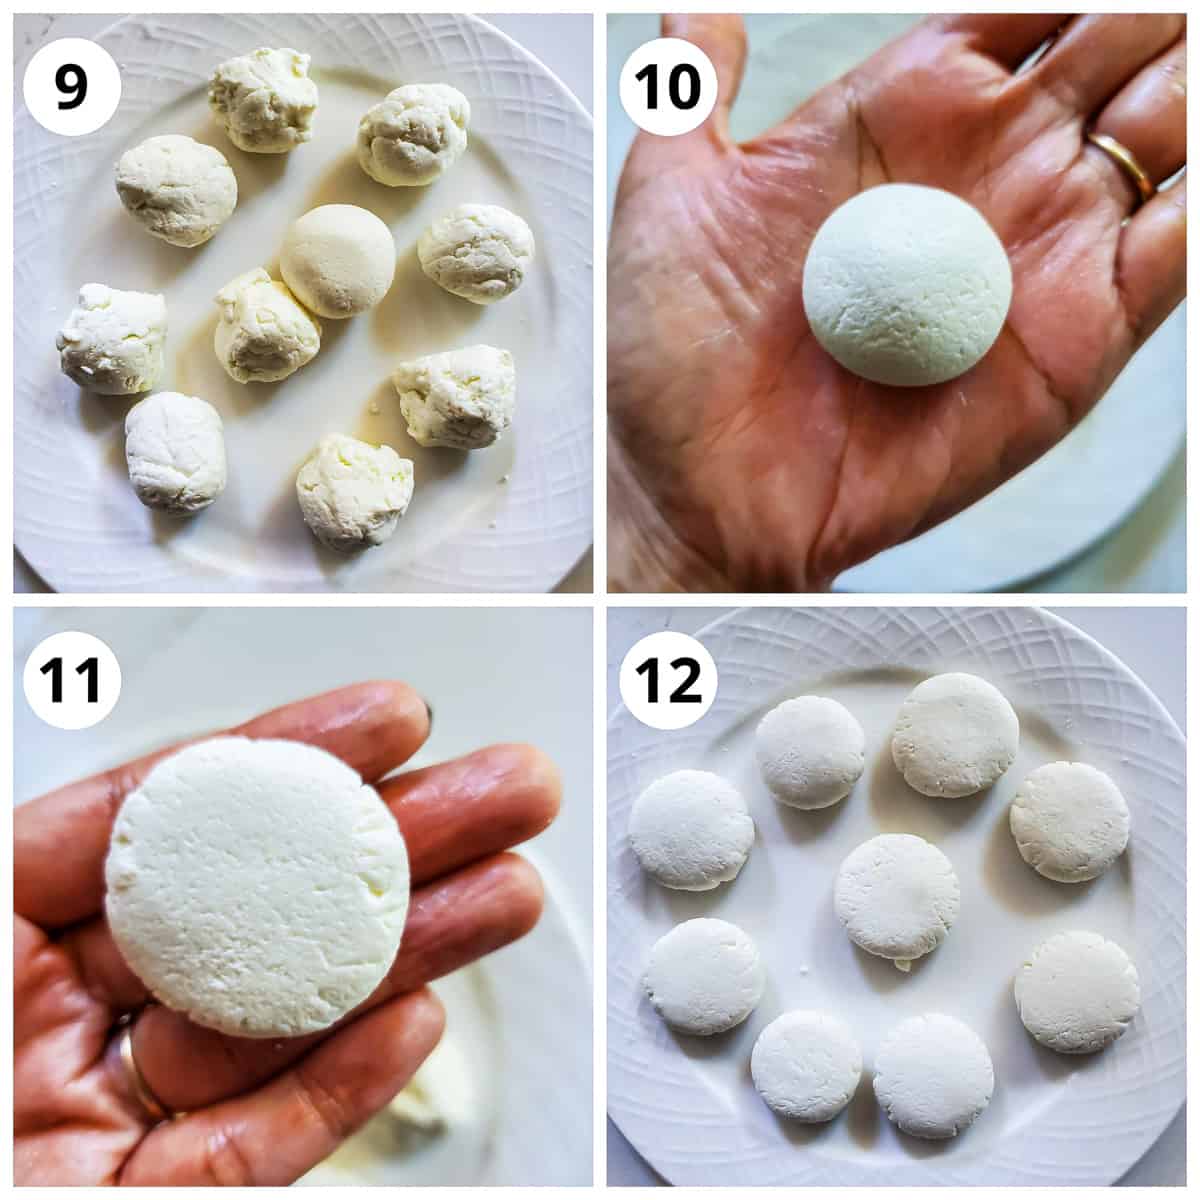
9 to 11 - Divide into 10 portions, roll into ball apply some pressure to knead into a smooth ball, and flatten them slightly to shape.
12 - Make all the balls in a similar manner. They should be smooth without cracks. Fill in any cracks you may see. Keep aside.
Soaking in sugar syrup
In another pan get the water and sugar mixture to a rolling boil.
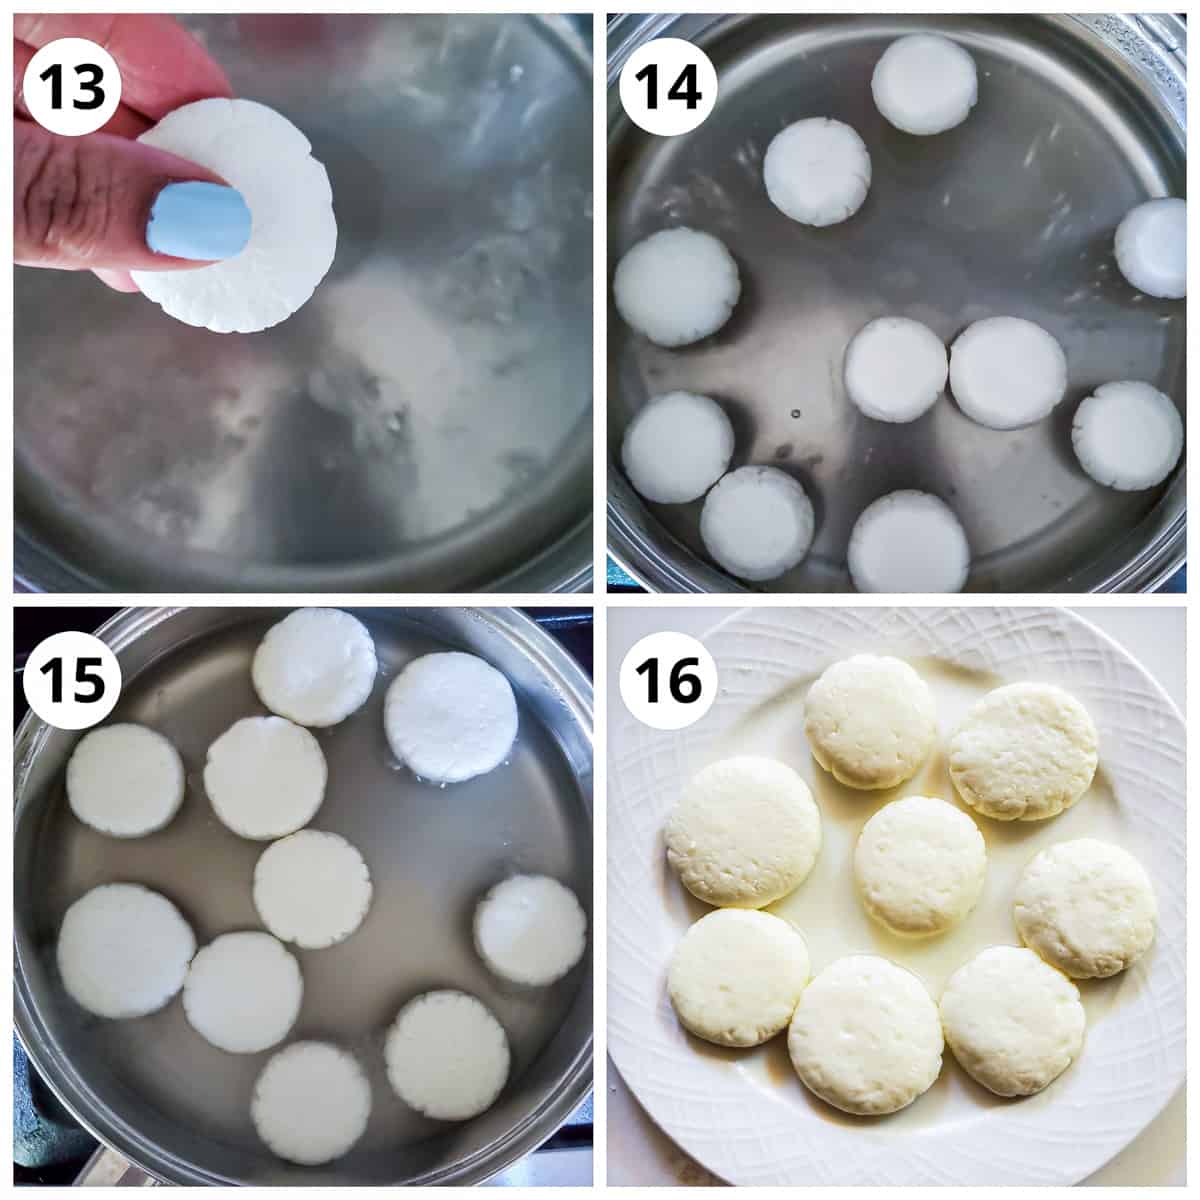
13 and 14 - Add these chenna balls gently in it and close the lid. Add only as much the pan can hold since the balls will expand. Do it in batches if required.
15 - Let these boil on high for 10 mins and you will see they absorb the liquid and expand in size.
16 - Turn off the heat and allow them to rest in the syrup for 30 mins. Remove them and let them cool. Keep covered.
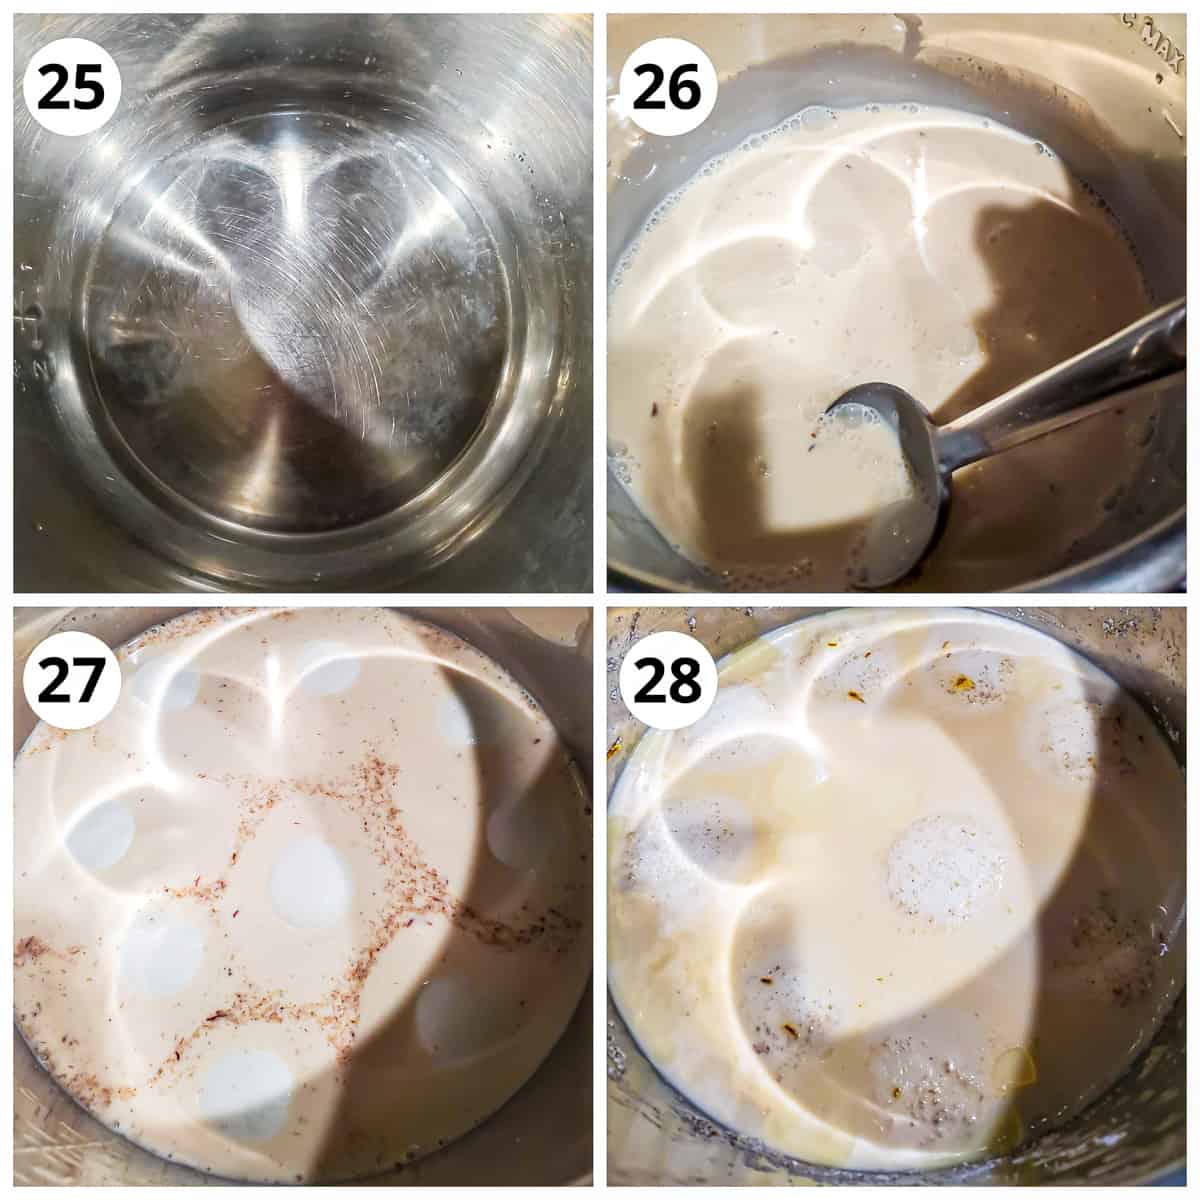
For making thickened milk (ras)
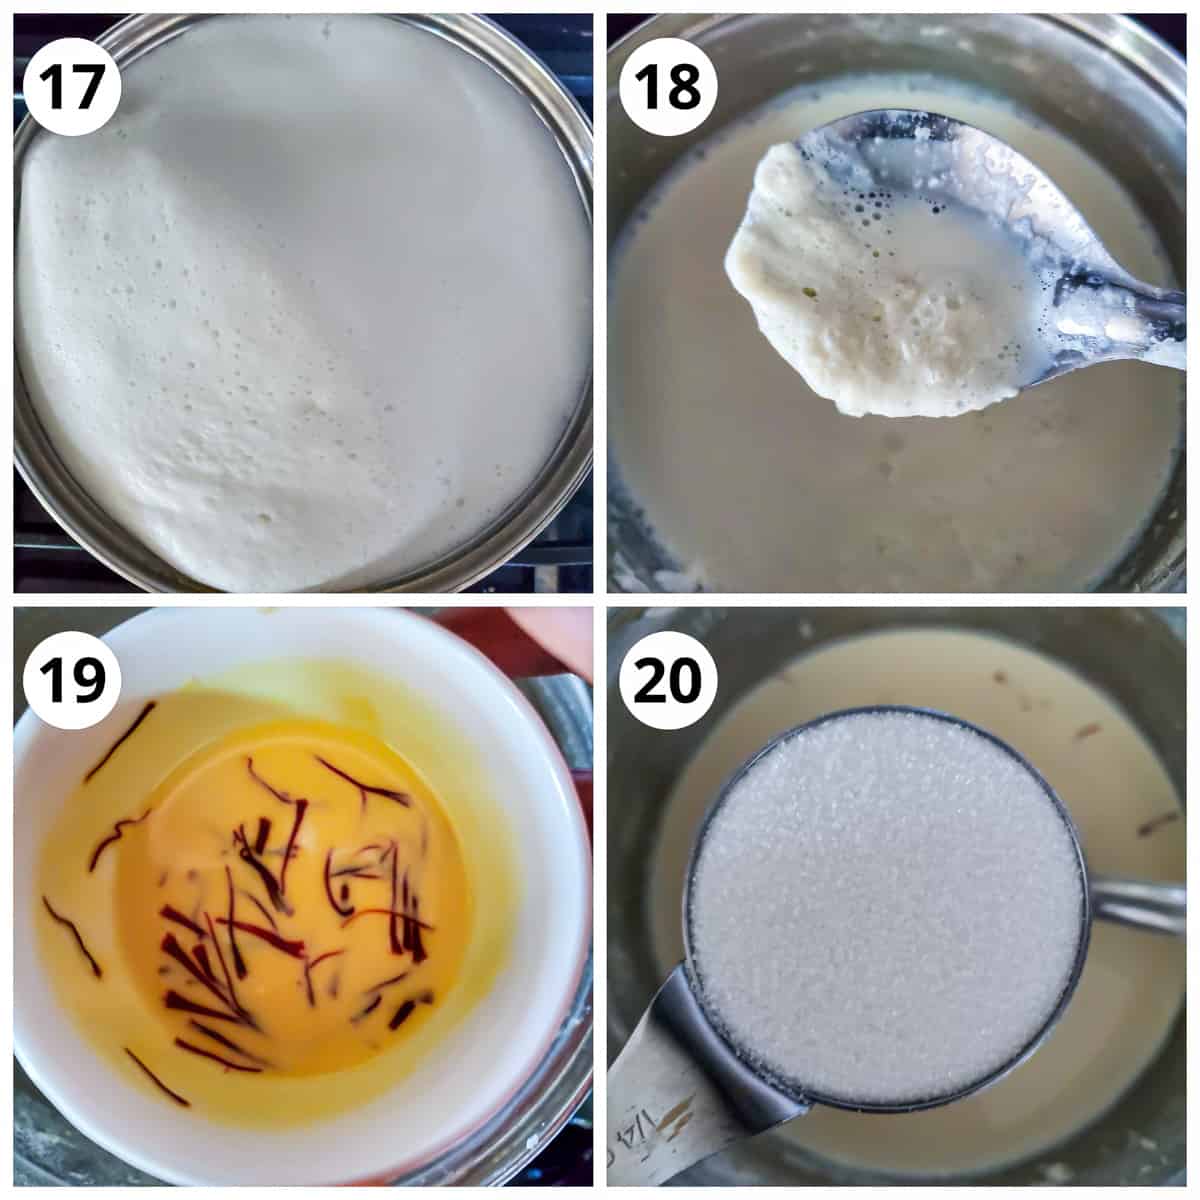
17 - In a thick bottom nonstick vessel, get milk to a boil stirring in between to avoid sticking to the pan.
Take 2 tablespoons of boiled milk and add it to another bowl with saffron threads, mix well and allow the saffron to soak.
18 - Lower the heat and simmer milk, stirring intermittently. Keep scraping the sides and layer of cream (malai) that is formed over the milk.
Mix it back into the milk and repeat this process until the milk has reduced and thickened (almost half).
The scraped cream (malai) mixed in milk adds a lot of texture to the milk so dont miss that. It's my favorite part of Rabdi.
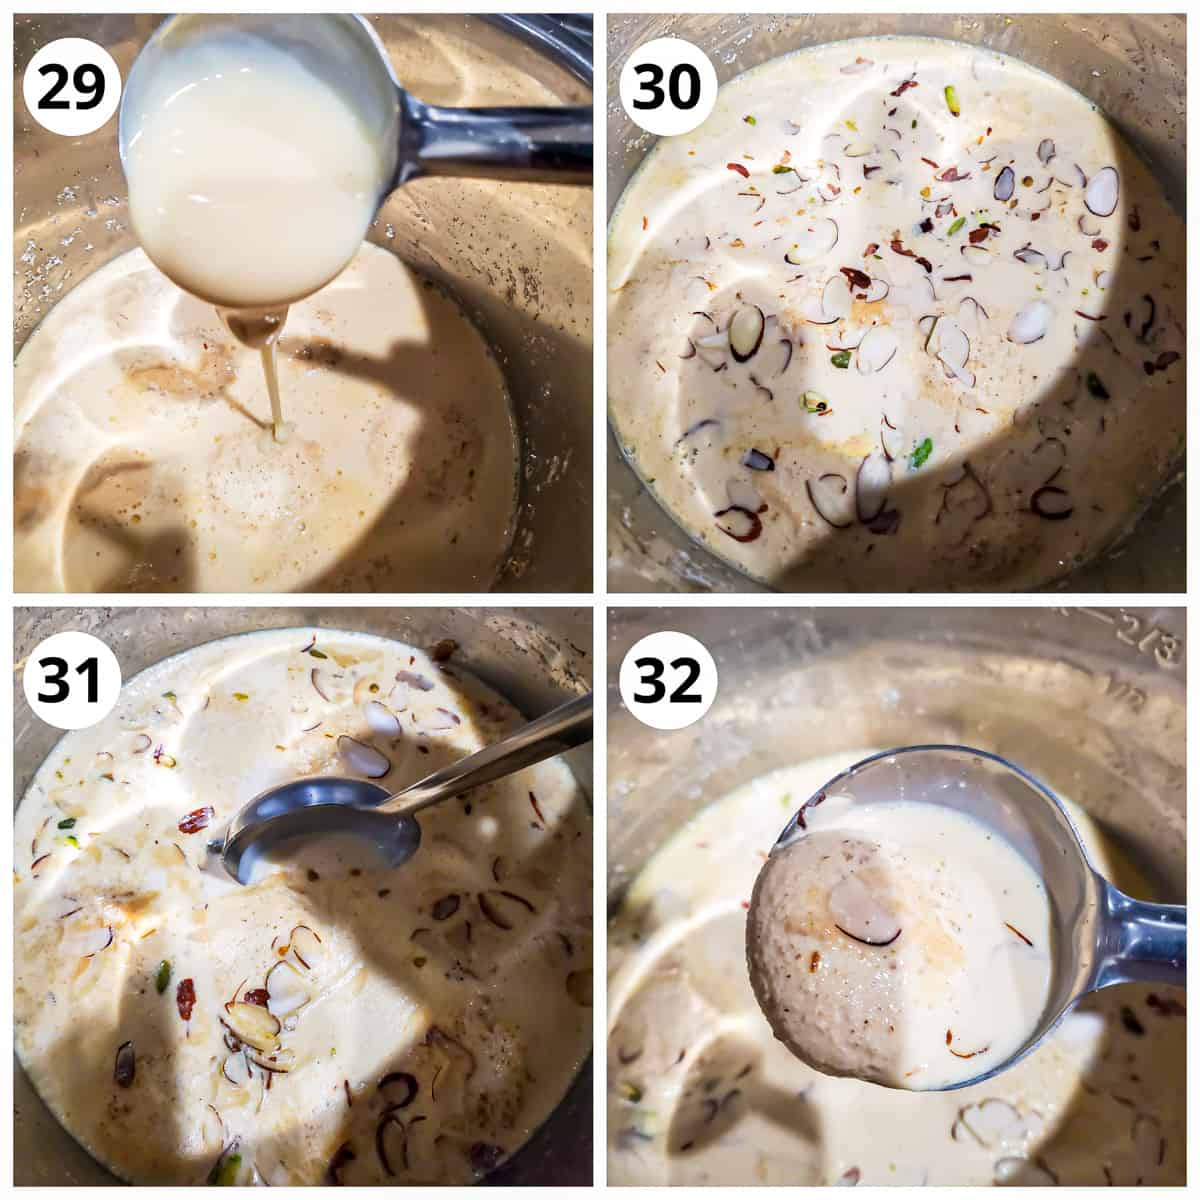
19 -21 - Add saffron mixed in warm milk along with sugar cardamom powder and nuts and simmer for another 5 mins. The milk will turn yellow due to the saffron addition. Turn the heat off at this point.
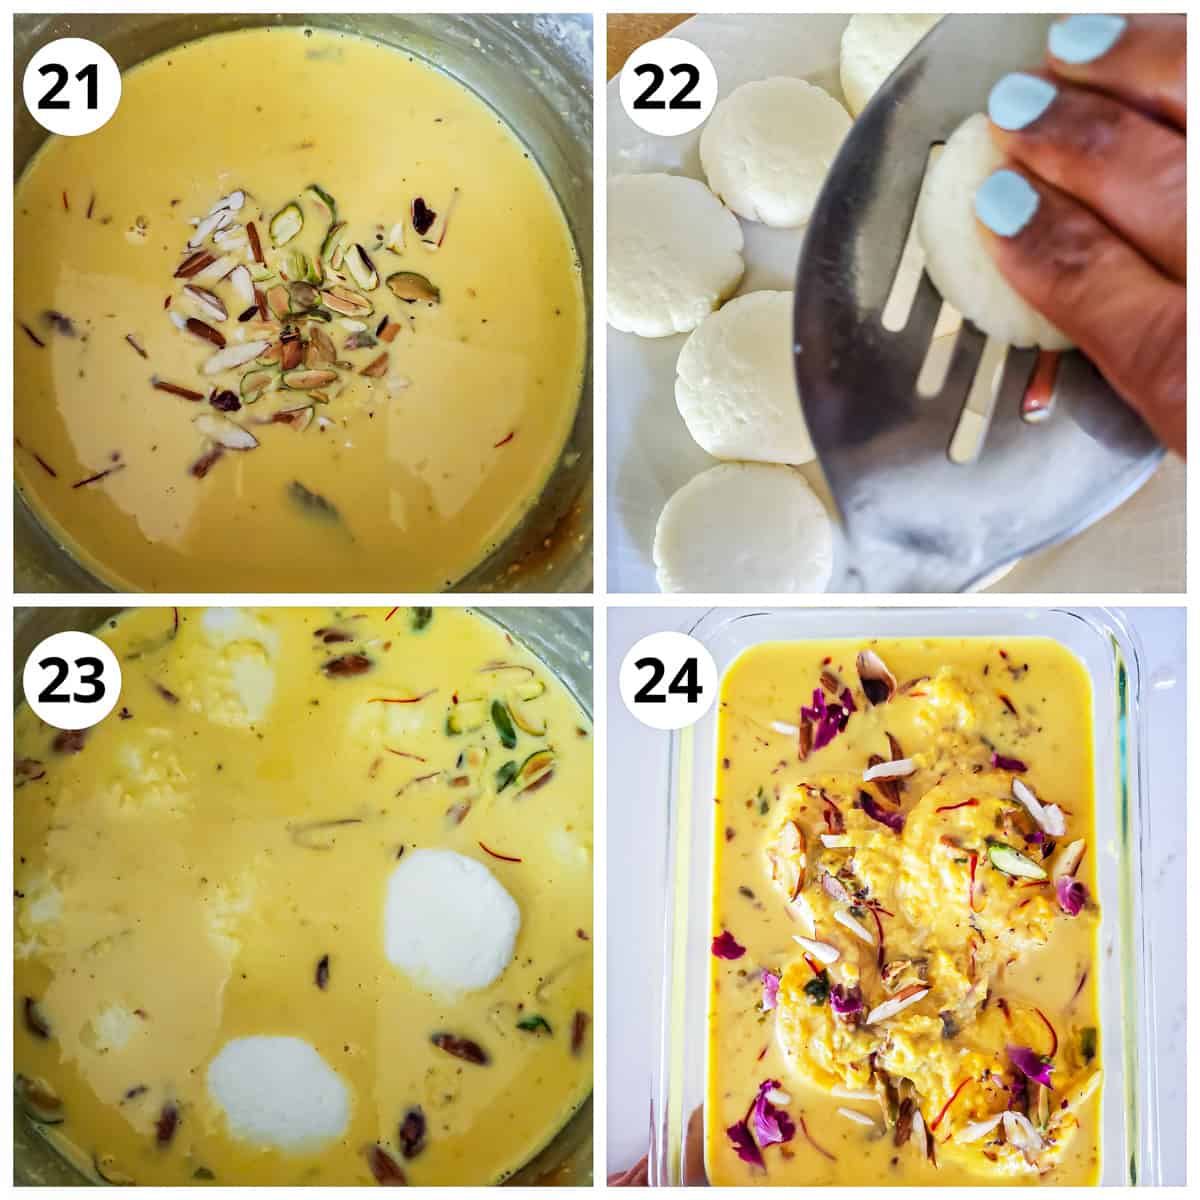
22 - Squeeze the balls gently between your palms or use the spatula as shown to drain the liquid without breaking them
23 - Add them to this warm thickened milk and allow the balls to soak up.
24 - Cool completely, garnished with more nuts and dry rose petals, and keep refrigerated until ready to serve.
Delicious, soft melt in mouth Rasmalai is ready!!
Instant Pot Method
For making rasmalai in an Instant pot, here are a few things to consider
- Add water in the pot to prevent milk from sticking.
- Use evaporated milk with whole milk to achieve thickened milk consistency since the milk will be boiled and not reduced.
- Don't flatten the balls too much, they will flatten as they cook.
- I prefer using a combination of sugar and condensed milk for that perfect milk thickness and taste.
25 and 26 - In the Instant Pot (switched off), add in the given order ¼ cup of water, one 12oz can of evaporated milk, ½ cup of whole milk (so a total of 2 cups), cardamom powder, saffron, and 2 tablespoon sugar. Mix well until combined.
27 - Gently place the paneer balls equidistantly making sure they have space to expand. 6 QT can easily fit 9-11 balls.
The balls should not be completely immersed in fact you should peeping on the top as shown in step 27 pic.
28 - Close the lid and cook on manual high for 10 minutes followed by natural release. Don't do quick release the milk will splatter all around. The balls will puff up and almost double in size.
29 and 30 - Open the lid and add 2 more tablespoons of condensed milk (skip this if you are using all sugar) and nuts and mix gently.
31 - I leave it open switched off. As it cools, the milk forms a layer of cream, mix gently to incorporate in milk and then let another layer form.
Repeat this a few times. This process gives the same texture as you get on a stovetop by cooking milk for hours.
The below step is optional and may be needed only if using whole milk instead of evaporated.
To thicken the milk, remove the balls in a bowl and then start IP on saute mode. Reduce the milk to your liking stirring intermittently to prevent burning and spilling over.
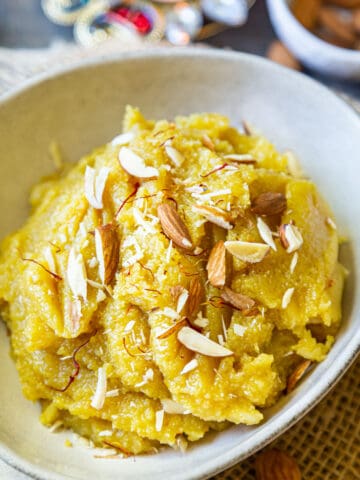
32 - Delicious, soft Instant pot rasmalai is ready!!
Storage and Serving
Rasmalai tastes best when served chilled. So allow it to come to room temperature and then store refrigerated for up to a week in an airtight container.
For longer use freeze it for up to 3 months. Thaw it overnight in the refrigerator and mix well before serving. You can also microwave it for few seconds if you prefer it warm.
To serve, add 1-2 rasmalai balls in each bowl and pour some milk over it. Then garnish with some more dry-fruits and dry rose petals (optional) and serve chilled.
Recipe tips and notes
Milk - Use full-fat whole milk for the best results. We want the rasmalai to be more creamy so it melts in the mouth and full-fat in whole milk provides that. Low fat will not yield the same texture.
Curdling - Once the milk has curdled, add ice cubes or cold water to stop the cooking process. This is important to keep the chenna soft. Overcooking will result in hard chenna.
Draining - While draining the chenna, squeeze the liquid out until there is no water dripping. We don't want chenna to dry out completely but not too wet either. Dry paneer will not result in soft rasmalai and too wet will cause the balls to break while boiling.
Kneading - Knead the drained chenna at least for 5-7 mins or till it turns smooth and crumb-free (not grainy). Don't over knead as that result in hard chenna balls. I prefer using a food processor to knead as it quicker and less effort.
Sugar Syrup - Maintain the water to sugar ratio for sugar syrup. It should be more on the watery side vs thicker consistency. Add the balls only once sugar syrup has boiled
Pan size - The paneer balls will double in size so take a pan that will be large enough to fit all. Do not overcrowd the pan. Cook in batches if needed.
Squeezing and soaking - Squeeze the sugar syrup out as much as possible without breaking the balls. That creates spaces or vacuum in these spongy balls and when immersed in warm liquid they absord the ras and become soft and delicious!! Note that, if the chenna has turned hard, it will not absord that much ras.
Rasmalai color - the yellow color is due to saffron and will vary based on the quantity and quality of saffron used. See the difference in the stovetop color is (richer and yellower) from the instant pot one. It is ok to have a pale yellow color saffron milk. It will still taste equally delicious!!
FAQ's
Hard chenna is a result of why rasmalai balls turn hard. Over draining over kneading, and over boiling are the main reasons that causes the chenna to harden.
Too much moisture in the chenna is the main reason for the balls to break. Make sure to drain well till the chenna is moist but not dripping water and not overly dry too.
Yes, you can make rasmalai with paneer instead of making paneer/chenna from scratch. Make sure the paneer is fresh and soft and knead it to smooth consistency and then make balls and flatten them. The rest of the steps for soaking in sugar syrup and ras remain same.
More delicious dessert recipes
Hope you enjoy this Rasmalai recipe!! If you give this recipe a try, please rate by clicking stars ⭐️ in the recipe card. Thank you ❤️ ! You can also follow me on Facebook | Instagram to see what's cooking in my kitchen!!
Recipe Card
Rasmalai Recipe
Ingredients
For Rasmalai balls
- 4 cups whole milk
- 2-3 tablespoon vinegar or lemon juice
- 1-2 cups ice
For sugar syrup
- 4 cups water
- 1 cup sugar
For thickened milk (ras)
- 4 cups milk
- ¼ cup sugar or condensed milk
- ¼ teaspoon cardamom powder
- pinch saffron
- 10 pistachios sliced
- 10 almonds sliced
Want to save this recipe?
Instructions
Stove top Method
For Rasmalai balls
- In a thick bottom vessel, bring the milk to a boil stirring in between to avoid it sticking to the pan.
- Lower the heat, add vinegar 1 tablespoon at a time and mix until you see all the milk has curdled (you see a clean greenish liquid, whey remaining). I used 3 tablespoon vinegar.
- Immediately add the ice cubes to stop any further cooking and line a muslin cloth to a strainer. Filter the whey out collecting the curdled milk in the muslin cloth.
- Run some fresh water over it and rinse for a couple of times to get rid of the sour taste from the vinegar/lemon juice.
- Now gather the ends of cloth together and squeeze the liquid out as much as possible and hang it for 20-30 mins to drain the liquid further.Note: chenna should be soft with no dripping water. It should not be completely dry but not too wet either.
- Open the knot and transfer the block of paneer to a plate or bowl.
- Crumble and knead with your palms for about 5-7 mins until it forms a smooth dough. Do not over-knead.Alternately you can also knead it in a food processor, pulse for a minute or less. It will turn from crumby grainy to smooth and lump up on one side. Remove on to a clean plate.
- The paneer is ready when it is smooth and soft and does not stick to your hand.
- Divide into 10 portions, roll into ball apply some pressure to knead into a smooth ball, and flatten them slightly to shape.
- Make all the balls in a similar manner. They should be smooth without cracks. Fill in any cracks you may see.
Soaking in sugar syrup
- In another pan get the water and sugar mixture to a rolling boil.
- Add these chenna balls gently in it and close the lid. Add only as much the pan can hold since the balls will expand. Do it in batches if required.
- Let these boil on high for 10 mins and you will see they absorb the liquid and expand in size (almost dpuble).
- Turn off the heat and allow them to rest in the syrup for 30 mins.
For making thickened milk (ras)
- In a thick bottom nonstick vessel, get milk to a boil stirring in between to avoid sticking to the pan.
- Take 2 tablespoons of boiled milk and add it to another bowl with saffron threads, mix well and allow the saffron to soak.
- Lower the heat and simmer milk, stirring intermittently. Keep scraping the sides and layer of cream (malai) that is formed over the milk.
- Mix it back into the milk and repeat this process until the milk has reduced and thickened (almost half). The scraped cream (malai) mixed in milk adds a lot of texture to the milk so dont miss that.
- Add saffron mixed in warm milk along with sugar cardamom powder and nuts and simmer for another 5 mins. The milk will turn yellow due to the saffron addition. Turn the heat off at this point.
- Squeeze the balls gently between your palms or use the spatula as shown to drain the liquid without breaking them
- Add them to this warm thickened milk and allow the balls to soak up.
- Cool completely, garnished with more nuts and dry rose petals, and keep refrigerated until ready to serve.
- Delicious, soft melt in mouth Rasmalai is ready!! Allow to cool and store refrigerated.
Instant Pot Method
- In the Instant Pot (switched off), add in the given order ¼ cup of water, one 12oz can of evaporated milk, ½ cup of whole milk (so a total of 2 cups), cardamom powder, saffron, and 2 tablespoon sugar. Mix well until combined.
- Gently place the paneer balls equidistantly making sure they have space to expand. 6 QT can easily fit 9-11 balls.
- The balls should not be completely immersed in fact you should peeping on the top as shown in step 27 pic.
- Close the lid and cook on manual high for 10 minutes followed by natural release. Don't do quick release the milk will splatter all around. The balls will puff up and almost double in size.
- Open the lid and add 2 more tablespoons of condensed milk (skip this if you are using all sugar) and nuts and mix gently.
- I leave it open switched off. As it cools, the milk forms a layer of cream, mix gently to incorporate in milk and then let another layer form.
- Repeat this a few times. This process gives the same texture as you get on a stovetop by cooking milk for hours.
- This step is optional only needed if using whole milk instead of evaporated milk.To thicken the milk, remove the balls in a bowl and then start IP on saute mode. Reduce the milk to your liking stirring intermittently to prevent burning and spilling over.
- Delicious, soft Instant pot rasmalai is ready!! Allow to cool completely and store refrigerated.
Notes
- Use store-bought paneer instead of making chenna (paneer) from scratch. 200gms should give 10-11 balls.
- To make it even quicker, use store-bought rasgulla, squeeze them, and add to the warm thickened milk (ras).
- Use evaporated milk in place of whole milk to achieve quicker results for thickened milk.
- Use condensed milk for richer flavor and thickening the milk.
- Use full-fat whole milk for the best results.
- Add ice cubes or cold water to stop the cooking process. This is important to keep the chenna soft. Overcooking will result in hard chenna.
- Squeeze the liquid out until there is no water dripping. We don't want chenna to dry out completely but not too wet either.
- Dry paneer will not result in soft rasmalai and too wet will cause the balls to break while boiling.
- Knead the drained chenna till it turns smooth and crumb-free (not grainy). Don't over knead that results in hard chenna balls. I prefer using a food processor to knead as it quicker and less effort.
- Squeeze the sugar syrup out as much as possible without breaking the balls. That creates spaces or vacuum in these spongy balls which when immersed in warm liquid absord the ras and become soft and delicious!!
- if the chenna has turned hard, it will not absord that much ras.


Pallavi says
Made with store bought Paneer still came out well !! No other receipes mention its possible with store bought Paneer. Thanks for sharing this !!
Shweta Arora says
Thank you, Pallavi!! Happy to know that you liked it!! Yes, sometimes the shortcuts like store-bought paneer are worth it when the outcome is still delicious!!