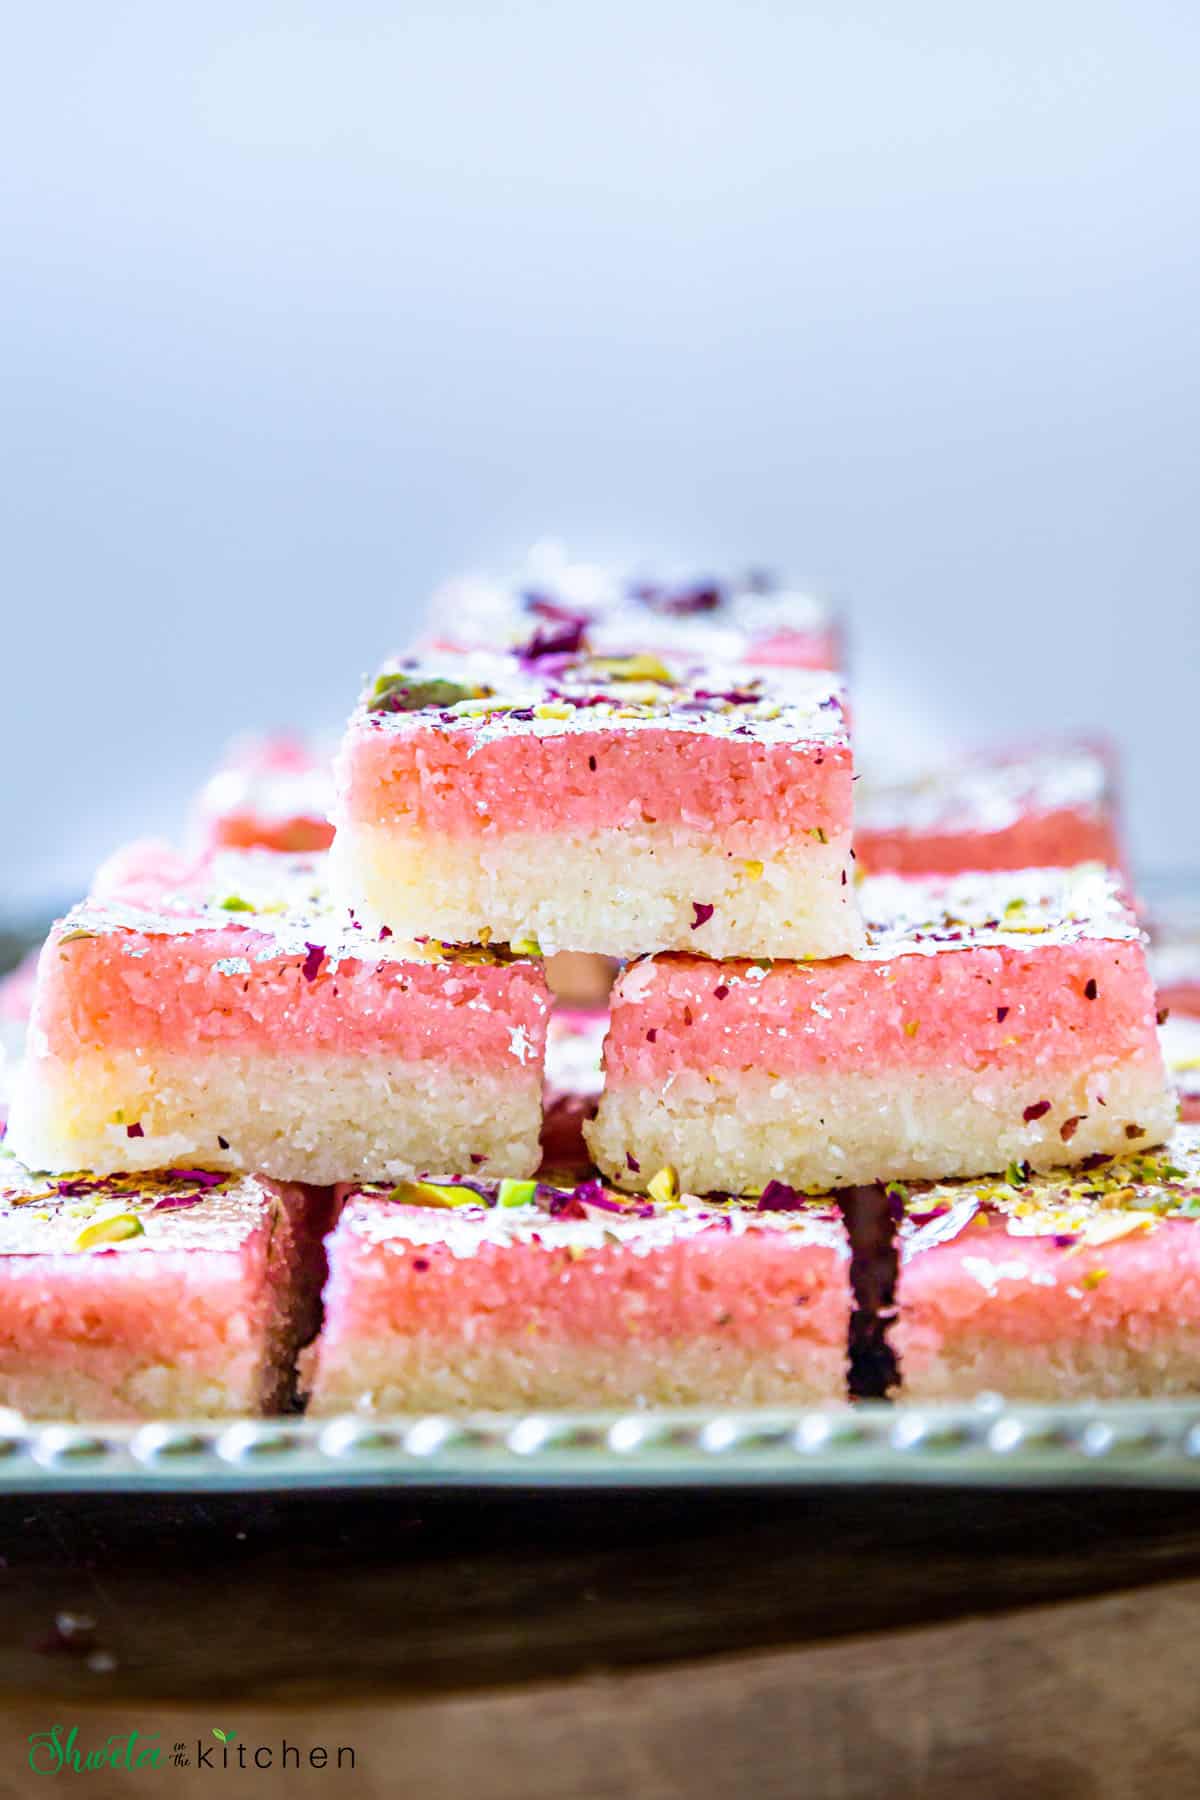
Coconut Burfi is an easy and delicious Indian sweet made with desiccated coconut, milk, cream, and sugar. It is moist, soft, and comes together in less than 30 mins making it perfect for festivals like Diwali, or any celebration!
I am sharing a detailed recipe with step-by-step photos and a video of how to make double-layered coconut barfi at home without ghee, milk powder, khoya, mawa, or condensed milk.

Want to save this recipe?
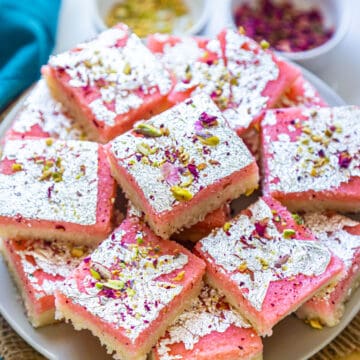
If you are looking for an easy and quick Diwali sweet to make this year, try this double-layer Coconut Burfi.
It's moist, soft, sets perfect, and looks so pretty with the two layers of white and pink.
If you love coconut, you will love this coconut barfi recipe. Here are two other favorite coconut recipes to try, Coconut Ladoo Recipe and Eggless Coconut Cookies.
Jump to:
What is Coconut Burfi
Coconut Burfi (Barfi, or Barfee) is a popular Indian sweet or Indian fudge, made with dry desiccated coconut, milk, sugar and flavored with cardamom.
It is also known as nariyal barfi (in Hindi), khobra barfi (in Marathi), or thengai burfi in South India.
It is commonly made and available in the sweet shops during the festive season be it Diwali, Holi, Raksha Bandhan, Navratri, or Janamashtami.
Today I am sharing a layered coconut burfi recipe made of a base white layer and top pink layer.
This layered coconut barfi is very easy to make and turns out soft and delicious using ingredients easily available at home.
You don't need any sugar syrup unlike traditional coconut burfi neither khoya, mawa, milk powder nor condensed milk.
The base layer of this burfi is made with dry desiccated coconut, milk, sugar, cardamom powder, and the secret ingredient, heavy whipping cream that makes all the difference!!
The heavy cream provides the required fat content to this recipe making it extremely moist, soft, and delicious.
For the top pink layer, I have used the base layer and added a few drops of red food color and rose water.
You can even make this coconut barfi as a single layer without color and it's still delicious!! I prefer making it two-layered as that's how it is sold in most Mithai (Sweet) shops in India.
Why you will love this recipe
- It is easy to make, and quick
- Requires just 5 basic ingredients
- Simple to prepare
- Turns out moist, and soft
- It is coconutty and melt in the mouth delicious
- Sets perfectly every time without crumbling
- Perfect for festivals, celebrations, and sharing!
Recipe Ingredients
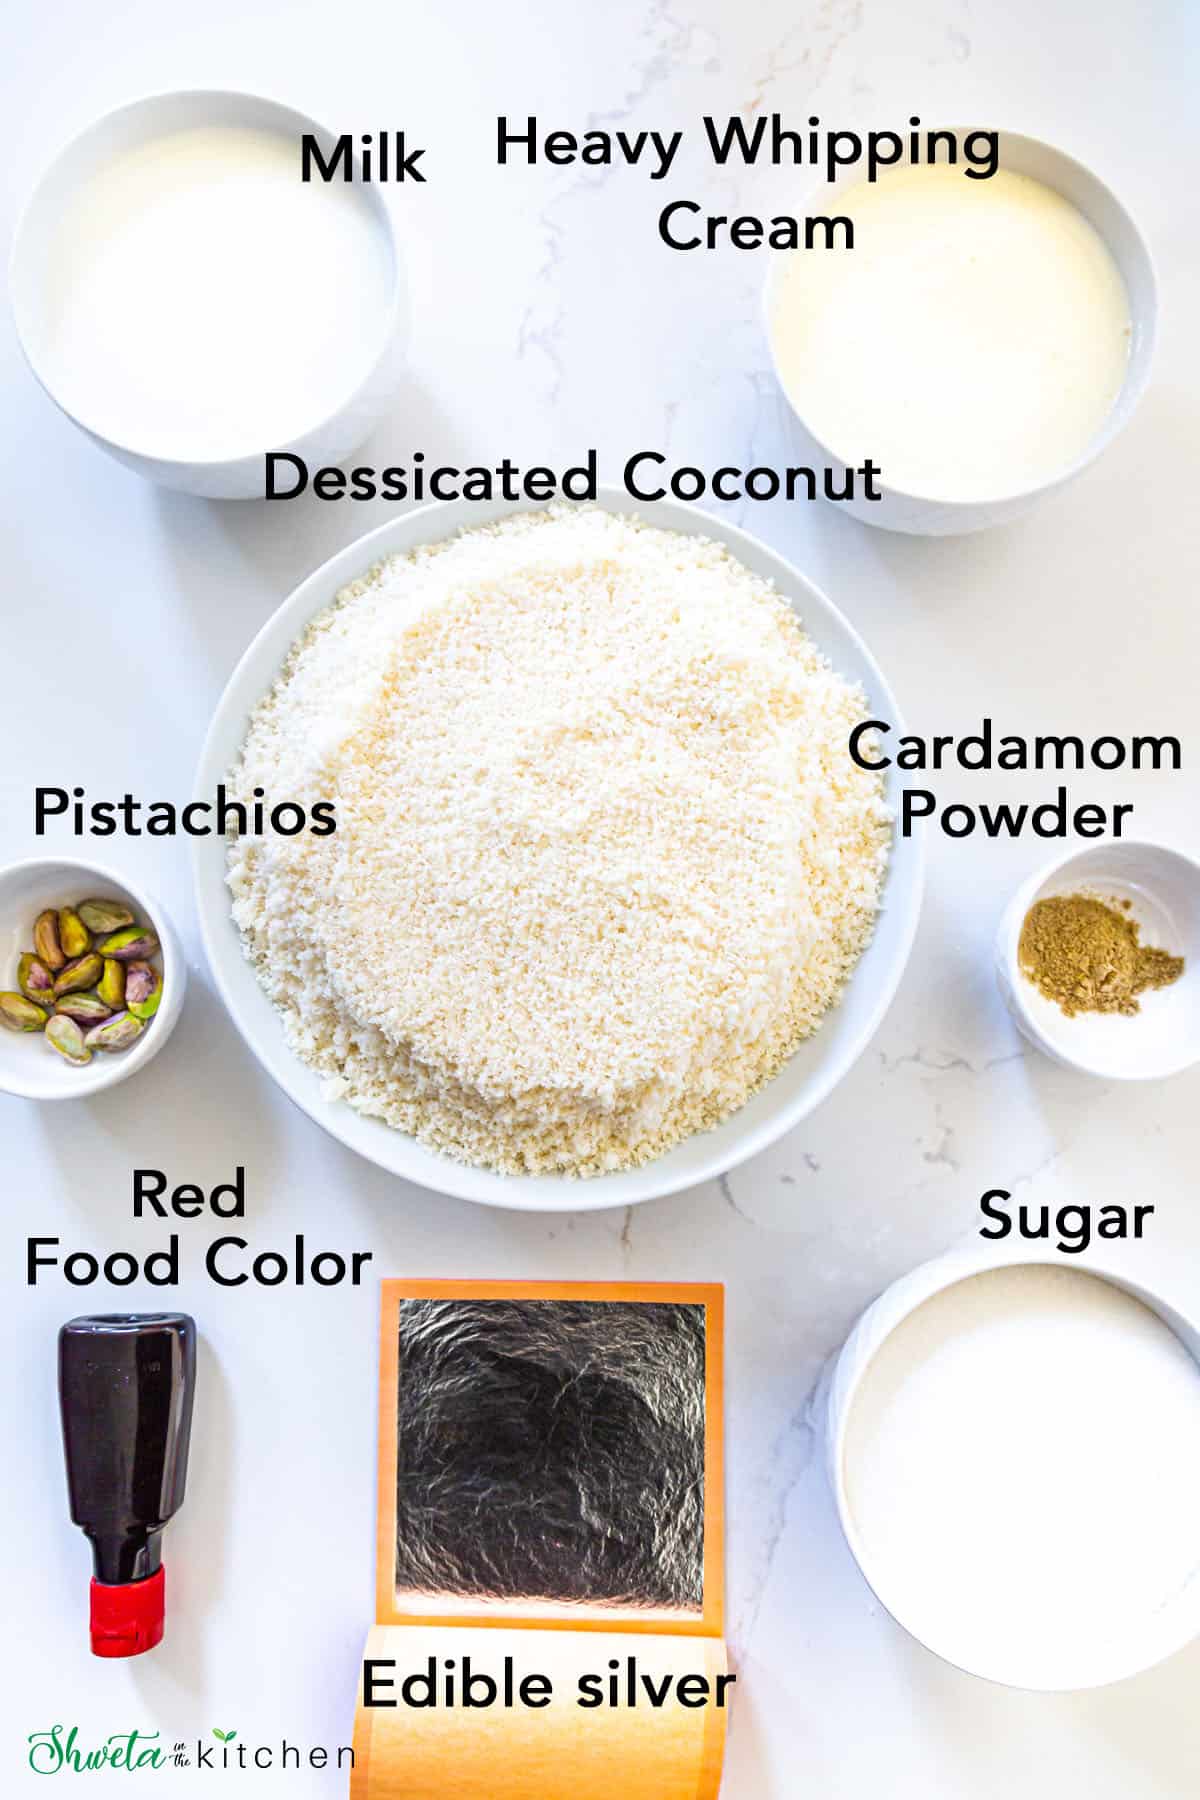
Coconut - I have used unsweetened desiccated coconut (coconut powder) for this recipe. Freshly grated coconut or frozen coconut can be used too!
Milk - I prefer using full-fat milk (whole milk) for this recipe to make it richer and moist.
Cream - Use heavy whipping cream to help boost the fat content and provide moisture to the burfi.
Sugar - I use white granulated sugar as sweetener for this recipe.
Flavor - I have used two flavor combinations, cardamom powder to favor the entire burfi, and the top pink layer is flavored with rose water too.
Red food color - This is optional. I have used it to get the top pink layer.
Garnish - This is optional too but I like to decorate with edible silver leaves (optional), pistachios, and dry rose petals.
Please refer to the recipe card for exact measurements of ingredients.
Step by Step Method
Prep work
Line a baking tray with parchment paper. Keep aside. Lining the tray makes it easy to remove the barfi. If you don't have parchment paper, grease the tray with ghee or oil. Don't skip this step.
Gather all the ingredients and chop nuts if using any.
To make coconut burfi
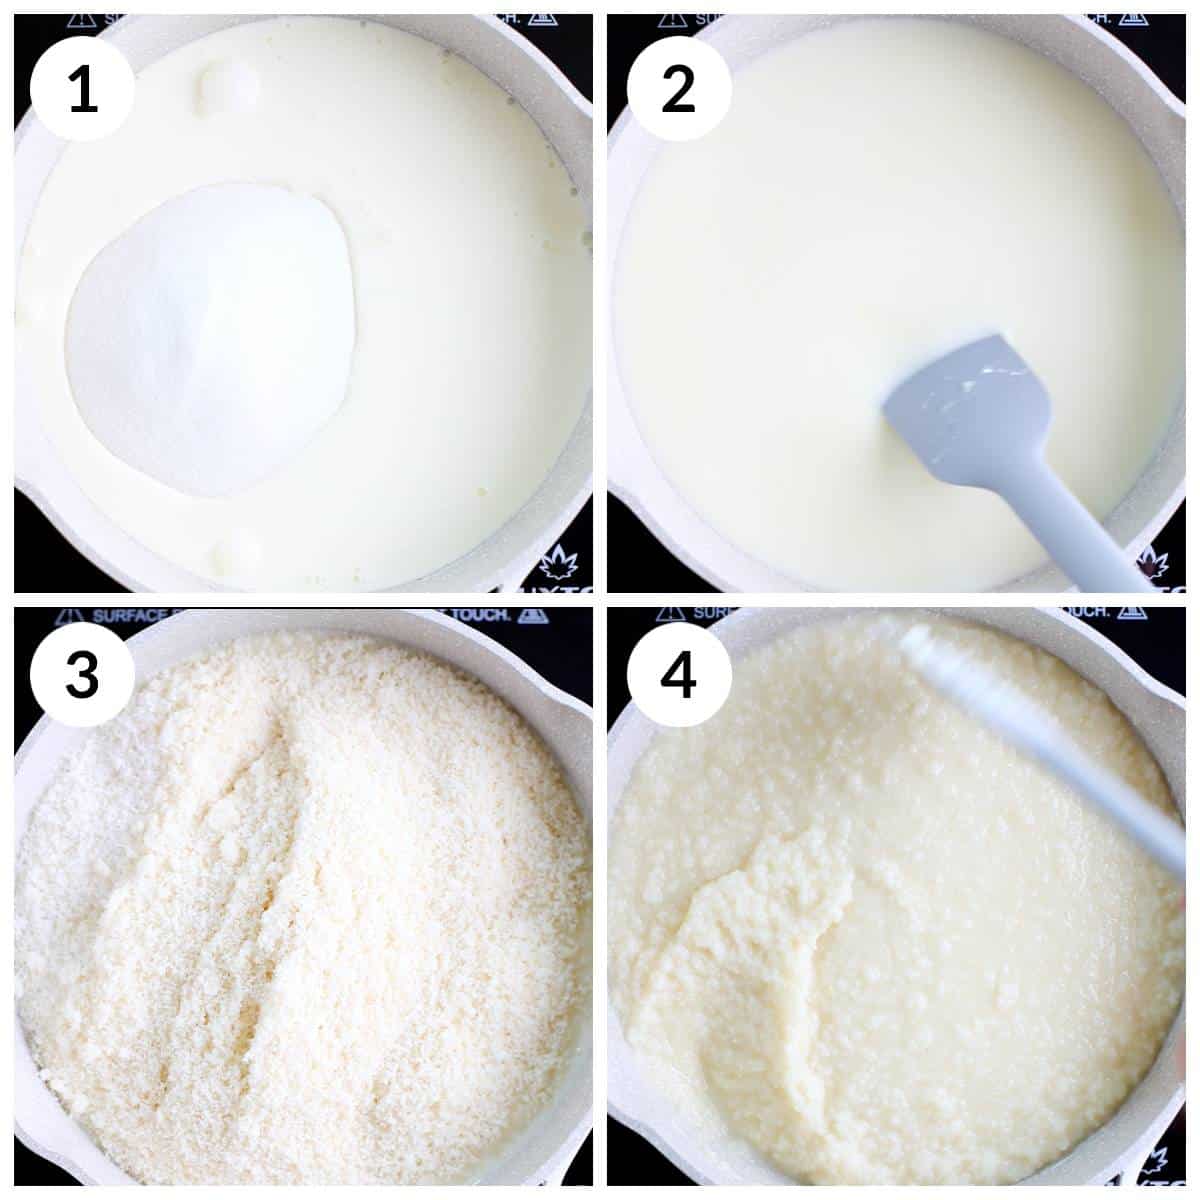
1 - Heat a large thick-bottomed pan on medium-low heat. Add milk, cream, sugar to it. Mix well.
2 - Keep stirring intermittently until sugar melts and the mixture starts to boil. Stirring prevents milk from burning or sticking to the bottom of the pan.
3 and 4 - Stir in the desiccated coconut and mix until well combined.
5 - Increase the heat to medium and cook the coconut burfi mixture stirring intermittently. The mixture will start to thicken. Do not burn or brown the mixture.
6 - Continue cooking until all the liquid is absorbed and you reach a consistency where the coconut barfi mixture is dense (thick) yet moist. Took me approximately 20 mins. Time may vary based on the heat and pan used so look for visual cues.
At this point, add cardamom powder and mix until well combined.
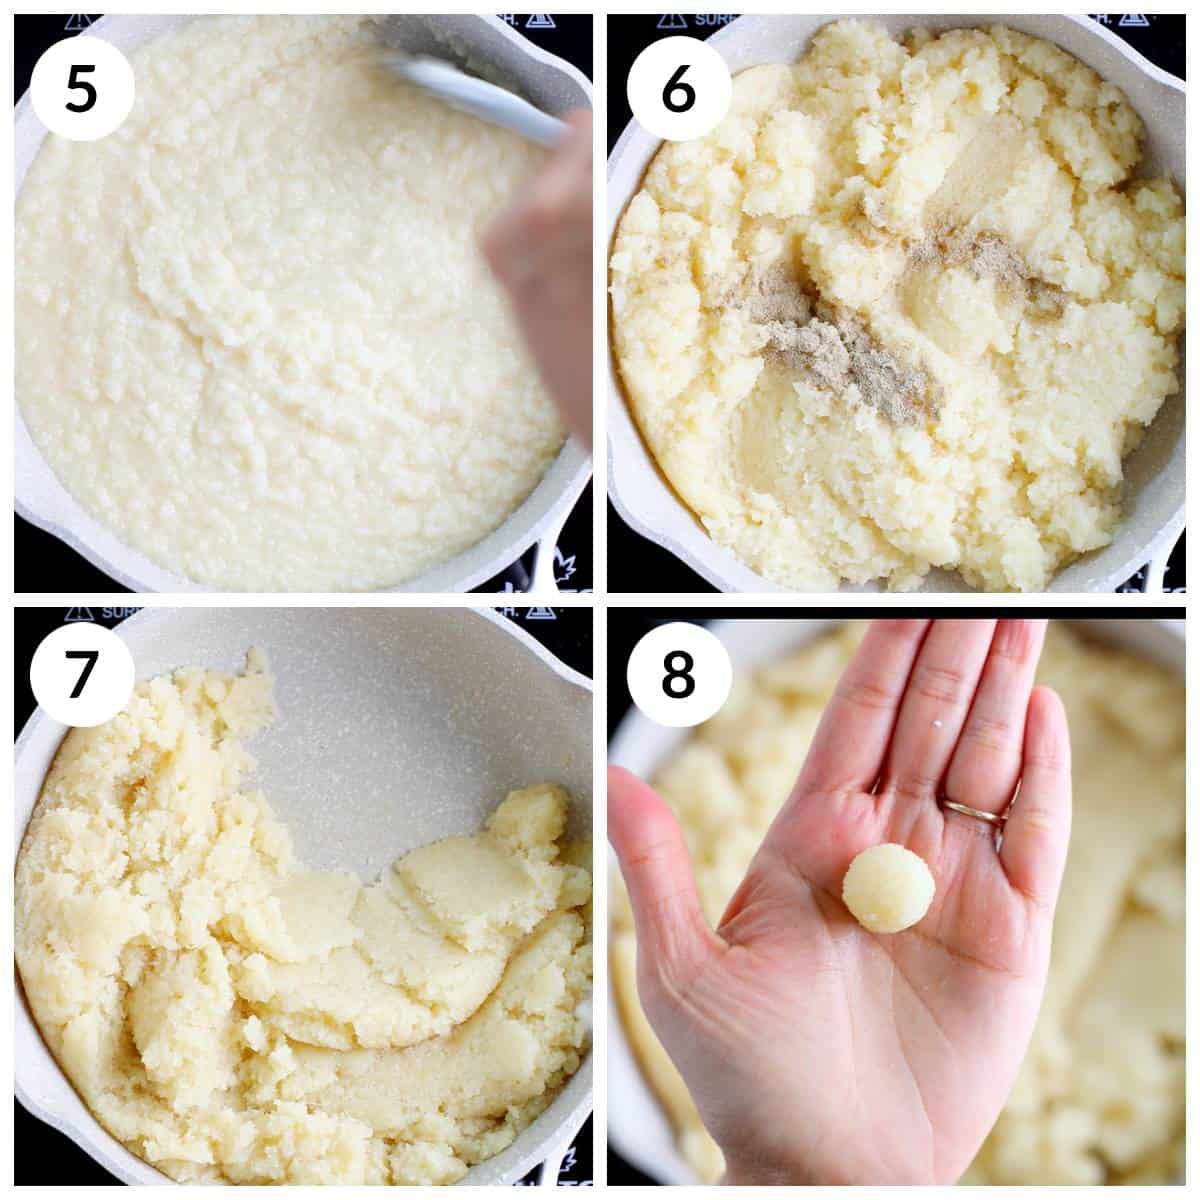
7 - When the coconut barfi mixture starts to leave the side of the pans that indicates it's ready to set.
8 - Another way to test is to roll a small portion into a ball. If it retains the shape, then the mixture is ready to set.
Turn off the heat and transfer the pan off the stove. Do not overcook or brown the mixture. Stir for a few more mins even after the heat is off to prevent the mixture from overcooking or burning with residual heat.
To set the coconut burfi
To make the layered coconut burfi, divide the coconut barfi mixture into two equal parts.
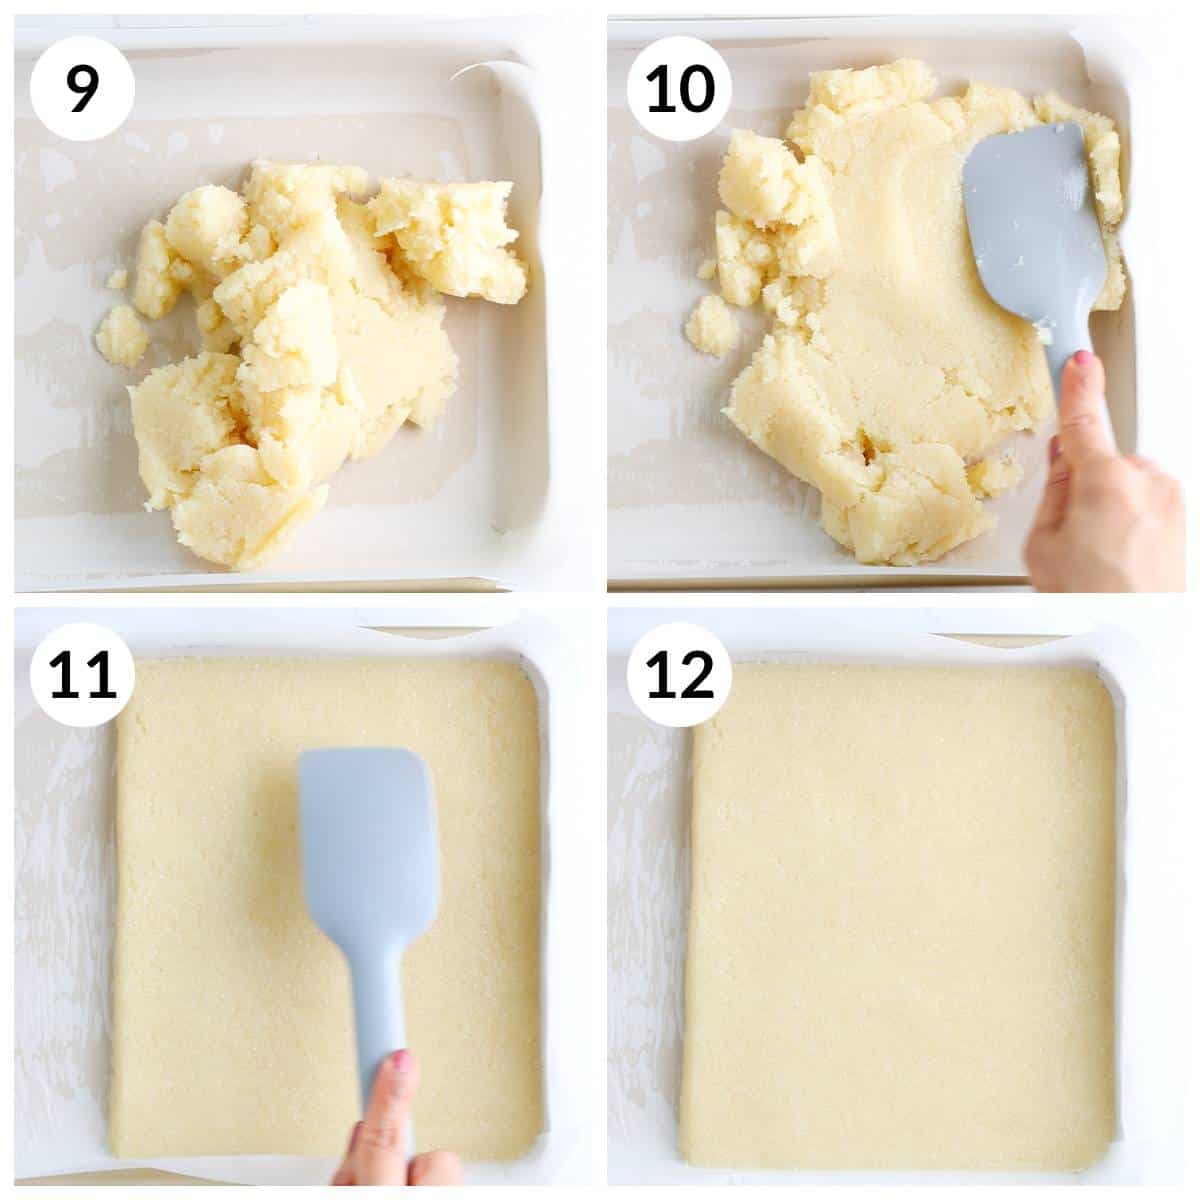
9 - For the first layer: Transfer half of the coconut mixture to the lined tray.
10 - Spread it into a 7X9 inch block using a spatula. You can vary the burfi thickness and size to your preference.
11 - Press, pack the mixture into a tight block. Leaving it loose will cause the burfi to crumble so pack tight. Take your time here don't rush. Smoothen and level the burfi using a spatula.
12 - Keep this tray aside to set it at room temperature or you can even put it in the fridge while we prepare the second layer.
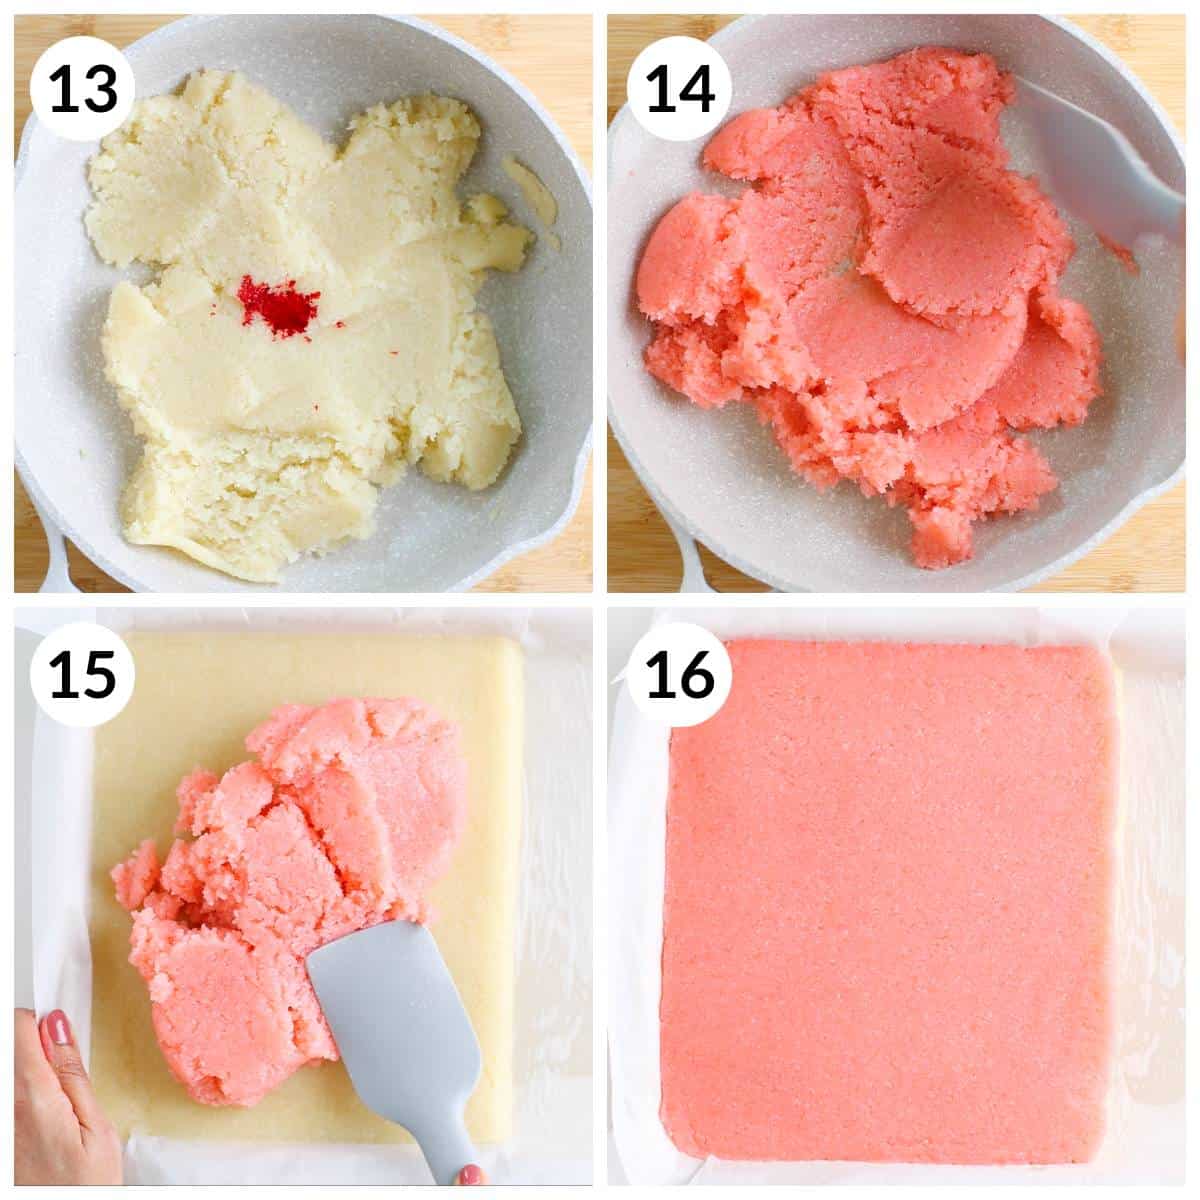
13 - For the second layer, to the remaining half of the mixture in the pan, add 1-2 drops of red for color along with rose water.
14 - Mix until well combined. It should give a beautiful pink color.
15 - Transfer this pink mixture on top of the white layer. Spread it evenly until it covers the white layer completely.
16 - Using a spatula, press and pack the mixture until it's smooth. Set it in the fridge for 1 hour or for 15-20 mins in the freezer.
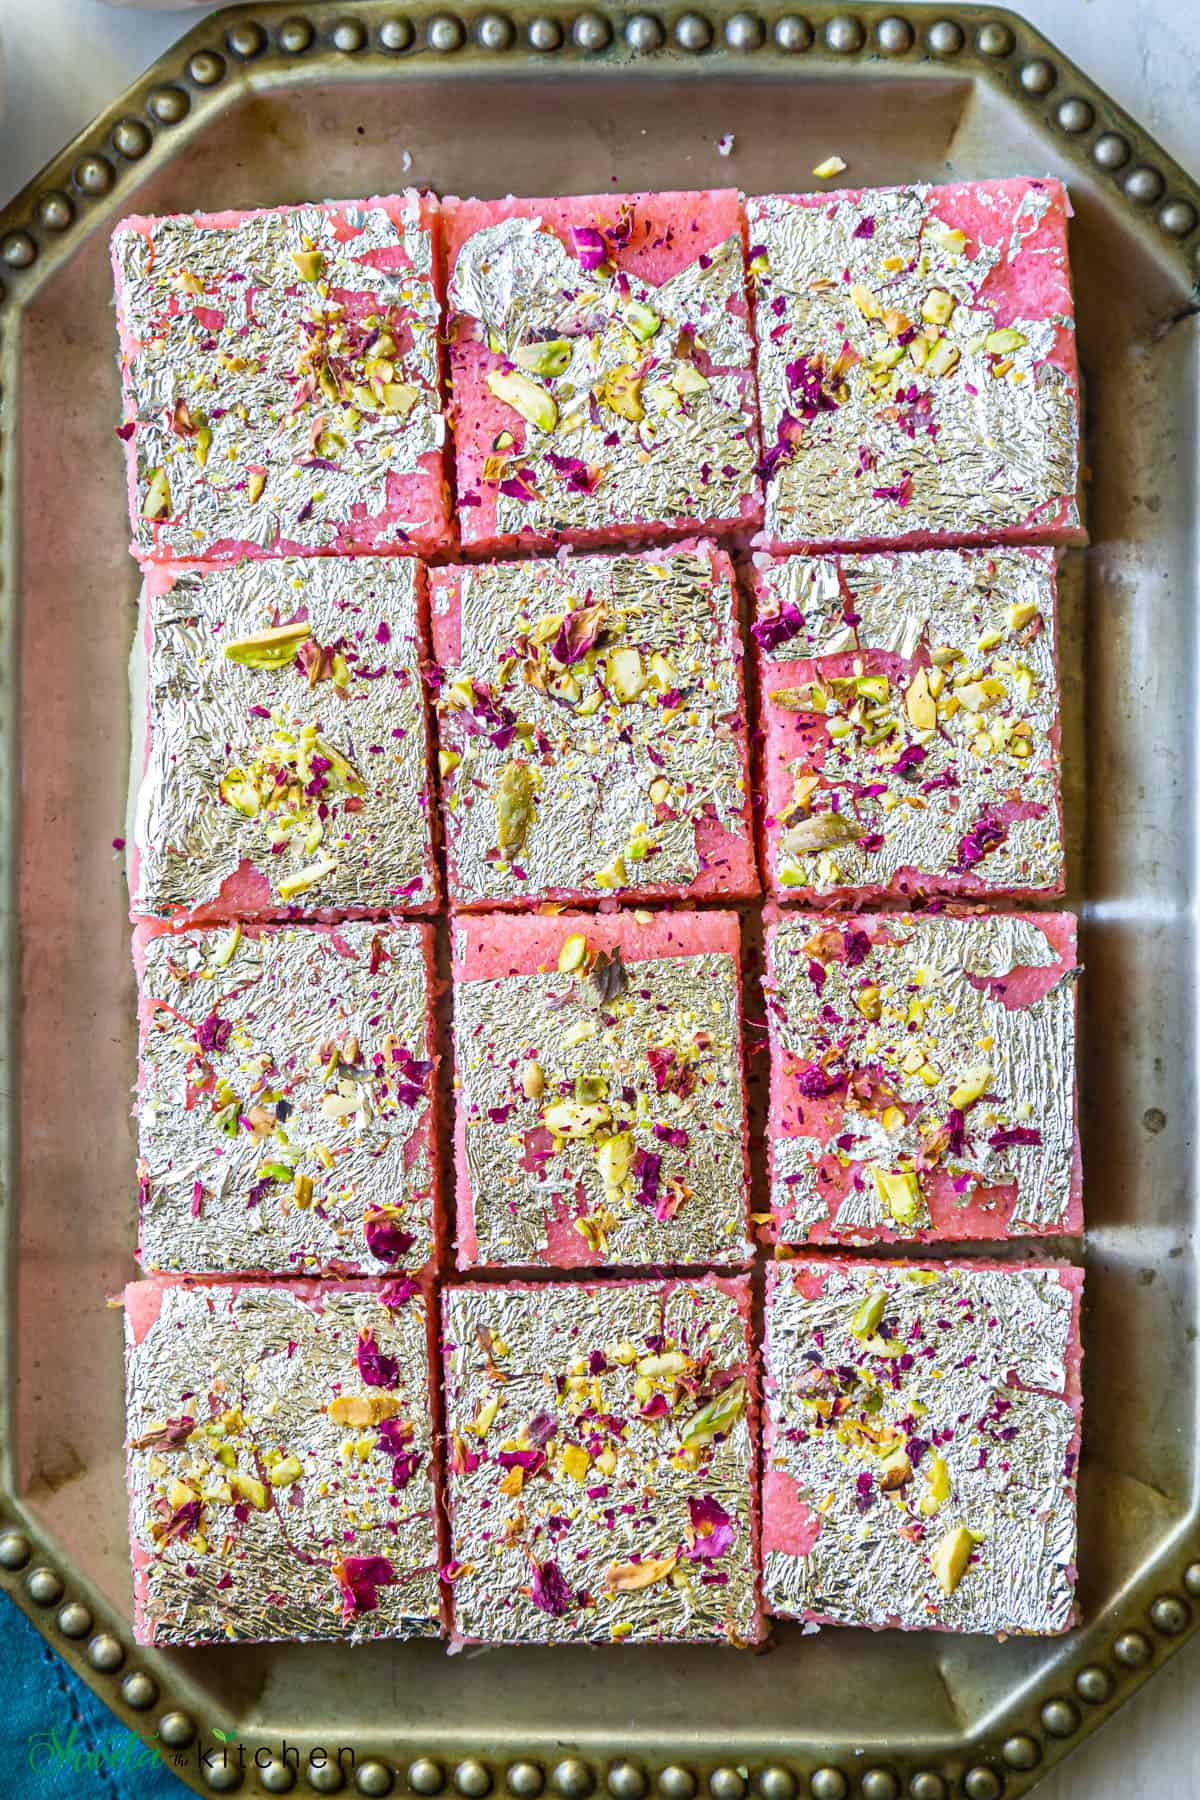
Coconut burfi is ready! You can slice and serve at this point or garnish it further.
To Garnish Coconut Barfi
Garnishing the coconut barfi is optional but recommend it especially if you making these sweets for party or sharing. It doesn't change the taste but definitely makes it prettier.
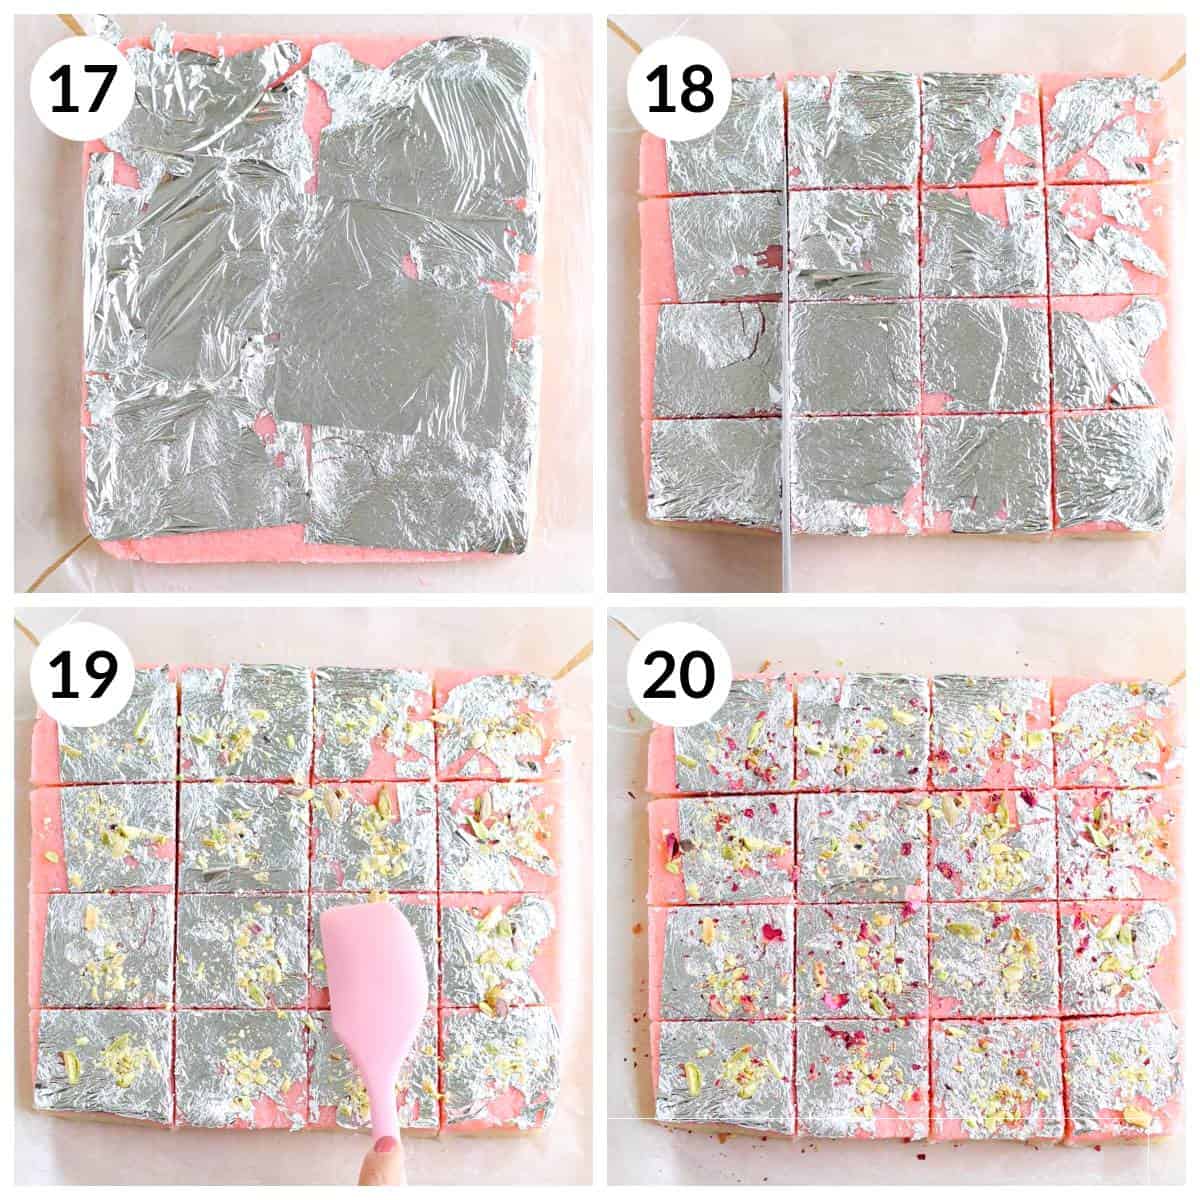
17 - Carefully add the edible silver leaves to cover the surface of the burfi. I used a total of 6 leaves. Make sure to transfer the silver directly to the burfi and not touch it or else it will stick to your hand and then it's just difficult to transfer them.
18 - Cut the burfi into the desired shape. I cut them into squares. Triangles or rectangles look nice too. Vary size and shape to your preference.
19 - Add some chopped pistachios and press gently using a spatula so the nuts stick to the burfi.
20 - Finally garnish with some dry rose petals. Delicious coconut burfi (nariyal ki barfi) is ready to serve or store.
Storage and Serving
Coconut burfi can be stored covered in the fridge for up to a week (7-8 days).
It will turn firm (not hard) to touch as the fat solidifies in the fridge but it will still be soft to chew.
If you prefer room temperature burfi, simply keep it out for 30 mins to an hour before serving.
Recipe Tips
Line the tray with parchment paper such that there is extra around the edges. That extra paper serves as a handle to hold, lift and transfer the burfi out of the tray.
If your coconut powder has larger gratings, process it in the food processor to get powder or fine consistency. This helps the burfi set better. Pulse in shorter intervals to avoid making the coconut greasy from the oils released.
Dry roast the coconut on low heat for a couple of minutes to intensify the coconut flavor. I have skipped it. Make sure to not change the coconut color while roasting.
You can also use fresh grated coconut or frozen coconut for this recipe. Fresh and frozen coconut has some moisture content already so may need additional cooking time.
Do not overcook the coconut mixture else burfi will become dry and crumbly. Similarly, an extra moist mixture, will not let the burfi set so cook till the right consistency. It should be dense (thick), not crumbly, moist to touch (not wet), and should hold shape when rolled into a ball.
Press and pack the layers tight. Failure to do so can result in crumbly burfi. Use a spatula to level and smoothen the layers!
For the top pink layer, I have used rose water and the red color but you can use any flavor or color of choice. Kewra water and green color is another great option. Or simply skip the color and make it a single-layer coconut barfi.
Frequently Asked Questions
Yes, to make it vegan, replace the milk with coconut milk and cream with coconut cream. The rest of the recipe remains the same.
Yes, you can make this coconut barfi 2-3 days ahead and store covered in the refrigerator. It stays fresh for up to a week in the fridge.
There can be two main reasons why barfi is not setting. Either you overcooked the mixture due to which it's dry and crumbly (no moisture) and so it is not setting. To fix the dry mixture, transfer it back to a pan, add some milk or cream a tablespoon at a time and cook until it is moist (not wet) and holds shape.
Your barfi will also not set if the mixture has too much moisture, to fix this, simply cook till most of the moisture has been absorbed and then set.
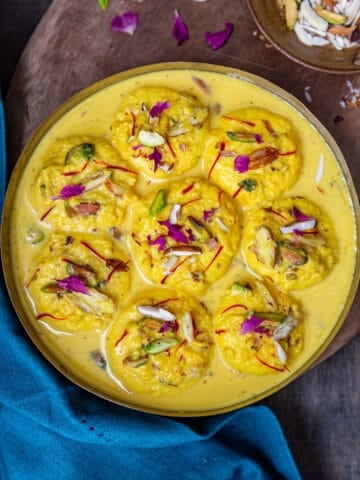
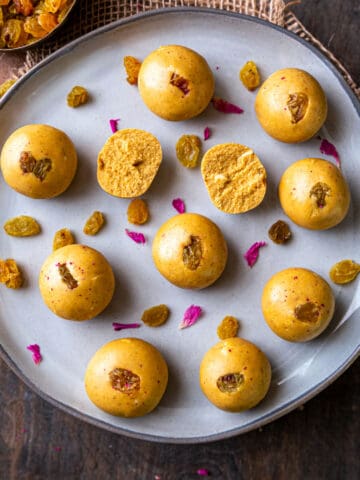
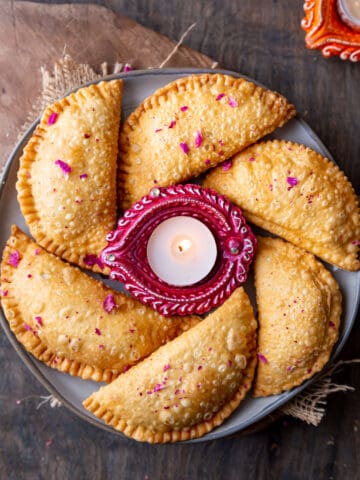
More Diwali Sweets Recipes
Hope you enjoy this Coconut Burfi Recipe !! If you give this recipe a try, please rate by clicking stars ⭐️ on the recipe card. Thank you ❤️! You can also follow me on Facebook | Instagram to see what's cooking in my kitchen!!
Recipe Card
Coconut Burfi
Ingredients
- 4 cups desiccated coconut or coconut powder
- 1 cup whole milk
- 1 cup heavy whipping cream
- 1 cup sugar adjust to taste
- ½ teaspoon cardamom powder
- ½ teaspoon rose water
- 2 drops red food color optional, for pink layer
- 6 edible silver leaves optional, for garnish
- 12-15 pistachios roughly chopped
- dry rose petals optional for garnish
Want to save this recipe?
Instructions
Prep work
- Line a baking tray with parchment paper. Keep aside. Lining the tray makes it easy to remove the barfi. If you don't have parchment paper, grease the tray with ghee or oil. Don't skip this step.
- Gather all the ingredients and chop nuts if using any.
To make coconut burfi mixture
- Heat a large thick-bottomed pan on medium-low heat. Add milk, cream, sugar to it. Mix well.
- Keep stirring intermittently until sugar melts and the mixture starts to boil. Stirring prevents milk from burning or sticking to the bottom of the pan.
- Stir in the desiccated coconut and mix until well combined.
- Cook the coconut barfi mixture on medium heat stirring intermittently. The mixture will start to thicken. Do not burn or brown the mixture.
- Continue cooking until all the liquid is absorbed and you reach a consistency where the coconut barfi mixture is dense (thick) yet moist. Took me approximately 20 mins. Time may vary based on the heat and pan used so look for visual cues.
- At this point, add cardamom powder and mix until well combined.
- When the coconut barfi mixture starts to leave the side of the pans that indicates it's ready to set.
- Another way to test is to roll a small portion into a ball. If it retains the shape, then the mixture is ready to set.
- Turn off the heat and transfer the pan off the stove. Do not overcook or brown the mixture.
- Stir for a few more mins even after the heat is off to prevent the mixture from overcooking or burning with residual heat.
To make the layered coconut barfi
- Divide coconut barfi mixture into two equal parts.
- For the first layer: Transfer half of the mixture to the lined tray.
- Spread it into a 7X9 block using a spatula. You can vary the burfi thickness and size to your preference.
- Press, pack the mixture into a tight block. Leaving it loose will cause the burfi to crumble so pack tight. Take your time here don't rush. Smoothen and level the burfi using a spatula.
- Keep this tray aside to set it at room temperature or you can even put it in the fridge while we prepare the second layer.
- For the second layer, to the remaining half mixture in the pan, add 1-2 drops of red for color along with rose water.
- Mix until well combined. It should give a light pink color.
- Transfer this pink mixture on top of the white layer. Spread it evenly until it covers the white layer completely.
- Using a spatula, press and pack the mixture until it's smooth.
- Set it in the fridge for 1 hour or for 15-20 mins in the freezer.
- Coconut burfi is ready! You can slice and serve at this point or garnish it further.
To garnish
- Garnishing the coconut burfi is optional but recommend it especially if you making these sweets for party or sharing. It doesn't change the taste but definitely makes them prettier.
- Place the edible silver leaves over the burfi to cover the surface. Make sure to transfer the silver directly to the burfi and not touch them or else it will stick to your hand and then it's just difficult to transfer them.
- Cut the burfi into the desired shape. I cut them into squares, triangles or smaller rectangles look nice too. You can vary size and shape to your preference.
- Add some chopped pistachios and press gently using a spatula so the nuts stick to the burfi.
- Finally garnish with some dry rose petals.
- Delicious coconut burfi is ready to serve or store covered in the fridge for up to a week (7-8 days).


Su says
I am usually sweets challenged, but I tried this for Deepavali because I had all the ingredients. It came out really well. I like that it's made without milk powder. Everyone who tasted it loved it. Thank you for sharing this goof-proof recipe.
After grinding the desiccated coconut, the volume shrunk so I had to add more to get up to the 4 cups. Maybe if you clarified that in the instructions it might help? Or also give the amount in weights?
Shweta Arora says
Hi Su, thanks for making the coconut Burfi recipe for Diwali! Makes me so happy to know that everyone loved it. Thanks for the feedback, will definitely try to add the amount in weights soon.
Ayesha says
Looks amazing!
When you say cups, do you mean American cups? X
Shweta Arora says
yes, thanks for checking!
Yukti says
Hello, can we use coconut milk in place of regular milk to amp up the coconut flavour?
Shweta Arora says
Hi, Yes!
Mona says
Made this today! It tasted and looked amazing, was moist and melted in the mouth. So easy ro make!,
Shweta Arora says
Thank you Mona!Happy to know you loved it and found it easy too!!
Neha himthani says
Can we use amul fres cream
Shweta Arora says
yes
Charu says
Really good
Shweta Arora says
Thank you!
Priya says
These sound delicious! Would it be possible to make these round balls?
Shweta Arora says
Yes, you can roll these into balls.